


Models
>
25329711990
25329711990 Kenmore Freezer
Jump to:
Find Part by Name
Keep searches simple, eg. "belt" or "pump".
Manuals & Guides for 25329711990
Click to downloadKeep searches simple, eg. "belt" or "pump".

$142.90
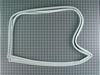
This door gasket helps keep your freezer cold by sealing the edge of the door. If your freezer isn’t staying cold or the seal looks worn, replacing it can help. It’s easy to install and fits around th...
In Stock
Order now and your part arrives by Jul 23

$63.75
Ensure proper lighting inside your refrigerator with this 3.8W LED bulb, designed for use in various models. It provides clear, energy-efficient illumination to help you easily see stored items. If yo...
In Stock
Order now and your part arrives by Jul 23

In Stock
Order now and your part arrives by Jul 23

This is an adjustable foot for your freezer, refrigerator, and dryer. This part supports your unit by screwing into one of the bottom four corners, and adjusting the height of your machine. If your ap...
In Stock
Order now and your part arrives by Jul 23

$25.10
This 18 ml bottle of white appliance touch up paint is a little over two inches tall. It can be used for refrigerators, microwaves, ranges, clothes dryers, and freezers.
In Stock
Order now and your part arrives by Jul 23

In Stock
Order now and your part arrives by Jul 23

$30.60
This is a switch for your refrigerator, but you may also know it as a door switch or a plunger light switch. This part turns your appliance light on and off as the door is opened and closed. If your c...
In Stock
Order now and your part arrives by Jul 23

$20.01
This multi-use screw fits various appliances and tools such as, freezers, refrigerators, wall ovens, washers, ranges, dishwashers, dryers, microwave oven combos, combos, wine and beverage coolers. *Pl...
In Stock
Order now and your part arrives by Jul 23

In Stock
Order now and your part arrives by Jul 23


In Stock
Order now and your part arrives by Jul 23

This evaporator shelf trim is designed to snap onto the front edge of freezer or refrigerator shelves, providing a clean, finished look while helping keep items securely in place. The raised lip helps...
In Stock
Order now and your part arrives by Jul 23
Common Problems and Symptoms for 25329711990
Viewing 8 of 8Frost buildup
Fixed by these parts

How to fix it
Door Sweating
Fixed by these parts
How to fix it
Too warm
Fixed by these parts
How to fix it
Fridge too warm
Fixed by these parts
How to fix it
Won’t start
Fixed by these parts
How to fix it
Leaking
Fixed by these parts
How to fix it
Doesn’t stop running
Fixed by these parts
How to fix it
Will Not Start
Fixed by these parts
How to fix it


Keep searches simple. Use keywords, e.g. "leaking", "pump", "broken" or "fit".
- Customer:
- Louise from Ocala, FL
- Parts Used:
- 5304507200
- Difficulty Level:
- Easy
- Total Repair Time:
- 1- 2 hours
Ice and frost were forming in a frost free freezer
The old gasket was obviously gapping, partially from age and partially from damage during a move. To make the repair, I loosened the screws that are under the gasket and hold it in, but did not remove them. Once all were loose, I removed the old gasket, then starting at the top, ran a thin bead of food grade RTV under the portion of the
... Read more
door that captures the gasket. I put the sealant on that edge only, then carefully worked one of the short edges of the gasket under the plastic and tightened all but the corner screws. I then ran the RTV down the inside of the hinge side of the door and repeated the process, this time tightening the top screw and the hinge side screw at the top, but leaving the bottom most screw loose. I repeated the process on the opening side of the door. The bottom was the hardest because the gasket seemed just a little long and it was hard to get the RTV up and behind the door portion, but after a couple tried I got a good bead of sealant then slid the gasket under the door capture and tightened all the remaining screws. After closing the door, it was obvious that there were places were it did not seal well. I used some cardboard strips, cut from the box the gasket came in, to place inside the freezer, between the hard plastic of the door and the inside of the gasket where it laps over the screws. This helped a lot, but there were still a couple small areas, so I used more cardboard, from the outside, between the main portion of the gasket and the rim of the gasket. This eliminated all the gaps. I let this sit overnight and this morning removed all the cardboard for a great sealing freezer.
Read less
Was this instruction helpful to you?
Thank you for voting!
- Customer:
- Jorg from LOS ALAMOS, NM
- Parts Used:
- 5304507200
- Difficulty Level:
- A Bit Difficult
- Total Repair Time:
- 1- 2 hours
- Tools:
- Screw drivers
replace a damaged door gasket
Removed old gasket by loosening all the screws. Inserted new gasket. Be careful to prop up the plastic shell so that ALL screw holes line up, especially at the bottom, and that shell is not tilted. Then carefully insert gasket inch by inch and fasten very other screw, best from bottom up. Make sure that the gasket lip is clearly under the
... Read more
shell and engaged with it. Before you do anything you have to straighten out ALL the kinks with a heat gun. Do not get too close. It takes a while.
Read less
Was this instruction helpful to you?
Thank you for voting!
- Customer:
- Linda from Gurnee, IL
- Parts Used:
- 216594300
- Difficulty Level:
- Easy
- Total Repair Time:
- 30 - 60 mins
- Tools:
- Screw drivers
The compressor would not run.
I removed the cover, used a multimeter to test the compressor circuit, and found the compressor start relay to be defective.
Ordered a new one and installed it when it arrived.
Ordered a new one and installed it when it arrived.
Was this instruction helpful to you?
Thank you for voting!