


Models
>
FFU17K1CW0
FFU17K1CW0 Frigidaire Freezer
Jump to:
Find Part by Name
Keep searches simple, eg. "belt" or "pump".
Diagrams for FFU17K1CW0
Viewing 4 of 4


Manuals & Guides for FFU17K1CW0
Click to downloadKeep searches simple, eg. "belt" or "pump".

$56.05
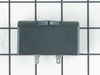
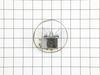
This part is attached to the compressor. It helps the compressor kick on and off while maintaining a constant temperature to keep things frozen in your freezer.
In Stock
Order now and your part arrives by Jul 23

$142.90
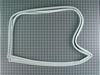
This door gasket helps keep your freezer cold by sealing the edge of the door. If your freezer isn’t staying cold or the seal looks worn, replacing it can help. It’s easy to install and fits around th...
In Stock
Order now and your part arrives by Jul 23

In Stock
Order now and your part arrives by Jul 23

This is an adjustable foot for your freezer, refrigerator, and dryer. This part supports your unit by screwing into one of the bottom four corners, and adjusting the height of your machine. If your ap...
In Stock
Order now and your part arrives by Jul 23

In Stock
Order now and your part arrives by Jul 23

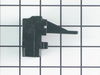
Compressor start relay kit is an original equipment manufacturer (OEM) part that fits some Kenmore, Frigidaire, Electrolux, Crosley, Gibson and White-Westinghouse refrigerators. It also fits some Kenm...
On Order

In Stock
Order now and your part arrives by Jul 23

$20.01
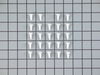
This multi-use screw fits various appliances and tools such as, freezers, refrigerators, wall ovens, washers, ranges, dishwashers, dryers, microwave oven combos, combos, wine and beverage coolers. *Pl...
In Stock
Order now and your part arrives by Jul 23

In Stock
Order now and your part arrives by Jul 23

In Stock
Order now and your part arrives by Jul 23


This evaporator shelf trim is designed to snap onto the front edge of freezer or refrigerator shelves, providing a clean, finished look while helping keep items securely in place. The raised lip helps...
In Stock
Order now and your part arrives by Jul 23
Common Problems and Symptoms for FFU17K1CW0
Viewing 14 of 14Will Not Start
Fixed by these parts
How to fix it
Frost buildup
Fixed by these parts
How to fix it
Fridge too warm
Fixed by these parts
How to fix it
Freezer section too warm
Fixed by these parts
How to fix it
Too warm
Fixed by these parts
How to fix it
Won’t start
Fixed by these parts
How to fix it
Fridge and Freezer are too warm
Fixed by these parts
How to fix it
Doesn’t stop running
Fixed by these parts
How to fix it
Noisy
Fixed by these parts
How to fix it
Fridge runs too long
Fixed by these parts
How to fix it
Door Sweating
Fixed by these parts
How to fix it
Too cold
Fixed by these parts
How to fix it
Leaking
Fixed by these parts
How to fix it
Clicking sound
Fixed by these parts
How to fix it


Keep searches simple. Use keywords, e.g. "leaking", "pump", "broken" or "fit".
- Customer:
- Louise from Ocala, FL
- Parts Used:
- 5304507200
- Difficulty Level:
- Easy
- Total Repair Time:
- 1- 2 hours
Ice and frost were forming in a frost free freezer
The old gasket was obviously gapping, partially from age and partially from damage during a move. To make the repair, I loosened the screws that are under the gasket and hold it in, but did not remove them. Once all were loose, I removed the old gasket, then starting at the top, ran a thin bead of food grade RTV under the portion of the
... Read more
door that captures the gasket. I put the sealant on that edge only, then carefully worked one of the short edges of the gasket under the plastic and tightened all but the corner screws. I then ran the RTV down the inside of the hinge side of the door and repeated the process, this time tightening the top screw and the hinge side screw at the top, but leaving the bottom most screw loose. I repeated the process on the opening side of the door. The bottom was the hardest because the gasket seemed just a little long and it was hard to get the RTV up and behind the door portion, but after a couple tried I got a good bead of sealant then slid the gasket under the door capture and tightened all the remaining screws. After closing the door, it was obvious that there were places were it did not seal well. I used some cardboard strips, cut from the box the gasket came in, to place inside the freezer, between the hard plastic of the door and the inside of the gasket where it laps over the screws. This helped a lot, but there were still a couple small areas, so I used more cardboard, from the outside, between the main portion of the gasket and the rim of the gasket. This eliminated all the gaps. I let this sit overnight and this morning removed all the cardboard for a great sealing freezer.
Read less
Was this instruction helpful to you?
Thank you for voting!
- Customer:
- MARK from LIBERTY LAKE, WA
- Parts Used:
- 5304491941, 5304464438
- Difficulty Level:
- Easy
- Total Repair Time:
- Less than 15 mins
Rear of upper shelf would freeze, while the rest of the freezer was dripping wet
We opened our freezer last week only to find the bottom 2/3 was barely cold, while only the rear of the upper shelf was cold. In fact, it was covered in frost, despite being a frost-free model. Our frozen veggies were slushy, not rock hard, and our frozen juices were all liquid. We defrosted the freezer, plugged it back in, but immediat
... Read more
ely noticed that we didn't hear the 'whhoooooosh' that you typically hear when you close the freezer door. After 30 minutes, the rear upper shelf was frosty again, but the rest was still at room temp. We figured the freezer was a goner, so we started looking at new freezers. I headed online to see if I could fix it, and I eventually found this site. I had learned online that these symptoms can be caused by either a bad capacitor, or a bad controller (which the capacitor plugs in to). I guess you can't necessarily tell which of the two parts is defective, so I chose to order/replace both of them. I ordered the correct parts from partselect.com, and they alerted me that Frigidaire has a new replacement part for the capacitor. When the parts arrived (quickly, ftw!), I unplugged the freezer and snipped the two wires leading to the controller. Next I unplugged the controller from the compressor housing. I spliced the replacement controller's wires into the freezer's wires (using my own wire nuts...as none were included with my order :( ). I snapped the new controller onto the compressor mounting, and then plugged the capacitor in. I plugged the freezer back in, and it was time for the moment of truth. The interior light of the freezer came on, and I could hear the compressor 'humming'. I could hear it humming before the repair, so the big test was to see if it got cold. I was nervous because the freezer DIDN'T make the 'whoooshing' noise right away, but after just an hour, the 'test' mug of water was already turning into ice. It was fixed!!!! If you have these symptoms, you CAN do this!!! Unplug the freezer. Cut two wires. Unplug the controller. Splice two wires. Plug in the new controller. Snap in the new capacitor. DONE!!!
Read less
Was this instruction helpful to you?
Thank you for voting!
- Customer:
- JAMES from LA MESA, CA
- Parts Used:
- 5304464438, 5304491941
- Difficulty Level:
- Really Easy
- Total Repair Time:
- Less than 15 mins
- Tools:
- Nutdriver, Pliers
Extreme noise for 3 months, then not cold
Pulled the fridge from encloser, removed rear cardboard cover and found compressor in rear. The compressor, being very accessable, was easy to find the bad starter/capacitor. I removed the spring retainer, pulled the capacitor off the starter, removed the starter by pulling outward and replaced with new. All went well when the unit star
... Read more
ted and cooled as new. Some noise at times, but traced to icemaker. As time went by, that noise was gone.
Read less
Was this instruction helpful to you?
Thank you for voting!