


Models
>
XF22CW0
XF22CW0 Frigidaire Freezer
Jump to:
Find Part by Name
Keep searches simple, eg. "belt" or "pump".
Diagrams for XF22CW0
Viewing 4 of 4


Keep searches simple, eg. "belt" or "pump".

In Stock
Order now and your part arrives by Mar 20

In Stock
Order now and your part arrives by Mar 20

In Stock
Order now and your part arrives by Mar 20

$24.10
This 18 ml bottle of white appliance touch up paint is a little over two inches tall. It can be used for refrigerators, microwaves, ranges, clothes dryers, and freezers.
In Stock
Order now and your part arrives by Mar 20

$28.79
This is a switch for your refrigerator, but you may also know it as a door switch or a plunger light switch. This part turns your appliance light on and off as the door is opened and closed. If your c...
In Stock
Order now and your part arrives by Mar 20

$18.85
This multi-use screw fits various appliances and tools such as, freezers, refrigerators, wall ovens, washers, ranges, dishwashers, dryers, microwave oven combos, combos, wine and beverage coolers. *Pl...
In Stock
Order now and your part arrives by Mar 20

$144.56
This gray door gasket creates a secure seal around your refrigerator door, helping maintain proper temperature and energy efficiency. Built for durability and flexibility, it prevents leaks and ensure...
In Stock
Order now and your part arrives by Mar 20

In Stock
Order now and your part arrives by Mar 20

In Stock
Order now and your part arrives by Mar 20

In Stock
Order now and your part arrives by Mar 20

In Stock
Order now and your part arrives by Mar 20

Questions and Answers
We're sorry, but our Q&A experts are temporarily unavailable.
Please check back later if you still haven't found the answer you need.
Common Problems and Symptoms for XF22CW0
Viewing 4 of 4Noisy
Fixed by these parts
How to fix it
Fridge too warm
Fixed by these parts
How to fix it
Leaking
Fixed by these parts

How to fix it
Frost buildup
Fixed by these parts

How to fix it

Keep searches simple. Use keywords, e.g. "leaking", "pump", "broken" or "fit".
- Customer:
- gary from ARANSAS PASS, TX
- Parts Used:
- 5308000010
- Difficulty Level:
- Easy
- Total Repair Time:
- 30 - 60 mins
- Tools:
- Nutdriver
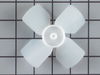
I had a broken fan blade due to ice build up from a leaking ice maker.
1. I took out one screw on the ice maker and loosened the other two screws and unplugged and removed the ice maker.
2. Next I took out 2 screws from the bottom of the auger drive box and unplugged the wiring harness and removed the box. The wiring harness was a little tricky. The lock on the plug pushes in to unlock even though ... Read more it looks like it pulls out,.
3.next you must remove 2 screws from the left side bracket that holds the auger box and remove the bracket.
4.Now take out 8 screws that hold the back panel in place and remove the back panel.
5. now your looking at the evaporator fan blade and motor. The simple way to replace the fan blade is to unplug the motor and remove it from the freezer. It just sits in with nothing holding it. The fan requires a little pressure but should pull right off. Install new fan blade and put everything back in the same order it was removed.
Read less
Was this instruction helpful to you?
Thank you for voting!
- Customer:
- Bruce from MARTINEZ, CA
- Parts Used:
- 5308000010
- Difficulty Level:
- Really Easy
- Total Repair Time:
- Less than 15 mins
- Tools:
- Nutdriver
Fridge made a hellacious noise and wasn't cooling well
From discussions with friends, I determined the problem might be easy to fix. The fridge made a lot of noise, but the compressor DID come on, and inside the freezer was cold, but the main fridge was warming.
After unplugging the fridge, I removed the fan assembly in the freezer (there were about 4 nuts and a couple of plugs to ... Read more uncouple.
I could see right away the fan blades has broken off, but the motor looked good. The new new fan pushed easily onto the shift and fit perfectly in the housing.
I reinstalled the fan assembly, plugged in the fridge, and right away heard the new fan come on - very quietly. What was a roar became a whisper and the fridge was down to 38 degrees with a few hours.
Read less
Was this instruction helpful to you?
Thank you for voting!
- Customer:
- Arlee from HOUSTON, TX
- Parts Used:
- 297243800
- Difficulty Level:
- Very Easy
- Total Repair Time:
- 15 - 30 mins
- Tools:
- Screw drivers
Pushbutton light switch failed.
Needed a Phillips head screwdriver to remove bottom plate (kick panel). UNPLUGGED FREEZER. Removed plate pulled switch out through the mounting hole and unhooked the two electric wires. Plac
... Read more
ed wires on new switch, pushed wires back through the hole and seated the switch. Plugged in the freezer and opened the door - magic, the light came on. Replaced the front kick panel (hardest part was to line up the plate holes with the holes in the mounting bracket).
Read less
Was this instruction helpful to you?
Thank you for voting!