


Models
>
E32AF75FPS1
E32AF75FPS1 Electrolux Freezer
Jump to:
Find Part by Name
Keep searches simple, eg. "belt" or "pump".
Diagrams for E32AF75FPS1
Viewing 5 of 5


Manuals & Guides for E32AF75FPS1
Click to downloadKeep searches simple, eg. "belt" or "pump".

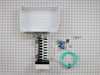
This is a genuine OEM ice maker assembly for your refrigerator. The ice maker makes eight cubes at a time, by filling the mold with water from the inlet valve, freezing the water until the cubes are f...
In Stock
Order now and your part arrives by Jul 31

$32.79
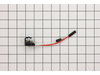
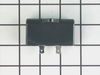
If you have frost building up in your freezer, or the temperature in your fridge is running too warm, there may be an issue with the defrost thermostat. This thermostat sits on the top of the evaporat...
In Stock
Order now and your part arrives by Jul 31

$59.35
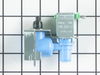
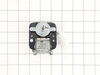
When energized, the water inlet valve will release water from the supply line into the ice mold and the water dispenser in the refrigerator. If the ice maker is not making or dispensing ice, not disp...
In Stock
Order now and your part arrives by Jul 31

$25.25
Sold individually.
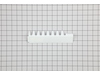
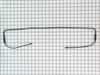
This is a genuine part. The handle mounting shoulder screw (no.10 ab) is made for use with many refrigerators. The metal screw helps to fasten the handle assembly to the outer do...
In Stock
Order now and your part arrives by Jul 31

$142.90
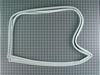
This door gasket helps keep your freezer cold by sealing the edge of the door. If your freezer isn’t staying cold or the seal looks worn, replacing it can help. It’s easy to install and fits around th...
In Stock
Order now and your part arrives by Jul 31

$63.75
Ensure proper lighting inside your refrigerator with this 3.8W LED bulb, designed for use in various models. It provides clear, energy-efficient illumination to help you easily see stored items. If yo...
In Stock
Order now and your part arrives by Jul 31

In Stock
Order now and your part arrives by Jul 31

In Stock
Order now and your part arrives by Jul 31
 – Part Number: 297309000")
$61.68
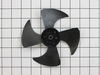
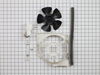
The 115-volt evaporator fan motor is in the back of the freezer section and circulates air over the coils. These coils will convert the heat into cool air, which is then circulated. If your freezer is...
In Stock
Order now and your part arrives by Jul 31

In Stock
Order now and your part arrives by Jul 31

In Stock
Order now and your part arrives by Jul 31

In Stock
Order now and your part arrives by Jul 31
Common Problems and Symptoms for E32AF75FPS1
Viewing 20 of 20Ice maker not making ice
Fixed by these parts
How to fix it
Noisy
Fixed by these parts

How to fix it
Frost buildup
Fixed by these parts
How to fix it
Too warm
Fixed by these parts
How to fix it
Fridge too warm
Fixed by these parts
How to fix it
Leaking
Fixed by these parts
How to fix it
Doesn’t stop running
Fixed by these parts
How to fix it
Won’t start
Fixed by these parts
How to fix it
Ice maker won’t dispense ice
Fixed by these parts
How to fix it
Light not working
Fixed by these parts
How to fix it
Freezer section too warm
Fixed by these parts
How to fix it
Freezer not defrosting
Fixed by these parts
How to fix it
Will Not Start
Fixed by these parts
How to fix it
Clicking sound
Fixed by these parts
How to fix it
Fridge and Freezer are too warm
Fixed by these parts
How to fix it
Fridge runs too long
Fixed by these parts
How to fix it
Door Sweating
Fixed by these parts
How to fix it
Freezer too cold
Fixed by these parts
How to fix it
Not dispensing water
Fixed by these parts
How to fix it
Too cold
Fixed by these parts
How to fix it

")


Keep searches simple. Use keywords, e.g. "leaking", "pump", "broken" or "fit".
- Customer:
- Juan from Miami, FL
- Parts Used:
- 241798231
- Difficulty Level:
- Really Easy
- Total Repair Time:
- 15 - 30 mins
- Tools:
- Socket set
Broken ice maker
Unplugged faulty ice maker, removed two screws holding it to the refrigerator and took it out. Reversed the operation with the new ice maker and after a few minutes presto, we have ice.
Was this instruction helpful to you?
Thank you for voting!
- Customer:
- Milton from Camp Hill, PA
- Parts Used:
- 240524102
- Difficulty Level:
- Really Easy
- Total Repair Time:
- 15 - 30 mins
- Tools:
- Wrench (Adjustable)
Broke a blade off of the fan
When cleaning the coils on your refrigerator always remember rule number 1, unplug it first. I was cleaning the coils and hit the fan blade while it was moving with a brush, thus breaking off one of the fan blades. I ordered a new fan and installed it in about 15 minutes. Very easy repair.
Was this instruction helpful to you?
Thank you for voting!
- Customer:
- Louise from Ocala, FL
- Parts Used:
- 5304507200
- Difficulty Level:
- Easy
- Total Repair Time:
- 1- 2 hours
Ice and frost were forming in a frost free freezer
The old gasket was obviously gapping, partially from age and partially from damage during a move. To make the repair, I loosened the screws that are under the gasket and hold it in, but did not remove them. Once all were loose, I removed the old gasket, then starting at the top, ran a thin bead of food grade RTV under the portion of the
... Read more
door that captures the gasket. I put the sealant on that edge only, then carefully worked one of the short edges of the gasket under the plastic and tightened all but the corner screws. I then ran the RTV down the inside of the hinge side of the door and repeated the process, this time tightening the top screw and the hinge side screw at the top, but leaving the bottom most screw loose. I repeated the process on the opening side of the door. The bottom was the hardest because the gasket seemed just a little long and it was hard to get the RTV up and behind the door portion, but after a couple tried I got a good bead of sealant then slid the gasket under the door capture and tightened all the remaining screws. After closing the door, it was obvious that there were places were it did not seal well. I used some cardboard strips, cut from the box the gasket came in, to place inside the freezer, between the hard plastic of the door and the inside of the gasket where it laps over the screws. This helped a lot, but there were still a couple small areas, so I used more cardboard, from the outside, between the main portion of the gasket and the rim of the gasket. This eliminated all the gaps. I let this sit overnight and this morning removed all the cardboard for a great sealing freezer.
Read less
Was this instruction helpful to you?
Thank you for voting!