


Models
>
YQCEM2735FQ0
YQCEM2735FQ0 Whirlpool Dryer
Jump to:
Find Part by Name
Keep searches simple, eg. "belt" or "pump".
Diagrams for YQCEM2735FQ0
Viewing 5 of 5


 Diagram and Parts List for Whirlpool Dryer")

Keep searches simple, eg. "belt" or "pump".

$17.44
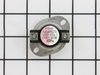
The dryer thermal fuse, also sometimes referred to as the thermal cut off or temperature fuse, is a 2 by 1/2-inch, white, plastic safety mechanism that halts the flow of electricity to the motor circu...
In Stock
Order now and your part arrives by Jul 30

$27.83
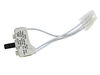
This OEM dryer door switch is an on/off mechanism that detects when the door is open to prevent the dryer from operating. If your dryer will turn on but will not start or continues working while the d...
In Stock
Order now and your part arrives by Jul 30

$8.70
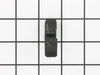
This kit includes two door strikes, and three door catches, to service doors that have one or two catches. The strike is mounted on the body of the dryer, while the catch is mounted on the dryer door....
In Stock
Order now and your part arrives by Jul 30

$39.63
The Whirlpool Dryer Repair Kit is a genuine OEM maintenance kit designed to resolve common issues such as squeaking, thumping, or poor drum rotation in 27-inch dryers. This all-in-one kit is compatibl...
In Stock
Order now and your part arrives by Jul 30

In Stock
Order now and your part arrives by Jul 30

$45.00
If the lint filter in your dryer has become damaged and unusable, it is important to replace it as soon as possible. The filter traps lint and other debris from your laundry, keeping it out of your ai...
In Stock
Order now and your part arrives by Jul 30

$6.51
It is important for your dryer to be properly leveled, as an unleveled one can cause excessive vibration and noise when operating, may not drain properly, and can cause excessive wear on various parts...
In Stock
Order now and your part arrives by Jul 30

This thermal cut-off kit includes a genuine OEM replacement high limit thermostat and a fuse. The thermostat is a safety device used to prevent the dryer from overheating, and the fuse serves as a bac...
In Stock
Order now and your part arrives by Jul 30

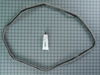
This part seals the drum to prevents air from escaping. This includes silicone rubber adhesive.
In Stock
Order now and your part arrives by Jul 30

$7.60
This is a multi-use screw and can be used on a variety of appliances. The measurements of the screw are: 8/18 x 3/8. *Please note: the screw is sold individually. Refer to the manual provided by the m...
In Stock
Order now and your part arrives by Jul 30

$28.91
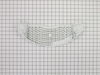
This genuine OEM part is a screen door grille for your dryer. This piece serves as the top cover for the lint filter. If the grille has become cracked or damaged, clothing may become snagged, or marks...
In Stock
Order now and your part arrives by Jul 30

$24.15
This 18 ml bottle of white appliance touch-up paint is used to cover scratches or marks on your appliance. The white touch-up paint can be used on refrigerators, microwaves, ranges, clothes dryers, an...
In Stock
Order now and your part arrives by Jul 30
Common Problems and Symptoms for YQCEM2735FQ0
Viewing 15 of 15Noisy
Fixed by these parts


How to fix it
Door won’t close
Fixed by these parts

How to fix it
Not Heating
Fixed by these parts


How to fix it
Won’t Start
Fixed by these parts
How to fix it
Drum Not Spinning
Fixed by these parts
How to fix it
Running With Door Open
Fixed by these parts
How to fix it
Too hot
Fixed by these parts
How to fix it
Marks left on clothes
Fixed by these parts

How to fix it
Door Pops Open
Fixed by these parts
How to fix it
Touchpad does not respond
Fixed by these parts
How to fix it
Light not working
Fixed by these parts
How to fix it
Will Not Start
Fixed by these parts
How to fix it
Lid or door won’t close
Fixed by these parts
How to fix it
Heat stays on after drum has stopped
Fixed by these parts
How to fix it
Timer Not Working
Fixed by these parts
How to fix it


Keep searches simple. Use keywords, e.g. "leaking", "pump", "broken" or "fit".
- Customer:
- ANTHONY from CHESHIRE, CT
- Parts Used:
- WP3392519
- Difficulty Level:
- Easy
- Total Repair Time:
- 15 - 30 mins
- Tools:
- Nutdriver, Pliers, Screw drivers
Dryer was working, but no heat.
First I unplugged the dryer, then removed the back panel, this exposed most all of the wiring and I could see the heater coils.
Not knowing what the problem was I started looking at the coils and could not see any broken parts.
So then checked the thermal fuse for continuity I removed the two wires from it with a small pair of ... Read more needle nose pliers, it was held in place by two screws, once they were removed the fuse came out easily, I checked continuity with a volt meter placing the meter on X1 Ohms and could not get a reading.
I replaced with a new one and put it all back together the way I took it apart.
Then I plugged it in and it worked first time, I now have warm dry clothes.
Read less
Was this instruction helpful to you?
Thank you for voting!
- Customer:
- pat from lisbon,, OH
- Parts Used:
- WP3406107
- Difficulty Level:
- Really Easy
- Total Repair Time:
- 15 - 30 mins
- Tools:
- Screw drivers, Wrench set
door switch was bad
i was able to go on line with your company , find my dryer, order the part and had it the next day. fast , great , service
Was this instruction helpful to you?
Thank you for voting!
- Customer:
- Dana from Grassvally, CA
- Parts Used:
- WP3392519
- Difficulty Level:
- A Bit Difficult
- Total Repair Time:
- More than 2 hours
- Tools:
- Screw drivers
No heat but would run otherwise
Cleaning the lint out of the whole machine took quite a bit of time--it was everywhere. Underneath the lint trap was a collection that ultimately ruined the thermal fuse where it restricted the air flow considerably.
Ascertaining the problem was the most time consuming part.
The actual repair was quite simple and did ... Read more n't take but 15-20 minutes.
Ascertaining the problem was the most time consuming part.
The actual repair was quite simple and did ... Read more n't take but 15-20 minutes.
Read less
Was this instruction helpful to you?
Thank you for voting!