This OEM kit comes with two ignition coils (one three-terminal boost/hold coil, and one two-terminal secondary coil). Usually only one of them burns out, but you should replace them as a set as both h...
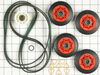
The Whirlpool Dryer Repair Kit is a genuine OEM maintenance kit designed to resolve common issues such as squeaking, thumping, or poor drum rotation in 27-inch dryers. This all-in-one kit is compatibl...
If the lint filter in your dryer has become damaged and unusable, it is important to replace it as soon as possible. The filter traps lint and other debris from your laundry, keeping it out of your ai...
The door catch is a metal piece found on the inside dryer door, which helps to keep the door closed. If the catch is broken the door may not stay securely shut, which can result in the dryer not start...
This is a genuine OEM replacement igniter kit for your gas-heated clothes dryer. The silicon carbide igniter is used to light the gas that creates the heat in order to dry your clothes. If your dryer ...
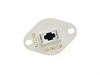
The internal-bias thermostat, also know as a thermistor, is used to prevent the dryer from overheating. It does this by monitoring and controlling the temperature of the inside of the dryer drum. If ...
This small but mighty OEM piece is called a tri-ring and is used to support the drum roller shaft and the idler pulley shaft in your dryer. It helps to provide a tight seal between components by evenl...
It is important for your dryer to be properly leveled, as an unleveled one can cause excessive vibration and noise when operating, may not drain properly, and can cause excessive wear on various parts...
This genuine OEM part is a radiant flame sensor for your gas dryer. It is used to determine when the temperature of the igniter is hot enough to ignite the gas. Once the igniter is hot enough, it allo...
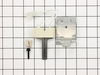
This is an authentic OEM replacement moisture sensor for your dryer. The sensor detects the moisture levels in your clothing while the appliance is operating, and once the appropriate level has been r...
This part includes a dryer thermal fuse, also sometimes referred to as a thermal limiter, for dryers. This authentically sourced part is located on the exhaust duct and acts a safety mechanism that sh...
In Stock
Order now and your part arrives by Jul 13
Questions and Answers
Ask our experts a question about this part and we'll get back to you as soon as possible!
1 question answered by our experts.
< Prev
1
Next >
Sort by:
Search filter:
Clear Filter
Your search term must have 3 or more characters.
Keep searches simple. Use keywords, e.g. "leaking", "pump", "broken" or "fit".
Sorry, we couldn't find any existing answers that matched. Try using some different or simpler keywords, or submit your new question by using the "Ask a Question" button above!
Lauren
February 21, 2023
Do i replace the belt from the front removing the lint panel or from the back
For model number WGD7800XW0
Hi Lauren, thank you for contacting us. The first thing you will need to do is disconnect the power to the dryer. Your next step will be to remove the lint screen and set it aside, which will expose two screws that you need to remove with caution so that you do not drop them down inside that opening. Now next you will need to raise that main top, and for this particular style of the dryer, you will need to open the door to allow that to raise up, but to begin with, you are going to take a thin putty knife and go into the gap between the front panel and the main top, locate a spring, press back on that, and just lift up slightly on that top. Do the same on the opposite side. Now, next, you will need to release the tension of the belt on that drum. We are going to reach the right-hand side, locate the idler and the belt, and pull them both towards the cabinet on the right. Once you release the tension on the belt, just slide it off the motor pulley, and using the belt, you will lift that drum. Now you will install that belt around the idler and the motor pulley. You will need to support that drum, so you will take the belt, keeping the groove side of the belt against the drum, over top of the idler pulley, and wrap it around down over the left side of that idler pulley. Push the idler pulley bracket towards the cabinet on the right, which will allow you to take that belt and wrap it around the motor pulley as you release the tension on that idler bracket, which will allow that dock to tighten up. We hope this sorts out your problem!
Was this helpful?
Thank you for voting!
Ask a Question
Ask our experts a question on this part and we'll respond as soon as we can.
PartSelect showed seven different possibilities why the dryer wouldn't heat. I removed the two screws to remove the bottom panel and turned the dryer on and noticed that the heating element that ignites the gas was working fine. This meant that it was not getting gas so it could be the gas valve or one of the two gas valve coils which are
... Read more located on top of the gas valve. I borrowed my neighbor"s ohm meter and touched the two probes on the coils terminals to check for continuity and found that one of the coils read zero. I then took both of the coils out by removing two screws and tested each coil again. One coil read 500-850 and the other read zero. This meant that it was no good so I called for the part and received it in three days. I reassembled the parts and turned the dryer on and it fired up after a few seconds. It works as good as new. The part plus shipping was less than $30. My repairman would have charged me $150-$200. While the dryer was apart I gave it a good cleaning with a vacuum and a toothbrush in delicate areas. I also removed and cleaned the lint trap housing by removing two nuts. I didn't know much about gas dryers, but thanks to PartSelect I easily fixed it myself.
There was no problem with lint build-up within the dryer & the exhaust vent. I removed the gas cycling thermostat & thermal fuse from system & dryer still was not operating correctly. The radiant sensor & hi-limit thermostat both seemed to be operating correctly. That left either of the two coils as the culprits. I replaced both coils
... Read more& the problem was corrected.


 Diagram and Parts List for Whirlpool Dryer")