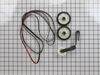
This is an authentic drum support roller kit for 29-inch-wide dryers. It includes 1 belt, 2 roller wheels and an idler pulley. The parts in this kit allow the dryer to tumble properly by supporting th...
The dryer thermal fuse, also sometimes referred to as the thermal cut off or temperature fuse, is a 2 by 1/2-inch, white, plastic safety mechanism that halts the flow of electricity to the motor circu...
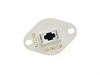
Sourced directly from the manufacturer, this heating element is an OEM approved replacement part for a variety of dryers and is sold individually. It measures approximately 10.5 inches long, 7.5 inche...
This thermal cut-off kit is for a dryer and is sourced directly from the manufacturer. The thermal cut-off is a safety mechanism that is designed to trip if your dryer is at risk of overheating, to pr...
The door catch is a metal piece found on the inside dryer door, which helps to keep the door closed. If the catch is broken the door may not stay securely shut, which can result in the dryer not start...
The internal-bias thermostat, also know as a thermistor, is used to prevent the dryer from overheating. It does this by monitoring and controlling the temperature of the inside of the dryer drum. If ...
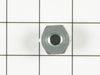
This small but mighty OEM piece is called a tri-ring and is used to support the drum roller shaft and the idler pulley shaft in your dryer. It helps to provide a tight seal between components by evenl...
It is important for your dryer to be properly leveled, as an unleveled one can cause excessive vibration and noise when operating, may not drain properly, and can cause excessive wear on various parts...
This heating element connection wire kit is a genuine OEM replacement for your electric dryer. The kit is used to connect the thermostat to the heater element. The kit comes with a yellow wire nut and...
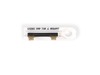
This 10-watt clear bulb provides dependable lighting inside dryers and refrigerators, helping you see the interior clearly when the door is open. Compatible with a variety of appliance models, it inst...
The blower wheel is a squirrel cage type wheel whose purpose is to move the air through the room or appliance. The blower wheel spins on the motor shaft to blow air through the dryer drum and out through the exhaust.
In Stock
Order now and your part arrives by Jun 27
Questions and Answers
Ask our experts a question about this part and we'll get back to you as soon as possible!
1 question answered by our experts.
< Prev
1
Next >
Sort by:
Search filter:
Clear Filter
Your search term must have 3 or more characters.
Keep searches simple. Use keywords, e.g. "leaking", "pump", "broken" or "fit".
Sorry, we couldn't find any existing answers that matched. Try using some different or simpler keywords, or submit your new question by using the "Ask a Question" button above!
Billy
October 8, 2021
Dryer will not start
Control panel says sensing for 10 minutes
Flips to wet for 10 minutes and shuts off
For model number WED6200SW1
Hi Billy,
Thank you for your question. Newer models of dryers may use a moisture sensor to control the timer from advancing when the automatic drying cycle is selected. The sensor circuit consists of an electronic control in the console and sensors that are typically located on the front bulkhead of the dryer. When sensor dry is selected the wet clothes in the dryer come in direct contact with the sensors and complete an electrical circuit. This circuit causes the control board’s capacitor to discharge and that prevents the timer motor from advancing. When clothes are nearly dry, they fail to complete this circuit and the timer begins to run until the end of the cycle. If these sensors are defective or become coated with fabric softener, then the dryer will shut off before the clothes can dry. Open your dryer door and locate your moisture sensor. On newer models, it is usually mounted to the lint filter housing. To clean, lightly rub it with very fine sandpaper to remove any debris or built up additives (e.g. fabric softener). Wipe the sensor with a damp cloth and place a load of clothes in the dryer and periodically check your clothes to see if they are still damp. If your dryer still shuts off too soon or continues to run after your clothes are dry, you need a replacement moisture sensor. We hope this helps! If you have any questions, please let us know.
First I unplugged the dryer, then removed the back panel, this exposed most all of the wiring and I could see the heater coils. Not knowing what the problem was I started looking at the coils and could not see any broken parts. So then checked the thermal fuse for continuity I removed the two wires from it with a small pair of
... Read moreneedle nose pliers, it was held in place by two screws, once they were removed the fuse came out easily, I checked continuity with a volt meter placing the meter on X1 Ohms and could not get a reading. I replaced with a new one and put it all back together the way I took it apart. Then I plugged it in and it worked first time, I now have warm dry clothes.
Read less
3060 of 3480 peoplefound this instruction helpful.
To reach the heating element you only need to open the back cover of the dryer (about 8 nut-head screws). Remember to disconnect the power.
To remove the heating element there are two small nut-head screws. Remove the two electric wires. Then you can pull the heating element away.
You can check the heating element wi
... Read moreth an ohm-meter or visually inspect it to see if the heating element spiral wire is broken.
Don't hurry to dispose the old element. My model includes a small electric safety part. You'll need to transfer it to the new heating element (that comes without it)..
Good luck.
Read less
2305 of 2503 peoplefound this instruction helpful.
Cleaning the lint out of the whole machine took quite a bit of time--it was everywhere. Underneath the lint trap was a collection that ultimately ruined the thermal fuse where it restricted the air flow considerably.
Ascertaining the problem was the most time consuming part.
The actual repair was quite simple and did
... Read moren't take but 15-20 minutes.


 Diagram and Parts List for Whirlpool Dryer")