


Models
>
YWED5050LW0
YWED5050LW0 Whirlpool Dryer
Jump to:
Find Part by Name
Keep searches simple, eg. "belt" or "pump".
Keep searches simple, eg. "belt" or "pump".

$36.42
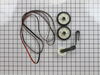
This is an authentic drum support roller kit for 29-inch-wide dryers. It includes 1 belt, 2 roller wheels and an idler pulley. The parts in this kit allow the dryer to tumble properly by supporting th...
In Stock
Order now and your part arrives by Jul 23

$39.63
The Whirlpool Dryer Repair Kit is a genuine OEM maintenance kit designed to resolve common issues such as squeaking, thumping, or poor drum rotation in 27-inch dryers. This all-in-one kit is compatibl...
In Stock
Order now and your part arrives by Jul 23

$46.07
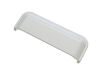
Sourced directly from the manufacturer, this OEM approved replacement handle is approximately 6 inches long, 2 inches wide, and is made of durable white plastic. This handle is used to open the dryer ...
In Stock
Order now and your part arrives by Jul 23

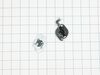
This heating element connection wire kit is a genuine OEM replacement for your electric dryer. The kit is used to connect the thermostat to the heater element. The kit comes with a yellow wire nut and...
In Stock
Order now and your part arrives by Jul 23

$55.18
This is a genuine OEM replacement door gasket for your dryer. The gasket, also known as a door seal, is used to provide an airtight seal when the dryer door is closed. If the gasket has failed it can ...
In Stock
Order now and your part arrives by Jul 23

$47.14
This kit comes with 2 adhesive pads, 2 brackets and 4 screws. This is for stacking the appliances vertically - dryer over washer.
In Stock
Order now and your part arrives by Jul 23

$43.92
This kit allows you to stack your washer and dryer to maximize your laundry space.
In Stock
Order now and your part arrives by Jul 23

In Stock
Order now and your part arrives by Jul 23

$57.30
This stationary drying rack is designed for use in dryers with rear drum dimples spaced 4½ inches apart. Constructed in white, it provides a stable platform for drying items that should not tumble, su...
In Stock
Order now and your part arrives by Jul 23

In Stock
Order now and your part arrives by Jul 23

$73.24
This kit is used for the bottom and side exhaust. The kit includes both the straight and elbow vent.
On Order

$59.43
This terminal and wire kit helps repair electrical connections in your dryer by replacing worn or damaged wires. It includes wires, screws, and wire nuts, but the terminal block is sold separately. Us...
In Stock
Order now and your part arrives by Jul 23
Common Problems and Symptoms for YWED5050LW0
Viewing 8 of 8Noisy
Fixed by these parts

How to fix it
Drum Not Spinning
Fixed by these parts
How to fix it
Door won’t close
Fixed by these parts

How to fix it
Not Heating
Fixed by these parts
How to fix it
Won’t Start
Fixed by these parts
How to fix it
Marks left on clothes
Fixed by these parts
How to fix it
Heat stays on after drum has stopped
Fixed by these parts
How to fix it
Too hot
Fixed by these parts
How to fix it


Keep searches simple. Use keywords, e.g. "leaking", "pump", "broken" or "fit".
- Customer:
- DENNIS from ALTOONA, FL
- Parts Used:
- 4392065
- Difficulty Level:
- A Bit Difficult
- Total Repair Time:
- 1- 2 hours
- Tools:
- Nutdriver, Screw drivers
Broken drive belt
Grow a second set of hands. Always unplug any appliance. Remove lint screen. remove two screws (philips Head). I took a wooden shim lightly tapped w/hammer to pop front of dryer top free. Mine worked on hinges and just flipped back til it rested against the wall. Removed two 5/16 screws inside holding face on carefully raise face section
... Read more
off the support clips at either side on the bottom. Pull drum out (I have the large style drum commercial size [approx.). Clean the inside free of all lint (known to be fire hazard). Sling new belt around drum. Get newly grown set of hands to hold drum in place. Pinch belt to fit between tensioner, lift tensioner and place belt around motor pulley. Spin drum couple times to make certain belt isn't twisted. Reverse dismantle proccess to put back together. Replace all parts that come with kit, you'll feel better knowing you got a new dryer, almost.
Read less
Was this instruction helpful to you?
Thank you for voting!
- Customer:
- jason from HOLDEN, MA
- Parts Used:
- 4392067
- Difficulty Level:
- Really Easy
- Total Repair Time:
- 30 - 60 mins
- Tools:
- Socket set
very loud squeeling sound
The issue was the idler pulley. First I began opening up the front panel based on a youtube video but soon realized the model was slightly different and required a lot more items to remove. I saw the pulley in the back with nothing in the way so I put the front panel crap back on and removed the rear panel. There it was, very simple to re
... Read more
move and replace. I'm not looking forward to drum rollers though. Hopefully they're aren't as difficult as they appear.
Read less
Was this instruction helpful to you?
Thank you for voting!
- Customer:
- Michael from Haines City, FL
- Parts Used:
- 4392065
- Difficulty Level:
- A Bit Difficult
- Total Repair Time:
- 1- 2 hours
- Tools:
- Nutdriver, Screw drivers, Wrench (Adjustable)
Dryer making extra noise while running
1st Unpluged power.
2nd removed two screws under lint screen cover.
3rd poped up lid with flathead screwdryer, then removed (2) 5/16 screws from door cover and unpluged lid switch, lifted up dryer door pannel
4th removed drum
5th took out plastic triangle wheel rings
6th removed old belt guild (to motor pully)
... Read more />7th removed old wheels and plastic rings stops
8th cleaned excessive hair dust with shopvac
9th put new replaicment part in dryer. made sure to turn manually to make sure belt was lined up properly, then put all dryer peices back.
10th aditional work, took back cover off and removed the (4) 1/4 screws for lint screen case (left side in dryer) vacumed out any excessive dirt lint ect, also cleaned any excessive dust I found in back of dryer, dryer , exhaust ect, and put all back together.
JUst like a new dryer aain after all PM was complete.
Read less
Was this instruction helpful to you?
Thank you for voting!