


Models
>
LPE4500W0
LPE4500W0 Whirlpool Dryer
Jump to:
Find Part by Name
Keep searches simple, eg. "belt" or "pump".
Keep searches simple, eg. "belt" or "pump".

$22.91
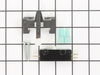
This lid or door switch kit helps ensure your washer or dryer only runs when the door is properly closed. It’s a safety feature that prevents spills and keeps your appliance working as it should. The ...
In Stock
Order now and your part arrives by Jul 20

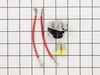
This thermostat kit helps regulate your dryer’s temperature by cycling the heating element on and off. It’s adjustable between 135°F and 155°F and reactivates the heat when the temperature drops by 20...
In Stock
Order now and your part arrives by Jul 20

In Stock
Order now and your part arrives by Jul 20

In Stock
Order now and your part arrives by Jul 20

In Stock
Order now and your part arrives by Jul 20

Special Order

This dryer timer is used to control the unit's cycles by regulating the length of time that power is directed to each setting.
No Longer Available

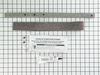
At 94-1/8 inches in length, this dryer drum belt from Whirlpool/Kenmore has three ridges. It is used for many of Whirlpool's brands of clothes dryers. This flat belt is 1/4 of an inch wide.
No Longer Available

 – Part Number: 299761")
Common Problems and Symptoms for LPE4500W0
Viewing 7 of 7Will Not Start
Fixed by these parts
How to fix it
Will not drain
Fixed by these parts
How to fix it
Too hot
Fixed by these parts
How to fix it
Noisy
Fixed by these parts


How to fix it
Will not agitate
Fixed by these parts
How to fix it
Won’t Start
Fixed by these parts
How to fix it
Not Heating
Fixed by these parts
How to fix it


Keep searches simple. Use keywords, e.g. "leaking", "pump", "broken" or "fit".
- Customer:
- Kenneth from Wilmington, IL
- Parts Used:
- W10820036
- Difficulty Level:
- Easy
- Total Repair Time:
- 1- 2 hours
- Tools:
- Nutdriver, Screw drivers, Socket set
Lid closes, switch wouldn't turn on machine.
Used toothpick for a year to push switch acctuator far enough to engage switch. Broke my foot and found time to order part thru PartSelect. Went from cast to boot and received part 2 days after ordered. Had difficulty with foot and getting to switch. Went back into PartSelect and figured out how to dis-assemmble panels thru the diagrams.
... Read more
Time on my job doesn't, just that their service and expertise that is available to everyone is there to use. Broken bones or not, I will always get my parts and advice from PartSelect. Thanks to PartSelect.
Read less
Was this instruction helpful to you?
Thank you for voting!
- Customer:
- Glen from Plano, TX
- Parts Used:
- W10820036
- Difficulty Level:
- A Bit Difficult
- Total Repair Time:
- 30 - 60 mins
- Tools:
- Screw drivers
Washer would fill up, wash, then stop
I deduced the lid switch was the problem.
I removed the two screws holding the control panel on. Pulled the control panel back.
Disconnected the ground wire of the lid switch.
removed the two top clamps that hold the panel to the top of the machine.
Pulled back the casing (outside of the washer) and placed ... Read more it on it's side on the floor. Here I could reach the switch. Removed old, installed new and reversed the process.
The part that gave me the biggest problem was setting the casing back on to the frame. You have to slide the front part in at the bottome, then lean back the rest of it.
Read less
Was this instruction helpful to you?
Thank you for voting!
- Customer:
- Robert from Buffalo, NY
- Parts Used:
- WP694674
- Difficulty Level:
- Easy
- Total Repair Time:
- 30 - 60 mins
- Tools:
- Nutdriver, Screw drivers
Temperature setting not working
Took off back cover, thermostat was easily identified because of photos I've seen on website. Took 2 connectors off, removed 2 screws and removed old thermostat. That was pretty much it!
NOTE: Replacement thermostat 694674 has an adjustable temperature range setting that MUST be manually set prior to installing! You need to use ... Read more the enclosed chart to find your original part# and make sure the setting is matched. My original part# 341146 had a "D" setting so I had to change but very easy to do.
NOTE: Replacement thermostat 694674 has an adjustable temperature range setting that MUST be manually set prior to installing! You need to use ... Read more the enclosed chart to find your original part# and make sure the setting is matched. My original part# 341146 had a "D" setting so I had to change but very easy to do.
Read less
Was this instruction helpful to you?
Thank you for voting!