


Models
>
LDI9801K1
LDI9801K1 Whirlpool Dryer
Jump to:
Find Part by Name
Keep searches simple, eg. "belt" or "pump".
Keep searches simple, eg. "belt" or "pump".

$15.26
This multi rib belt is an OEM replacement part for a dryer. It attaches to the drum, idler pulley, and motor pulley, and is responsible for spinning the drum. Over time, the belt can become frayed, br...
In Stock
Order now and your part arrives by Apr 9

$8.70
This kit includes two door strikes, and three door catches, to service doors that have one or two catches. The strike is mounted on the body of the dryer, while the catch is mounted on the dryer door....
In Stock
Order now and your part arrives by Apr 9

$18.54
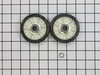
This is a rear drum support roller kit for your dryer. The 2 rollers come with 4 tri-rings, and 1 palnut. We recommend that you replace both rollers at once. This kit stabilizes the drum cylinder, whi...
In Stock
Order now and your part arrives by Apr 9

$33.20
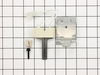
This is a genuine OEM replacement igniter kit for your gas-heated clothes dryer. The silicon carbide igniter is used to light the gas that creates the heat in order to dry your clothes. If your dryer ...
In Stock
Order now and your part arrives by Apr 9

$36.42
This genuine OEM part is a radiant flame sensor for your gas dryer. It is used to determine when the temperature of the igniter is hot enough to ignite the gas. Once the igniter is hot enough, it allo...
In Stock
Order now and your part arrives by Apr 9

$45.00
This genuine OEM lint filter has a plastic handle to make it easy to remove the filter from the dryer. If the handle has broken off, you may need to use a pair of needle nose pliers to remove the filt...
In Stock
Order now and your part arrives by Apr 9

$99.14
This drive motor operates the dryer by turning the drive belt which spins the drum and will fit most Whirlpool incorporated dryer brands before 1996. If the motor has shorted out, it will no longer tu...
In Stock
Order now and your part arrives by Apr 9

$22.91
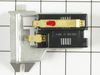
This lid or door switch kit helps ensure your washer or dryer only runs when the door is properly closed. It’s a safety feature that prevents spills and keeps your appliance working as it should. The ...
In Stock
Order now and your part arrives by Apr 9

$35.34
The blower wheel is a squirrel cage type wheel whose purpose is to move the air through the room or appliance. The blower wheel spins on the motor shaft to blow air through the dryer drum and out through the exhaust.
In Stock
Order now and your part arrives by Apr 9

This thermostat kit helps regulate your dryer’s temperature by cycling the heating element on and off. It’s adjustable between 135°F and 155°F and reactivates the heat when the temperature drops by 20...
In Stock
Order now and your part arrives by Apr 9

$49.29
This seal kit for large capacity gas and electric clothes dryers includes a seal, an adhesive, and an instructions sheet. This felt seal for the back of the drum is sewn with red thread.
In Stock
Order now and your part arrives by Apr 9

$56.24
This gray door gasket is used to seal the dryer door when closed. It does not come with the adhesive.
Special Order
Questions and Answers
We're sorry, but our Q&A experts are temporarily unavailable.
Please check back later if you still haven't found the answer you need.
Common Problems and Symptoms for LDI9801K1
Viewing 15 of 15Noisy
Fixed by these parts


How to fix it
Door won’t close
Fixed by these parts

How to fix it
Drum Not Spinning
Fixed by these parts
How to fix it
Not Heating
Fixed by these parts
How to fix it
Won’t Start
Fixed by these parts

How to fix it
Door Pops Open
Fixed by these parts
How to fix it
Will Not Start
Fixed by these parts
How to fix it
Too hot
Fixed by these parts


How to fix it
Will not drain
Fixed by these parts
How to fix it
Marks left on clothes
Fixed by these parts

How to fix it
Heat stays on after drum has stopped
Fixed by these parts
How to fix it
Will not agitate
Fixed by these parts
How to fix it
Lid or door won’t close
Fixed by these parts
How to fix it
Running With Door Open
Fixed by these parts
How to fix it
Touchpad does not respond
Fixed by these parts
How to fix it


Keep searches simple. Use keywords, e.g. "leaking", "pump", "broken" or "fit".
- Customer:
- Terri from Saint Augustine, FL
- Parts Used:
- 279570
- Difficulty Level:
- Really Easy
- Total Repair Time:
- Less than 15 mins
Door Catch part had fallen out,/ was missing
Received your parts, Popped them both right into place, Even though only one side needed to be replaced, I wanted them to match up. It was amazing how easy this was. My husband was quite impressed I had ordered these rather then look for either a new or used dryer from some other source.
Was this instruction helpful to you?
Thank you for voting!
Wife told me Dryer would make a funny sound, then stop + had an a funny smell as well. The Electric motor that drove the unit was overheating and locking up, It was time to be replace.
The best part of my repair was I had everything back in service in 3 days. And one of these days was to consider just buying a new dryer. Had parts overnited and all parts fit and easy to replace.
1) Removed back - 6 screws
2) Removed dryer vent - 2 screws on top, 3 on bottom
3) Popped the top open
4) Removed Fro ... Read more nt of dryer cabinet - 2 screws
5) Removed Belt
6) Removed Drum
7) Cleaned up all lint
8) Pop off motor retainers front and back
Here is the tricky part for me.
9) Removed vent fan on back of motor.
I did not know that the back of the fan was square, and you could put an open ended wrench on it to hold it while you also have a vice grip on the front motor shaft. Then its a simple left to loosey operation. I first tryed to turn the fan blade to take it off, but proved to be to tight.
10) Repeat backwards to reassemble
While I had it apart I also replaced the Drum support rollers & Installed a new belt. Not that diffucult of a repair Good Luck, was certainly better than buying a new one at + $300.00 at Black Friday rates.
Read less
Was this instruction helpful to you?
Thank you for voting!
- Customer:
- Melody from North Las Vegas, NV
- Parts Used:
- 279570
- Difficulty Level:
- Really Easy
- Total Repair Time:
- Less than 15 mins
Door wouldn't latch.
I can't believe I waited so long to find this part and do this. I got the package very fast, opened it, took the piece to my dryer and popped it into place with my fingers. It worked perfectly! this took all of two minutes and saved me from having to hold the dryer door closed with a stick. Thank you, thank you!!!
Was this instruction helpful to you?
Thank you for voting!