


Models
>
DG495PXW3
DG495PXW3 Westinghouse Dryer
Jump to:
Find Part by Name
Keep searches simple, eg. "belt" or "pump".
Keep searches simple, eg. "belt" or "pump".

$10.95
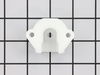
The drum support bearing is an authentic OEM replacement part for your dryer. The bearing is used to support the drum and allow it to rotate smoothly and quietly. If your dryer is excessively noisy wh...
In Stock
Order now and your part arrives by Jul 31

In Stock
Order now and your part arrives by Jul 31

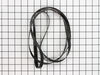
Use this idler pulley assembly with gas or electric clothes dryer that has a flat dryer belt.
***Please NOTE: This part has been redesigned by the manufacturer and may not fit your appliance.
No Longer Available

In Stock
Order now and your part arrives by Jul 31

This dryer lint screen and frame is used for Frigidaire/WCI brand electric and gas dryers. The filter is 14-1/4 inches wide and comes with a bezel frame and mounting screws.
No Longer Available


Special Order

Special Order
Special Order
Special Order

Common Problems and Symptoms for DG495PXW3
Viewing 4 of 4Noisy
Fixed by these parts

How to fix it
Not Heating
Fixed by these parts
How to fix it
Marks left on clothes
Fixed by these parts
How to fix it
Drum Not Spinning
Fixed by these parts
How to fix it

Keep searches simple. Use keywords, e.g. "leaking", "pump", "broken" or "fit".
- Customer:
- Giuseppe from San Francisco, CA
- Parts Used:
- 5303281135
- Difficulty Level:
- Difficult
- Total Repair Time:
- 15 - 30 mins
- Tools:
- Screw drivers
Gas flame turns off after a while. No more heat.
Fixed it eventually with part PS470049 ('M' Series Ignition Coil Kit). See separate story.
The flame sensor did not fix it but read on for info on how to replace this part. Before replacing this part, I should have read another posting in a different web site about the ignition coils: if you see a red glow inside the burner uni ... Read more t but the flame does not come on, then the problem is likely to be with the coils, not the flame sensor. However since some users here had solved the problem by replacing the flame sensors, I figured I'd try it. The setting for "More dry, less dry" never worked either so maybe this would fix two problems at once.
This dryer is a stacked front loader sitting on top of our washing machine. Opening the little front door (lower left side) is easy once you figure out that a little screw below needs to be removed. I almost broke the door trying to pull it open. The sensor is attached to the side of the flame area cylinder. It was hard to remove both the screw and the part itself from the slots as it's very springy. In fact when I finally removed it, it dropped to the base of the unit and sparks went flying as one of the electrical clips touched the metal (ground). Tip: first disconnect the electrical lead coming from the back of the unit to the ingnition block and later I used rubber gloves just in case. (I could not access the plug/outlet in the back). I installed the new part easily, though I was confused by the electrical leads: the white wire connects to the lead that has a red plastic dot on the side, but I think that must be a mechanical part and not a (wrong) marking, while the red connects to the other lead. Anyway, I connected it the same way I found it and put it back. Reconnected the other electrical wires and closed the door.
This did not fix the problem which turned out to be with the gas valve coils: as they get old, they turn off the flame when they get hot, even though the dryer keeps on turning. To read how to replace that part, search for comments under part number PS470049 ('M' Series Ignition Coil Kit). I don't know whether replacing the flame sensor is going to fix the "more dry-less dry" function, will have to see. Still, this website is great. Our dryer is a Westinghouse bought in 1991 (almost 20 years old!) and with this fixes it's just like new.
Read less
Was this instruction helpful to you?
Thank you for voting!
- Customer:
- Tod from West Springfield, MA
- Parts Used:
- 5303281154
- Difficulty Level:
- A Bit Difficult
- Total Repair Time:
- 1- 2 hours
- Tools:
- Nutdriver, Screw drivers, Wrench set
Broken Dryer Belt
1st I pried the dryer top open then disconnected the two wires for the auto shut-off. Removed four nuts with driver that opens front and releases dryer barrel. Lifted front up a bit to remove from two lower tabs at bottom of unit and put aside.
I then slid the belt over the barrel noting the side up directions on the belt. On ... Read more the lower left on the back of unit I opened up the vented cover to reveal the motor pulley and belt tension pulley. I put the belt on the pulley and brought the belt tension pulley over the belt. I then aligned the belt to the proper point on the barrel and reattached the front being careful to center the barrel onto the rim that is built into the front. Take care to align all the tabs and shims in the correct order so that barrel rotates freely. Replace auto shut off wires to switch on inside of front and close top.
I then slid the belt over the barrel noting the side up directions on the belt. On ... Read more the lower left on the back of unit I opened up the vented cover to reveal the motor pulley and belt tension pulley. I put the belt on the pulley and brought the belt tension pulley over the belt. I then aligned the belt to the proper point on the barrel and reattached the front being careful to center the barrel onto the rim that is built into the front. Take care to align all the tabs and shims in the correct order so that barrel rotates freely. Replace auto shut off wires to switch on inside of front and close top.
Read less
Was this instruction helpful to you?
Thank you for voting!
- Customer:
- David from Murrieta, CA
- Parts Used:
- 5303281135
- Difficulty Level:
- A Bit Difficult
- Total Repair Time:
- 30 - 60 mins
- Tools:
- Screw drivers, Socket set
Dryer would not ignite
Make Sure Dryer is off and disconnected from power! Also, beware of sharp edges on dryer parts and cabinet.
1) Popped-off top lid with flat-blade screw driver (Insert screw driver in joint between top and front of dryer above door) Spring clips are all that's holding top on in front
2) Unplugged plastic electrical connector loc ... Read more ated just along the top-right side of dryer
3) Removed one sheet metal screw located about 8" down from top on either side of dryer - total of two screws
4) Pull front of dryer back and pull up at bottom of dryer (Remember that when you replace front you will have to make sure plastic bearing surfaces on dryer tub are centered back in cut-out on front panel. Plastic tabs fit inside the cut-out or else you'll ge a swishing noise when tub rotates)
5) Set front panel to side
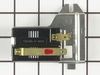
6) Flame sensor is located on the left side of the burn chamber sheet metal cover. It has a red and white wire with flat connectors that must be pulled off. Note which color goes to what terminal
7) Unscrew fastener. Note: this screw/fastener needs a non-standard driver to get it out. I have a variety of other drivers beyond phillips/flat types and non of them worked.
8) I ended up using a pair of pliers to just work it out from under the screw. I bent it, as it has a tab that slips in along left bottom edge of burn chamber cover.
9) Finish taking screw out by hand
10) Put new flame sensor in by inserting tab on bottom first. Then, screw in fastener to top of sensor bracket and reconnect wires. White on top and red on bottom terminal.
11) Replace front panel with door by placing in tabs on bottom front of dryer. Again, make sure plastic bearing surfaces are inside of circular flange on front panel
12) Make sure to reconnect plastic cable connector. Note: I added a tie-wrap because it looked like the connector might rub against drum. There are some holes through which you can run the tie-wrap
13) Replace the two sheet-metal screws
14) Push top down so spring clips re-engage with dryer body
1) Popped-off top lid with flat-blade screw driver (Insert screw driver in joint between top and front of dryer above door) Spring clips are all that's holding top on in front
2) Unplugged plastic electrical connector loc ... Read more ated just along the top-right side of dryer
3) Removed one sheet metal screw located about 8" down from top on either side of dryer - total of two screws
4) Pull front of dryer back and pull up at bottom of dryer (Remember that when you replace front you will have to make sure plastic bearing surfaces on dryer tub are centered back in cut-out on front panel. Plastic tabs fit inside the cut-out or else you'll ge a swishing noise when tub rotates)
5) Set front panel to side
6) Flame sensor is located on the left side of the burn chamber sheet metal cover. It has a red and white wire with flat connectors that must be pulled off. Note which color goes to what terminal
7) Unscrew fastener. Note: this screw/fastener needs a non-standard driver to get it out. I have a variety of other drivers beyond phillips/flat types and non of them worked.
8) I ended up using a pair of pliers to just work it out from under the screw. I bent it, as it has a tab that slips in along left bottom edge of burn chamber cover.
9) Finish taking screw out by hand
10) Put new flame sensor in by inserting tab on bottom first. Then, screw in fastener to top of sensor bracket and reconnect wires. White on top and red on bottom terminal.
11) Replace front panel with door by placing in tabs on bottom front of dryer. Again, make sure plastic bearing surfaces are inside of circular flange on front panel
12) Make sure to reconnect plastic cable connector. Note: I added a tie-wrap because it looked like the connector might rub against drum. There are some holes through which you can run the tie-wrap
13) Replace the two sheet-metal screws
14) Push top down so spring clips re-engage with dryer body
Read less
Was this instruction helpful to you?
Thank you for voting!