


Models
>
EE2107
EE2107 Speed Queen Dryer
Jump to:
Find Part by Name
Keep searches simple, eg. "belt" or "pump".
Keep searches simple, eg. "belt" or "pump".

$22.91
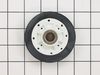
If your dryer is not tumbling, takes a long time to dry, or is noisy while tumbling, it may be time to replace the drum support rollers. These hold the drum in place while it rotates, so if they have ...
In Stock
Order now and your part arrives by Aug 2

$14.16
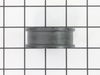
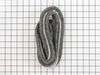
The multi rib belt, which may also be called a dryer drum belt or a multi-v belt, helps to rotate the drum of the dryer. The belt wraps completely around the drum, around a tension pulley, and then ar...
In Stock
Order now and your part arrives by Aug 2

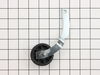
This two inch wide idler pulley wheel is beige in color and is made of plastic. This pulley wheel comes with its own metallic bearing in its center.
In Stock
Order now and your part arrives by Aug 2

$36.42
The spring for this part is sold separately.
This idler assembly is for dryers.
Idler assembly includes the idler arm and the idler pulley that maintains tension on the drive belt, allowing the ...
In Stock
Order now and your part arrives by Aug 2

In Stock
Order now and your part arrives by Aug 2

$46.07
This rear drum felt seal is designed to create a flexible, airtight barrier between the dryer drum and the rear panel, helping to maintain optimal heat circulation and airflow during drying cycles. By...
In Stock
Order now and your part arrives by Aug 2

$8.70
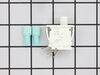
This dryer door latch kit comes in two pieces: a door latch, and a door strike. It's used to help hold your door shut to your dryer.
Special Order

$57.30
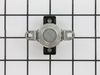
This hi-limit thermostat acts as a safety mechanism that keeps the dryer from overheating. With this thermostat, a dryer's heating element will cut out if the internal temperature reaches 225 degrees...
In Stock
Order now and your part arrives by Aug 2

In Stock
Order now and your part arrives by Aug 2

$100.07
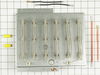
This 240 volt heating element is used for electric clothes dryers. Included with this element is a fuse kit consisting of a thermal fuse, a high limit thermostat, two wire leads, and four mounting screws.
In Stock
Order now and your part arrives by Aug 2

$81.07
This fuse kit comes with a thermal fuse, a high limit thermostat, two lead wires, & four mounting screws.
Special Order

This part is connected to the rear bulkhead of the dryer with screws. It provides a way of connecting individual electrical wires and offers protection of the device from electrical surges (voltages and/or currents).
No Longer Available
Common Problems and Symptoms for EE2107
Viewing 9 of 9Noisy
Fixed by these parts

How to fix it
Door won’t close
Fixed by these parts
How to fix it
Drum Not Spinning
Fixed by these parts
How to fix it
Marks left on clothes
Fixed by these parts
How to fix it
Too hot
Fixed by these parts
How to fix it
Won’t Start
Fixed by these parts
How to fix it
Door Pops Open
Fixed by these parts
How to fix it
Not Heating
Fixed by these parts
How to fix it
Running With Door Open
Fixed by these parts
How to fix it


Keep searches simple. Use keywords, e.g. "leaking", "pump", "broken" or "fit".
- Customer:
- Robert from Skokie, IL
- Parts Used:
- WP40111201
- Difficulty Level:
- Difficult
- Total Repair Time:
- 1- 2 hours
- Tools:
- Nutdriver
Replace drive belt
Remove front panel, lint basket, motor mounts,exhaust hood, front drum brackets. Then slip serpentine belt around drum, pressure w/ tension idler pulley and slip around drive motor spindle. Replace all parts in reverse order (a two person job).
Vacuumed inside of dryer (full of lint.)
Vacuumed inside of dryer (full of lint.)
Was this instruction helpful to you?
Thank you for voting!
- Customer:
- Fred from Chicago, IL
- Parts Used:
- WP37001042
- Difficulty Level:
- A Bit Difficult
- Total Repair Time:
- 30 - 60 mins
- Tools:
- Socket set
Support Roller removal and Installation
First I turned off the gas supply line. Then unplug the dryer. Remove bottom front cover by removing the 2 screws (1 at each side) at the bottom. Next remove the 2 screws (1 at each side) located at bottom of front door panel. Pull front panel away from dryer and pull down slightly. This will disconnect the entire front panel(with door) f
... Read more
rom dryer. Carefull because there is a switch located at the top right corner of the panel on the inside. This will not allow you to remove the door yet. On some scratch paper, sketch the switch and correct color wire positions. Remove wires at connections. Pull the drum toward front dryer carefully. This dislodges it from the back of the dryer. No need to remove it from dryer. This way the belt still remains in place. From inside drum, use a pair of snap ring pliers to remove the snap ring from the support roller shaft located on left side of drum, below where the drum was sitting prior to pulling it forward to dislodge it from inside rear of dryer.
Remove old wheel , place some grease on inside of new support roller and some on the shaft. Install new roller and replace snap ring. Slide drum back in place inside the dryer at the rear. Hand rotate the drum to ensure it is properly installed. Reconnect the switch wires to the front panel. Slide panel up into place so that the clips (at top of panel) lock into place(square holes in top cover plate of dryer). Have the door open when doing this because you have to seat the front of the drum into the front cover. Reinstall the 2 screws. Test spin the drum again by hand. If it feels right, it's correctly seated.
Reinstall bottom front cover. While everything is apart, you may want to use a vacuum cleaner to clean the inside of your dryer. Perfect time to do this. Plug dryer back in and open gas supply line. Test the dryer. Should be nice and quiet again.
This fix is for the left side support roller only. There is a support roller on the right side also. In my case I only needed to fix the left side support roller. The inner diameter of the roller was badly worn and needed to be replaced. You may want to purchase the support roller shaft at the same time. I didn't and will need to do this repair again. I only purchased the support roller and when I removed it, I noticed the shaft is badly worn also. In my case, temporary fix until the shaft is ordered and then I'll do this again.
Read less
Was this instruction helpful to you?
Thank you for voting!
- Customer:
- Don from Jacksonville, FL
- Parts Used:
- W10169313
- Difficulty Level:
- Really Easy
- Total Repair Time:
- 15 - 30 mins
- Tools:
- Nutdriver
Switch sticking in on position
FIRST unplug dryer from electrical source, CAUTION, the top of this dryer does not open with clips, do not pry on top to open! On the front of the dryer look under the lower panel, and find two screws, one on the left side, and one on the right, remove these screws, and pull slightly down on panel to remove. Behind this panel find two s
... Read more
crews holding the door panel, one on the left, and one on the right, remove the left, and support the door panel while removing the right side. Gently pull the bottom of door panel outward, and the clips on top of door panel will unhinge from top, carefully rotate left side of door panel to floor, and note the wire connections on switch, and orientation of switch, then unplug wires, and move door panel to a comfortable working positon. Door must be open to remove switch, then depress the two plastic retaining keepers on each side of switch, and push switch through toward door. Replace with new switch, reconnect the wires, and reassymble in reverse order. Remember, door assymbly must be inserted in dryer top at an angle, and then bottom rotated downward, and bottom panel nylon guildes inserted into door panel bottom.
Read less
Was this instruction helpful to you?
Thank you for voting!