


Models
>
DV56H9100GV
DV56H9100GV ((A2)(0000)) Samsung Dryer
Jump to:
Find Part by Name
Keep searches simple, eg. "belt" or "pump".
Diagrams for DV56H9100GV
Viewing 1 of 1(0000) Samsung Dryer")
Keep searches simple, eg. "belt" or "pump".

$60.49
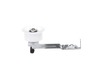
This idler pulley assembly includes the pulley wheel and bracket, and is located near the motor in compatible dryer models. It maintains tension on the dryer belt, allowing the drum to rotate smoothly...
In Stock
Order now and your part arrives by Apr 6

In Stock
Order now and your part arrives by Apr 6

$27.83
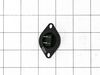
This replacement thermostat is designed for use with electric dryers to help regulate and maintain the correct temperature during each drying cycle. A properly working thermostat ensures that the heat...
In Stock
Order now and your part arrives by Apr 6

$32.12
Leveling leg supports the dryer. Adjust the height of the leveling leg to make the dryer level.
In Stock
Order now and your part arrives by Apr 6

In Stock
Order now and your part arrives by Apr 6

In Stock
Order now and your part arrives by Apr 6

In Stock
Order now and your part arrives by Apr 6

$6.51
This manufacturer-approved screw is for refrigerators, including Kenmore refrigerator model. Avoid cross-threading refrigerator screw during installation.
In Stock
Order now and your part arrives by Apr 6

On Order

On Order

In Stock
Order now and your part arrives by Apr 6

In Stock
Order now and your part arrives by Apr 6
Questions and Answers
We're sorry, but our Q&A experts are temporarily unavailable.
Please check back later if you still haven't found the answer you need.
Common Problems and Symptoms for DV56H9100GV
Viewing 5 of 5Noisy
Fixed by these parts
How to fix it
Not Heating
Fixed by these parts

How to fix it
Won’t Start
Fixed by these parts
How to fix it
Drum Not Spinning
Fixed by these parts
How to fix it
Too hot
Fixed by these parts
How to fix it


Keep searches simple. Use keywords, e.g. "leaking", "pump", "broken" or "fit".
- Customer:
- Israel from KLAMATH FALLS, OR
- Parts Used:
- DC47-00016A
- Difficulty Level:
- Really Easy
- Total Repair Time:
- 30 - 60 mins
- Tools:
- Screw drivers
No heat in dryer
I ordered twice from this site. the thermistor was the first order, the fuse was the second order. Turns out the thermistor sent was the WRONG one. When I reassemble the dryer, after 20 minutes the thermistor sent burned up to a crispy chard. The ohms on the wrong part was 12ohms. per the dryer diagnostics the thermistor should have been
... Read more
=<1 ohm. I put in the original part and it worked. The fuse did the trick. the thermistor, not so much. Lesson to be learned is to not rely on this sites parts compatibility information. Look at the specs for your dryer from the manufacturer.
Read less
Was this instruction helpful to you?
Thank you for voting!
- Customer:
- Noah from OXFORD, KS
- Parts Used:
- DC93-00634A
- Difficulty Level:
- Really Easy
- Total Repair Time:
- Less than 15 mins
- Tools:
- Screw drivers
Tension/Dead Man Wheel Broke/Shattered
Dryer would not start but electronics were working.
Pulled top of dryer off; noticed the belt was loose but not broken.
Went in through the back (1 screw and removed the exhaust pipe/plate); noticed the wheel was broken and thus the belt had fallen off.
Ordered replacement wheel/arm.
One screw to remove ol ... Read more d one, one screw to install new one...tentioned the belt. Dryer was good as new.
Read less
Was this instruction helpful to you?
Thank you for voting!
- Customer:
- Tim from Madison, TN
- Parts Used:
- DC32-00007A
- Difficulty Level:
- Really Easy
- Total Repair Time:
- 1- 2 hours
- Tools:
- Screw drivers
Dryer giving a HC code.
A month prior to this repair, I took the dryer apart, cleaned the clogged lint out, and replaced the thermistor with a cheap aftermarket part. It lasted a month. Bought this more expensive OEM thermistor, hopefully of a better quality. Realized that I could have gotten to the thermistor from the back by simply removing the vent pipe an
... Read more
d carefully reaching through the vent pipe hole to take out the thermistor. Did that this time instead of taking everything apart. Also bought an updated lint screen (aftermarket part). It has better mesh although it doesn't fit quite as perfectly as the original. So we'll see if the OEM thermistor lasts longer. The repair time was mostly spent moving the washer and dryer within a fairly small laundry room. The air lifter really helps.
Read less
Was this instruction helpful to you?
Thank you for voting!