


Models
>
MGDC200XW4
MGDC200XW4 Maytag Dryer
Jump to:
Find Part by Name
Keep searches simple, eg. "belt" or "pump".
Diagrams for MGDC200XW4
Viewing 5 of 5


 Diagram and Parts List for Maytag Dryer")

Keep searches simple, eg. "belt" or "pump".

$36.42
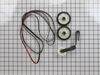
This is an authentic drum support roller kit for 29-inch-wide dryers. It includes 1 belt, 2 roller wheels and an idler pulley. The parts in this kit allow the dryer to tumble properly by supporting th...
In Stock
Order now and your part arrives by Apr 9

$27.28
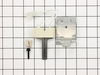
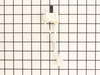
This thermostat is an OEM replacement part for a dryer. It is sold individually. It measures approximately 2-inches by 1.5-inches, is black and silver, and constructed of plastic and metal material. Y...
In Stock
Order now and your part arrives by Apr 9

$28.91
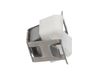
This OEM kit comes with two ignition coils (one three-terminal boost/hold coil, and one two-terminal secondary coil). Usually only one of them burns out, but you should replace them as a set as both h...
In Stock
Order now and your part arrives by Apr 9

$19.63
This drum support roller is sold individually. Most dryers require two. The tri-rings are included. This is a drum support roller for a dryer. It is a genuine replacement part. This part is sold separ...
In Stock
Order now and your part arrives by Apr 9

$33.20
This is a genuine OEM replacement igniter kit for your gas-heated clothes dryer. The silicon carbide igniter is used to light the gas that creates the heat in order to dry your clothes. If your dryer ...
In Stock
Order now and your part arrives by Apr 9

$11.98
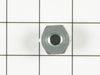
This small but mighty OEM piece is called a tri-ring and is used to support the drum roller shaft and the idler pulley shaft in your dryer. It helps to provide a tight seal between components by evenl...
In Stock
Order now and your part arrives by Apr 9

$36.42
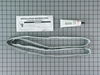
This genuine OEM kit includes a high limit thermostat and a thermal cut-off fuse for your dryer. The thermostat has a limit of 250 degrees Fahrenheit, and the fuse has a limit of 360 degrees Fahrenhei...
In Stock
Order now and your part arrives by Apr 9

$6.51
It is important for your dryer to be properly leveled, as an unleveled one can cause excessive vibration and noise when operating, may not drain properly, and can cause excessive wear on various parts...
In Stock
Order now and your part arrives by Apr 9

$36.42
This genuine OEM part is a radiant flame sensor for your gas dryer. It is used to determine when the temperature of the igniter is hot enough to ignite the gas. Once the igniter is hot enough, it allo...
In Stock
Order now and your part arrives by Apr 9

$99.14
This drive motor operates the dryer by turning the drive belt which spins the drum and will fit most Whirlpool incorporated dryer brands before 1996. If the motor has shorted out, it will no longer tu...
In Stock
Order now and your part arrives by Apr 9

$42.85
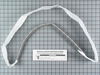
This is a genuine OEM replacement rear drum seal for your dryer. This seal is made of felt and comes with the adhesive required for installation. The purpose of the seal is to prevent hot air from esc...
In Stock
Order now and your part arrives by Apr 9

$35.34
The blower wheel is a squirrel cage type wheel whose purpose is to move the air through the room or appliance. The blower wheel spins on the motor shaft to blow air through the dryer drum and out through the exhaust.
In Stock
Order now and your part arrives by Apr 9
Questions and Answers
We're sorry, but our Q&A experts are temporarily unavailable.
Please check back later if you still haven't found the answer you need.
Common Problems and Symptoms for MGDC200XW4
Viewing 12 of 12Noisy
Fixed by these parts


How to fix it
Not Heating
Fixed by these parts


How to fix it
Drum Not Spinning
Fixed by these parts

How to fix it
Too hot
Fixed by these parts


How to fix it
Door won’t close
Fixed by these parts

How to fix it
Marks left on clothes
Fixed by these parts

How to fix it
Won’t Start
Fixed by these parts
How to fix it
Door Pops Open
Fixed by these parts
How to fix it
Timer Not Working
Fixed by these parts
How to fix it
Heat stays on after drum has stopped
Fixed by these parts
How to fix it
Running With Door Open
Fixed by these parts
How to fix it
Will Not Start
Fixed by these parts
How to fix it


Keep searches simple. Use keywords, e.g. "leaking", "pump", "broken" or "fit".
- Customer:
- Gary from Haverhill, NH
- Parts Used:
- 279834
- Difficulty Level:
- Easy
- Total Repair Time:
- 30 - 60 mins
- Tools:
- Nutdriver, Screw drivers, Socket set
Dryer ran but would not heat
PartSelect showed seven different possibilities why the dryer wouldn't heat. I removed the two screws to remove the bottom panel and turned the dryer on and noticed that the heating element that ignites the gas was working fine. This meant that it was not getting gas so it could be the gas valve or one of the two gas valve coils which are
... Read more
located on top of the gas valve. I borrowed my neighbor"s ohm meter and touched the two probes on the coils terminals to check for continuity and found that one of the coils read zero. I then took both of the coils out by removing two screws and tested each coil again. One coil read 500-850 and the other read zero. This meant that it was no good so I called for the part and received it in three days. I reassembled the parts and turned the dryer on and it fired up after a few seconds. It works as good as new. The part plus shipping was less than $30. My repairman would have charged me $150-$200. While the dryer was apart I gave it a good cleaning with a vacuum and a toothbrush in delicate areas. I also removed and cleaned the lint trap housing by removing two nuts. I didn't know much about gas dryers, but thanks to PartSelect I easily fixed it myself.
Read less
Was this instruction helpful to you?
Thank you for voting!
- Customer:
- DENNIS from ALTOONA, FL
- Parts Used:
- 4392065
- Difficulty Level:
- A Bit Difficult
- Total Repair Time:
- 1- 2 hours
- Tools:
- Nutdriver, Screw drivers
Broken drive belt
Grow a second set of hands. Always unplug any appliance. Remove lint screen. remove two screws (philips Head). I took a wooden shim lightly tapped w/hammer to pop front of dryer top free. Mine worked on hinges and just flipped back til it rested against the wall. Removed two 5/16 screws inside holding face on carefully raise face section
... Read more
off the support clips at either side on the bottom. Pull drum out (I have the large style drum commercial size [approx.). Clean the inside free of all lint (known to be fire hazard). Sling new belt around drum. Get newly grown set of hands to hold drum in place. Pinch belt to fit between tensioner, lift tensioner and place belt around motor pulley. Spin drum couple times to make certain belt isn't twisted. Reverse dismantle proccess to put back together. Replace all parts that come with kit, you'll feel better knowing you got a new dryer, almost.
Read less
Was this instruction helpful to you?
Thank you for voting!
Dryer flame goes out after about 8-minutes from start and won’t work again until a 15-minute rest.
There was no problem with lint build-up within the dryer & the exhaust vent. I removed the gas cycling thermostat & thermal fuse from system & dryer still was not operating correctly. The radiant sensor & hi-limit thermostat both seemed to be operating correctly. That left either of the two coils as the culprits. I replaced both coils
... Read more
& the problem was corrected.
Read less
Was this instruction helpful to you?
Thank you for voting!