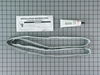
Sourced directly from the manufacturer, this heating element is an OEM approved replacement part for a variety of dryers and is sold individually. It measures approximately 10.5 inches long, 7.5 inche...
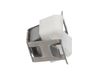
This OEM dryer door switch is an on/off mechanism that detects when the door is open to prevent the dryer from operating. If your dryer will turn on but will not start or continues working while the d...
This thermal cut-off kit is for a dryer and is sourced directly from the manufacturer. The thermal cut-off is a safety mechanism that is designed to trip if your dryer is at risk of overheating, to pr...
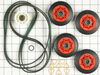
The Whirlpool Dryer Repair Kit is a genuine OEM maintenance kit designed to resolve common issues such as squeaking, thumping, or poor drum rotation in 27-inch dryers. This all-in-one kit is compatibl...
This is a manufacturer-approved high-limit thermostat for your dryer. This part includes one high limit thermostat with a terminal extension arm. It is a safety mechanism that prevents your dryer from...
Sourced directly from the manufacturer, this OEM approved replacement handle is approximately 6 inches long, 2 inches wide, and is made of durable white plastic. This handle is used to open the dryer ...
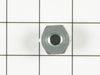
This small but mighty OEM piece is called a tri-ring and is used to support the drum roller shaft and the idler pulley shaft in your dryer. It helps to provide a tight seal between components by evenl...
It is important for your dryer to be properly leveled, as an unleveled one can cause excessive vibration and noise when operating, may not drain properly, and can cause excessive wear on various parts...
This drive motor operates the dryer by turning the drive belt which spins the drum and will fit most Whirlpool incorporated dryer brands before 1996. If the motor has shorted out, it will no longer tu...
This heating element connection wire kit is a genuine OEM replacement for your electric dryer. The kit is used to connect the thermostat to the heater element. The kit comes with a yellow wire nut and...
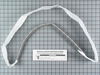
This is a genuine OEM replacement rear drum seal for your dryer. This seal is made of felt and comes with the adhesive required for installation. The purpose of the seal is to prevent hot air from esc...
In Stock
Order now and your part arrives by Jun 28
Questions and Answers
Ask our experts a question about this part and we'll get back to you as soon as possible!
2 questions answered by our experts.
< Prev
1
Next >
Sort by:
Search filter:
Clear Filter
Your search term must have 3 or more characters.
Keep searches simple. Use keywords, e.g. "leaking", "pump", "broken" or "fit".
Sorry, we couldn't find any existing answers that matched. Try using some different or simpler keywords, or submit your new question by using the "Ask a Question" button above!
Dave
October 7, 2021
Wife says dryer drying slower than usual, vents are clean and clear. Is it possible for the electric element to be partially burned out or would the whole element quit if there was a heating element problem?
For model number MEDX655DW1
Hello Dave, Thank you for the question. Some of the coils can burn out but in most cases you would have no heat at all. You should be able to see visible damage to the element if it is defective. We suggest testing the Thermal Cut-Off Kit and the Internal-Bias Thermostat with a Multimeter to check for continuity. We hope this helps!
Hi Shanna, thank you for your inquiry. We recommend the following: completely clean your lint trap, remove lint inside your dryer, and clean the vent hose and drum. Wipe out thoroughly with a mixture of baking soda and water. Then spray some lemon-scented all-purpose cleaner on a cloth and wipe out and then wipe out again with a clean dry cloth. Run a full dryer cycle with a damp towel in it and some dryer sheets. We hope this helps.
1 person found this helpful.
Was this helpful?
Thank you for voting!
Ask a Question
Ask our experts a question on this part and we'll respond as soon as we can.
To reach the heating element you only need to open the back cover of the dryer (about 8 nut-head screws). Remember to disconnect the power.
To remove the heating element there are two small nut-head screws. Remove the two electric wires. Then you can pull the heating element away.
You can check the heating element wi
... Read moreth an ohm-meter or visually inspect it to see if the heating element spiral wire is broken.
Don't hurry to dispose the old element. My model includes a small electric safety part. You'll need to transfer it to the new heating element (that comes without it)..
Good luck.
Read less
2305 of 2503 peoplefound this instruction helpful.
First tried heating element and thermal fuse with no luck. Ordered thermal cutoff and fixed problem. Had I used an ohm meter first I would have determined problem before having ordered heating element and fuse, as both had resistance. I wast just lazy and ordered the took the most common failed components first before taking dryer back
... Read more off.


 Diagram and Parts List for Maytag Dryer")