


Models
>
BDG810
BDG810 Maytag Dryer
Jump to:
Find Part by Name
Keep searches simple, eg. "belt" or "pump".
Diagrams for BDG810
Viewing 1 of 1
Keep searches simple, eg. "belt" or "pump".

In Stock
Order now and your part arrives by Jul 31

In Stock
Order now and your part arrives by Jul 31

$8.70
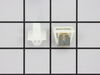
This dryer door latch kit comes in two pieces: a door latch, and a door strike. It's used to help hold your door shut to your dryer.
Special Order

$9.79
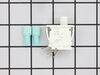
This front cover spring retaining clip is not quite an inch long. It is made entirely of metal and is used for some washing machines.
On Order


Special Order
Common Problems and Symptoms for BDG810
Viewing 6 of 6Door won’t close
Fixed by these parts
How to fix it
Won’t Start
Fixed by these parts
How to fix it
Door Pops Open
Fixed by these parts
How to fix it
Running With Door Open
Fixed by these parts
How to fix it
Will Not Start
Fixed by these parts
How to fix it
Noisy
Fixed by these parts
How to fix it


Keep searches simple. Use keywords, e.g. "leaking", "pump", "broken" or "fit".
- Customer:
- Don from Jacksonville, FL
- Parts Used:
- W10169313
- Difficulty Level:
- Really Easy
- Total Repair Time:
- 15 - 30 mins
- Tools:
- Nutdriver
Switch sticking in on position
FIRST unplug dryer from electrical source, CAUTION, the top of this dryer does not open with clips, do not pry on top to open! On the front of the dryer look under the lower panel, and find two screws, one on the left side, and one on the right, remove these screws, and pull slightly down on panel to remove. Behind this panel find two s
... Read more
crews holding the door panel, one on the left, and one on the right, remove the left, and support the door panel while removing the right side. Gently pull the bottom of door panel outward, and the clips on top of door panel will unhinge from top, carefully rotate left side of door panel to floor, and note the wire connections on switch, and orientation of switch, then unplug wires, and move door panel to a comfortable working positon. Door must be open to remove switch, then depress the two plastic retaining keepers on each side of switch, and push switch through toward door. Replace with new switch, reconnect the wires, and reassymble in reverse order. Remember, door assymbly must be inserted in dryer top at an angle, and then bottom rotated downward, and bottom panel nylon guildes inserted into door panel bottom.
Read less
Was this instruction helpful to you?
Thank you for voting!
- Customer:
- thomas from appleton, WI
- Parts Used:
- 306436
- Difficulty Level:
- Easy
- Total Repair Time:
- Less than 15 mins
- Tools:
- Screw drivers
Door latch broken
I used my screw driver to pry the old female end of the latch from the dryer unit. I forced the new female part of the latch into the hole and bang...45 seconds later the door closed securely --like new!
Was this instruction helpful to you?
Thank you for voting!
- Customer:
- Shawn from Dover, NH
- Parts Used:
- 306436
- Difficulty Level:
- Really Easy
- Total Repair Time:
- Less than 15 mins
- Tools:
- Screw drivers
broken clip for door latch
popped out old female clasp on dryer itself with screwdriver, undid 2 screws on dryer door and door handle with phillips screwdriver, popped in new male clasp part, put door knob back on and put the two screws back in door and it was all set to go. Less than 15 minutes to do. Better than new and wife is happy. No more duct tape holding do
... Read more
or closed now.
Read less
Was this instruction helpful to you?
Thank you for voting!