


Models
>
11065212610
11065212610 Kenmore Dryer
Jump to:
Find Part by Name
Keep searches simple, eg. "belt" or "pump".
Diagrams for 11065212610
Viewing 5 of 5


 Diagram and Parts List for Kenmore Dryer")

Keep searches simple, eg. "belt" or "pump".

$59.43
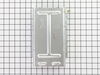
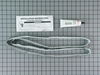
Sourced directly from the manufacturer, this heating element is an OEM approved replacement part for a variety of dryers and is sold individually. It measures approximately 10.5 inches long, 7.5 inche...
In Stock
Order now and your part arrives by Aug 1

$27.28
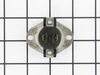
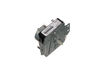
This thermostat is an OEM replacement part for a dryer. It is sold individually. It measures approximately 2-inches by 1.5-inches, is black and silver, and constructed of plastic and metal material. Y...
In Stock
Order now and your part arrives by Aug 1

In Stock
Order now and your part arrives by Aug 1

$20.72
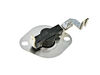
This is a manufacturer-approved high-limit thermostat for your dryer. This part includes one high limit thermostat with a terminal extension arm. It is a safety mechanism that prevents your dryer from...
In Stock
Order now and your part arrives by Aug 1

$11.98
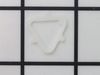
This small but mighty OEM piece is called a tri-ring and is used to support the drum roller shaft and the idler pulley shaft in your dryer. It helps to provide a tight seal between components by evenl...
In Stock
Order now and your part arrives by Aug 1

This heating element connection wire kit is a genuine OEM replacement for your electric dryer. The kit is used to connect the thermostat to the heater element. The kit comes with a yellow wire nut and...
In Stock
Order now and your part arrives by Aug 1

$42.85
This is a genuine OEM replacement rear drum seal for your dryer. This seal is made of felt and comes with the adhesive required for installation. The purpose of the seal is to prevent hot air from esc...
In Stock
Order now and your part arrives by Aug 1

$19.63
This 10-watt clear bulb provides dependable lighting inside dryers and refrigerators, helping you see the interior clearly when the door is open. Compatible with a variety of appliance models, it inst...
In Stock
Order now and your part arrives by Aug 1

$110.88
This dryer timer is used to control the unit's cycles by regulating the length of time that power is directed to each setting.
In Stock
Order now and your part arrives by Aug 1

$7.60
This is a multi-use screw and can be used on a variety of appliances. The measurements of the screw are: 8/18 x 3/8. *Please note: the screw is sold individually. Refer to the manual provided by the m...
In Stock
Order now and your part arrives by Aug 1

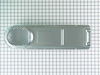
This genuine OEM part is a lint trap housing seal for your dryer. This part is used to form an airtight seal at the back of the dryer drum and the lint duct. The foam seal is approximately 28 inches i...
In Stock
Order now and your part arrives by Aug 1

$60.49
If your dryer is making strange noises or shaking more than usual, the drum bearing ring might be worn out. This part supports the front of the drum and helps it spin smoothly and quietly. Replacing i...
In Stock
Order now and your part arrives by Aug 1
Common Problems and Symptoms for 11065212610
Viewing 9 of 9Not Heating
Fixed by these parts
How to fix it
Noisy
Fixed by these parts

How to fix it
Too hot
Fixed by these parts
How to fix it
Marks left on clothes
Fixed by these parts

How to fix it
Timer Not Working
Fixed by these parts
How to fix it
Won’t Start
Fixed by these parts

How to fix it
Drum Not Spinning
Fixed by these parts
How to fix it
Heat stays on after drum has stopped
Fixed by these parts
How to fix it
Touchpad does not respond
Fixed by these parts
How to fix it


Keep searches simple. Use keywords, e.g. "leaking", "pump", "broken" or "fit".
- Customer:
- Gadi from Irvine, CA
- Parts Used:
- 279838
- Difficulty Level:
- Really Easy
- Total Repair Time:
- 30 - 60 mins
- Tools:
- Nutdriver
Dryer motor runs, but no heat
To reach the heating element you only need to open the back cover of the dryer (about 8 nut-head screws). Remember to disconnect the power.
To remove the heating element there are two small nut-head screws. Remove the two electric wires. Then you can pull the heating element away.
You can check the heating element wi ... Read more th an ohm-meter or visually inspect it to see if the heating element spiral wire is broken.
Don't hurry to dispose the old element. My model includes a small electric safety part. You'll need to transfer it to the new heating element (that comes without it)..
Good luck.
Read less
Was this instruction helpful to you?
Thank you for voting!
- Customer:
- Remie from Mahopac, NY
- Parts Used:
- 279838
- Difficulty Level:
- Really Easy
- Total Repair Time:
- 15 - 30 mins
- Tools:
- Nutdriver
Dryer would run with no heat.
The repair was easy. the most time consuming part was vacuuming the dust from the back of the Dryer, The repair required removing screw from the back panel of the dryer. Then removing screws from the heating element and unplugging the wires. The only moderately diffculy part was swapping the sensor form the old element.
Was this instruction helpful to you?
Thank you for voting!
- Customer:
- Leslie from Dallas, TX
- Parts Used:
- 279838
- Difficulty Level:
- Really Easy
- Total Repair Time:
- 30 - 60 mins
- Tools:
- Nutdriver, Pliers
No heat for dryer
Moved dryer from wall,disconnected power. Unscrewed the 12+ sheet metal screws holding on the back cover. Located heating element, remover it's two sheet metal screws and pulled down on the element to remove. Disconnected the two electrical leads from element and went to the top of Dryer. Do not remiember if told to remove the temptur
... Read more
e kill button was easy to see that it was needed on new element. Moved high tempeture senson to new element. Reversed steps to install new element. Replaced back cover, pluged in and powered up. Works like a champ. Thanks for the price on the part and the video which started me on the right track. I'll be back !!
Read less
Was this instruction helpful to you?
Thank you for voting!