


Models
>
1106507825
1106507825 Kenmore Dryer
Jump to:
Find Part by Name
Keep searches simple, eg. "belt" or "pump".
Keep searches simple, eg. "belt" or "pump".

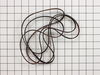
$15.26
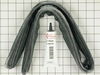
This multi rib belt is an OEM replacement part for a dryer. It attaches to the drum, idler pulley, and motor pulley, and is responsible for spinning the drum. Over time, the belt can become frayed, br...
In Stock
Order now and your part arrives by Jul 23

$19.75
This is a genuine OEM 40-Watt replacement light bulb that is compatible with various types of appliances. It has a frosted glass bulb with a standard metal socket base, making it easy to screw and uns...
In Stock
Order now and your part arrives by Jul 23

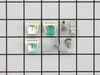
$8.70
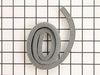
This kit includes two door strikes, and three door catches, to service doors that have one or two catches. The strike is mounted on the body of the dryer, while the catch is mounted on the dryer door....
In Stock
Order now and your part arrives by Jul 23

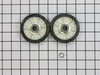
$18.54
This is a rear drum support roller kit for your dryer. The 2 rollers come with 4 tri-rings, and 1 palnut. We recommend that you replace both rollers at once. This kit stabilizes the drum cylinder, whi...
In Stock
Order now and your part arrives by Jul 23

$16.35
The idler pulley is found in your dryer and provides tension to the belt in order to rotate the drum. If your clothes are taking a long time to dry, the machine is noisy while operating, or the dryer ...
In Stock
Order now and your part arrives by Jul 23

$11.98
This small but mighty OEM piece is called a tri-ring and is used to support the drum roller shaft and the idler pulley shaft in your dryer. It helps to provide a tight seal between components by evenl...
In Stock
Order now and your part arrives by Jul 23

$101.78
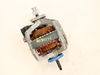
This drive motor operates the dryer by turning the drive belt which spins the drum and will fit most Whirlpool incorporated dryer brands before 1996. If the motor has shorted out, it will no longer tu...
In Stock
Order now and your part arrives by Jul 23

$35.34
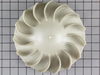
The blower wheel is a squirrel cage type wheel whose purpose is to move the air through the room or appliance. The blower wheel spins on the motor shaft to blow air through the dryer drum and out through the exhaust.
In Stock
Order now and your part arrives by Jul 23

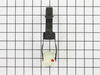
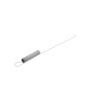
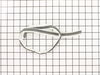
This black actuator spring with white rubber tip is used for both dryer doors and washer lids.
In Stock
Order now and your part arrives by Jul 23

$7.60
This is a multi-use screw and can be used on a variety of appliances. The measurements of the screw are: 8/18 x 3/8. *Please note: the screw is sold individually. Refer to the manual provided by the m...
In Stock
Order now and your part arrives by Jul 23

This genuine OEM part is a lint trap housing seal for your dryer. This part is used to form an airtight seal at the back of the dryer drum and the lint duct. The foam seal is approximately 28 inches i...
In Stock
Order now and your part arrives by Jul 23

In Stock
Order now and your part arrives by Jul 23
Common Problems and Symptoms for 1106507825
Viewing 13 of 13Noisy
Fixed by these parts
How to fix it
Door won’t close
Fixed by these parts
How to fix it
Drum Not Spinning
Fixed by these parts
How to fix it
Won’t Start
Fixed by these parts
How to fix it
Door Pops Open
Fixed by these parts
How to fix it
Marks left on clothes
Fixed by these parts
How to fix it
Heat stays on after drum has stopped
Fixed by these parts
How to fix it
Not Heating
Fixed by these parts
How to fix it
Too hot
Fixed by these parts
How to fix it
Lid or door won’t close
Fixed by these parts
How to fix it
Running With Door Open
Fixed by these parts
How to fix it
Will Not Start
Fixed by these parts
How to fix it
Touchpad does not respond
Fixed by these parts
How to fix it


Keep searches simple. Use keywords, e.g. "leaking", "pump", "broken" or "fit".
Dryer tub belt broke
Removed the two screws that attatch the lent channel to the top of the dryer, then lifted the top of the dryer by pushing in on the two locking tabs located at the front , left and right , corners of the dryer top with a small flat head screw driver. The top of the dryer will fold back out of the way. At this point I removed the two 1/4 i
... Read more
nch screws that are located on the inside of the dryer front left and right corners that hold the front panel/door to the two side panels. Now I was able to lift the front panel up and set it to the side. The bottom of the front panel that contains the dryer door that I just removed was held on the bottom by two clips that slide into slots on the front panel and did not require any removal to disconnect the bottom of the front panel, just pull up on the front panel. Since the tub was held in place by floating on a seal at the back of the dryer and a seal on the front panel , which I just removed the tub is now free floating except for the two alignment roller wheels at the bottom of the tub. It is easier if you lay the dryer on its back at this point with front of the tub pointing up. I pulled the tub out and cleaned the years of built up lent and removed all the pieces of the old , destroyed, belt. Note, the belt tentioner is located at the front of the motor which on the bottom right hand side. If your belt is broke like mine the tensioner may/will fall to the back of the dryer when you tilt it back, but do not worry. Once the dryer was cleaned up I put the tub back in place , still on its back and made sure the two alignment rollers were in place and rolled freely when the tub was turned by hand. Another note, my original belt tensioner did not have a rolling wheel that the belt rode on , but was a semi-circle smooth surface that the belt remained in constant friction with when the dyer was running, so I made sure the replacement tensioner I ordered with my new belt did have a rolling wheel that the belt would ride on, which I believe will reduce wear and extend the belt life. The new belt came with a diagram of the belt and tensioner routing which was helpful. Note: do not take the tensioner wheel off/apart when trying to route the belt. Follow the instructions routing diagram. The tensioner is held in palce by inserting the bottom back half into the slot in the bottom floor of the dryer making sure it is aligned with the belt pully on the shaft of the dryer motor. The dryer is still on its back side. Now, it was easier for me to route the belt around the center of the tub, following the marks from the original belt, and hold in in place in a few spots with masking tape and then route it thru the tensioner and onto the front pully of the motor. Make sure you have the grooves of the belt against the tub and the grooves are aligned with the pully on the motor. Now you can remove the masking tape that was holding the belt around the tub and spin the tub by hand watching the belt making sure it is not in a bind and is traveling around the motor pully , tensioner and tub freely. Make sure the tub is still sealed on the back side wall. As you turn the tub by hand you can adjust the belt by hand so that is following the original marks around the tub left by the orignal belt. Also double check the two alingment rollers and make sure they are spinning and on track. Now put the front panel with the door on by sliding it onto the two clips that are one the bottom at each side and put the two screws in that hold the front panel to the two side panels. Now stand the dryer back up and spin the tub by hand again making sure it has a good seal on the back side and on the front panel. Pull the top back down and put the two screws in that hold the lent channle to the top. I am not sure when the belt started failing on my dryer, but was amazed at how quiet it runs now. Guess I was use to the extra noise made by a dryer that was about to die. This was a cheap and easy repair and glad I did it myself.
Read less
Was this instruction helpful to you?
Thank you for voting!
- Customer:
- Terri from Saint Augustine, FL
- Parts Used:
- 279570
- Difficulty Level:
- Really Easy
- Total Repair Time:
- Less than 15 mins
Door Catch part had fallen out,/ was missing
Received your parts, Popped them both right into place, Even though only one side needed to be replaced, I wanted them to match up. It was amazing how easy this was. My husband was quite impressed I had ordered these rather then look for either a new or used dryer from some other source.
Was this instruction helpful to you?
Thank you for voting!
Wife told me Dryer would make a funny sound, then stop + had an a funny smell as well. The Electric motor that drove the unit was overheating and locking up, It was time to be replace.
The best part of my repair was I had everything back in service in 3 days. And one of these days was to consider just buying a new dryer. Had parts overnited and all parts fit and easy to replace.
1) Removed back - 6 screws
2) Removed dryer vent - 2 screws on top, 3 on bottom
3) Popped the top open
4) Removed Fro ... Read more nt of dryer cabinet - 2 screws
5) Removed Belt
6) Removed Drum
7) Cleaned up all lint
8) Pop off motor retainers front and back
Here is the tricky part for me.
9) Removed vent fan on back of motor.
I did not know that the back of the fan was square, and you could put an open ended wrench on it to hold it while you also have a vice grip on the front motor shaft. Then its a simple left to loosey operation. I first tryed to turn the fan blade to take it off, but proved to be to tight.
10) Repeat backwards to reassemble
While I had it apart I also replaced the Drum support rollers & Installed a new belt. Not that diffucult of a repair Good Luck, was certainly better than buying a new one at + $300.00 at Black Friday rates.
Read less
Was this instruction helpful to you?
Thank you for voting!