


Models
>
11065232610
11065232610 Kenmore Dryer
Jump to:
Find Part by Name
Keep searches simple, eg. "belt" or "pump".
Keep searches simple, eg. "belt" or "pump".

$36.42
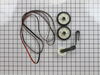
This is an authentic drum support roller kit for 29-inch-wide dryers. It includes 1 belt, 2 roller wheels and an idler pulley. The parts in this kit allow the dryer to tumble properly by supporting th...
In Stock
Order now and your part arrives by Jul 23

$17.44
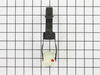
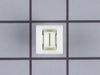
The dryer thermal fuse, also sometimes referred to as the thermal cut off or temperature fuse, is a 2 by 1/2-inch, white, plastic safety mechanism that halts the flow of electricity to the motor circu...
In Stock
Order now and your part arrives by Jul 23

$20.72
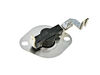
This is a manufacturer-approved high-limit thermostat for your dryer. This part includes one high limit thermostat with a terminal extension arm. It is a safety mechanism that prevents your dryer from...
In Stock
Order now and your part arrives by Jul 23

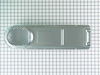
$46.07
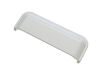
Sourced directly from the manufacturer, this OEM approved replacement handle is approximately 6 inches long, 2 inches wide, and is made of durable white plastic. This handle is used to open the dryer ...
In Stock
Order now and your part arrives by Jul 23

$16.35
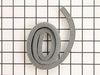
The idler pulley is found in your dryer and provides tension to the belt in order to rotate the drum. If your clothes are taking a long time to dry, the machine is noisy while operating, or the dryer ...
In Stock
Order now and your part arrives by Jul 23

$101.78
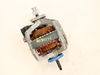
This drive motor operates the dryer by turning the drive belt which spins the drum and will fit most Whirlpool incorporated dryer brands before 1996. If the motor has shorted out, it will no longer tu...
In Stock
Order now and your part arrives by Jul 23

$19.63
This 10-watt clear bulb provides dependable lighting inside dryers and refrigerators, helping you see the interior clearly when the door is open. Compatible with a variety of appliance models, it inst...
In Stock
Order now and your part arrives by Jul 23

$7.60
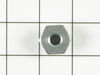
This is a multi-use screw and can be used on a variety of appliances. The measurements of the screw are: 8/18 x 3/8. *Please note: the screw is sold individually. Refer to the manual provided by the m...
In Stock
Order now and your part arrives by Jul 23

This genuine OEM part is a lint trap housing seal for your dryer. This part is used to form an airtight seal at the back of the dryer drum and the lint duct. The foam seal is approximately 28 inches i...
In Stock
Order now and your part arrives by Jul 23

In Stock
Order now and your part arrives by Jul 23

$60.49
This push to start switch is an authentic OEM replacement part for your dryer. Once a setting has been selected on the timer, the switch is then used to complete the circuit and start the cycle. If yo...
In Stock
Order now and your part arrives by Jul 23

$41.78
Hearing squealing or grinding from your dryer? The motor pulley might be the culprit. This part helps the drum spin by supporting the belt where it connects to the motor. It’s a genuine replacement an...
In Stock
Order now and your part arrives by Jul 23
Common Problems and Symptoms for 11065232610
Viewing 13 of 13Noisy
Fixed by these parts
How to fix it
Not Heating
Fixed by these parts

How to fix it
Drum Not Spinning
Fixed by these parts
How to fix it
Won’t Start
Fixed by these parts

How to fix it
Door won’t close
Fixed by these parts

How to fix it
Too hot
Fixed by these parts
How to fix it
Touchpad does not respond
Fixed by these parts
How to fix it
Marks left on clothes
Fixed by these parts
How to fix it
Door Pops Open
Fixed by these parts
How to fix it
Will Not Start
Fixed by these parts
How to fix it
Heat stays on after drum has stopped
Fixed by these parts
How to fix it
Leaking
Fixed by these parts
How to fix it
Timer Not Working
Fixed by these parts
How to fix it


Keep searches simple. Use keywords, e.g. "leaking", "pump", "broken" or "fit".
- Customer:
- ANTHONY from CHESHIRE, CT
- Parts Used:
- WP3392519
- Difficulty Level:
- Easy
- Total Repair Time:
- 15 - 30 mins
- Tools:
- Nutdriver, Pliers, Screw drivers
Dryer was working, but no heat.
First I unplugged the dryer, then removed the back panel, this exposed most all of the wiring and I could see the heater coils.
Not knowing what the problem was I started looking at the coils and could not see any broken parts.
So then checked the thermal fuse for continuity I removed the two wires from it with a small pair of ... Read more needle nose pliers, it was held in place by two screws, once they were removed the fuse came out easily, I checked continuity with a volt meter placing the meter on X1 Ohms and could not get a reading.
I replaced with a new one and put it all back together the way I took it apart.
Then I plugged it in and it worked first time, I now have warm dry clothes.
Read less
Was this instruction helpful to you?
Thank you for voting!
- Customer:
- Dana from Grassvally, CA
- Parts Used:
- WP3392519
- Difficulty Level:
- A Bit Difficult
- Total Repair Time:
- More than 2 hours
- Tools:
- Screw drivers
No heat but would run otherwise
Cleaning the lint out of the whole machine took quite a bit of time--it was everywhere. Underneath the lint trap was a collection that ultimately ruined the thermal fuse where it restricted the air flow considerably.
Ascertaining the problem was the most time consuming part.
The actual repair was quite simple and did ... Read more n't take but 15-20 minutes.
Ascertaining the problem was the most time consuming part.
The actual repair was quite simple and did ... Read more n't take but 15-20 minutes.
Read less
Was this instruction helpful to you?
Thank you for voting!
- Customer:
- DENNIS from ALTOONA, FL
- Parts Used:
- 4392065
- Difficulty Level:
- A Bit Difficult
- Total Repair Time:
- 1- 2 hours
- Tools:
- Nutdriver, Screw drivers
Broken drive belt
Grow a second set of hands. Always unplug any appliance. Remove lint screen. remove two screws (philips Head). I took a wooden shim lightly tapped w/hammer to pop front of dryer top free. Mine worked on hinges and just flipped back til it rested against the wall. Removed two 5/16 screws inside holding face on carefully raise face section
... Read more
off the support clips at either side on the bottom. Pull drum out (I have the large style drum commercial size [approx.). Clean the inside free of all lint (known to be fire hazard). Sling new belt around drum. Get newly grown set of hands to hold drum in place. Pinch belt to fit between tensioner, lift tensioner and place belt around motor pulley. Spin drum couple times to make certain belt isn't twisted. Reverse dismantle proccess to put back together. Replace all parts that come with kit, you'll feel better knowing you got a new dryer, almost.
Read less
Was this instruction helpful to you?
Thank you for voting!