


Models
>
GSE746RFS2
GSE746RFS2 Gibson Dryer
Jump to:
Find Part by Name
Keep searches simple, eg. "belt" or "pump".
Diagrams for GSE746RFS2
Viewing 6 of 6


Keep searches simple, eg. "belt" or "pump".

$43.95
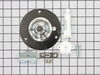
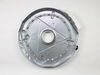
This ball-and-socket style bearing kit is used in your dryer to support the rear of the drum as it tumbles through the dry cycle. The bearing attaches on the inside of the rear panel of the dryer cabi...
In Stock
Order now and your part arrives by Aug 6

$17.55
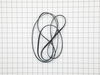
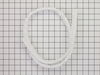
The drum belt, also known as a drive belt, is a rubber piece that wraps around the dryer drum, idler pulley, and motor pulley and is used to make the drum rotate. If you can hear the motor running, bu...
In Stock
Order now and your part arrives by Aug 6

If your dryer is noisy while tumbling, you may need to replace the drum glides. This genuine OEM part is found attached to the front panel of your dryer. It is used to reduce friction and allows the d...
No Longer Available

In Stock
Order now and your part arrives by Aug 6

$10.95
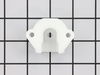
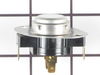
The drum support bearing is an authentic OEM replacement part for your dryer. The bearing is used to support the drum and allow it to rotate smoothly and quietly. If your dryer is excessively noisy wh...
In Stock
Order now and your part arrives by Aug 6

$147.67
If your dryer has little to no heat, there may be an issue with your heating element assembly. The heater element is a genuine OEM part that is found at the back of the dryer. The heating element come...
In Stock
Order now and your part arrives by Aug 6

$63.45
This door catch is an authentic OEM replacement part for your dryer. This part holds the door strike and ensures that the door stays closed while your dryer is running. This prevents hot air or laundr...
In Stock
Order now and your part arrives by Aug 6

$24.15
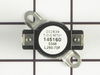
This thermal fuse limiter is used in dryers to monitor the temperature and make sure it does not overheat. The thermal fuse has a limit of 220 degrees Fahrenheit before the heating element and power a...
In Stock
Order now and your part arrives by Aug 6

Special Order

$74.46
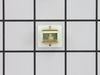
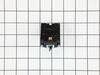
This part is used to start the dryer once you have selected a setting on the timer.
In Stock
Order now and your part arrives by Aug 6

$23.05
This drum bearing bracket is for dryers. Drum bearing bracket holds and supports the drum bearing
In Stock
Order now and your part arrives by Aug 6

$37.35
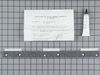
This white dryer lint filter screen collects lint as it passes through the dryer vent.
In Stock
Order now and your part arrives by Aug 6
Common Problems and Symptoms for GSE746RFS2
Viewing 8 of 8Noisy
Fixed by these parts
How to fix it
Marks left on clothes
Fixed by these parts
How to fix it
Door won’t close
Fixed by these parts
How to fix it
Too hot
Fixed by these parts

How to fix it
Drum Not Spinning
Fixed by these parts
How to fix it
Not Heating
Fixed by these parts
How to fix it
Won’t Start
Fixed by these parts
How to fix it
Door Pops Open
Fixed by these parts
How to fix it


Keep searches simple. Use keywords, e.g. "leaking", "pump", "broken" or "fit".
- Customer:
- Cynthia from Lexington, SC
- Parts Used:
- 134503600, 5303937139, 131825900
- Difficulty Level:
- Easy
- Total Repair Time:
- 1- 2 hours
- Tools:
- Pliers, Wrench (Adjustable), Wrench set
Squealing noise
We followed the instructions for the drum glide replacement and changed the belt and drum support bearing piece, cleaned it out too. Works like a charm. Thanks for saving us a bundle.
Was this instruction helpful to you?
Thank you for voting!
- Customer:
- Frank from Boyertown, PA
- Parts Used:
- 5303281153
- Difficulty Level:
- Easy
- Total Repair Time:
- 15 - 30 mins
- Tools:
- Nutdriver, Screw drivers
Loud Squeaking
1. Unplug dryer from outlet
2. Using Lg. flat screwdriver, pry under the front edge of the top and release two spring tabs
3. Lift up top and tilt back out of your way
4. Unscrew two phillips scews on inside of front panel
5. Lift up and out the front panel. Two spring clips at bottom.
6. Rlease tension on drum be ... Read more lt at the motor. Access panel at rear of dryer.
7.Unscrew 3 screws from inside, center rear of drum.
8. Remove drum through the front of the dryer. You may have to spread the sides apart a little bit for it to fit
9. Lift up on the rear drum bearing to remove it from the bearing retainer. ( U shaped plastic socket)
10. unsrew 2 screws and remove the bearing retainer, ground ball. Ball retainer is on outside of dryer.
11. Vacuum everything--duct, blower, lint trap, ect.
12. Intall new bearing retainer and grounding ball, an assistant is helpful at this time, one to hold ball retainer on rear of dryer, one to screw it in from the inside
13. reassemble remainder of parts in reverse order.
Read less
Was this instruction helpful to you?
Thank you for voting!
- Customer:
- Juan Carlos from Weston, FL
- Parts Used:
- 131553900
- Difficulty Level:
- Easy
- Total Repair Time:
- 30 - 60 mins
- Tools:
- Screw drivers
short circuit with a brasier metal support
Disconect the dryer from the main power source.
1) Remove the two screws from the rear / upper panel (below the control panel).
2) Snap the front side using a flat head screw driver.
3) On the inside front, remove two screws (one on each side) from the upper side and snap the door assembly off.
... Read more 4) Remove the rear motor access panel (two screws) and appying tension to the spring remove the belt.
5) Pull the drum upwards (verticaly) unnapping it from the rear wall and remove it horizontally through the front panel.
6) Disconect the four leads to the heating element and remove the four screws from the rear of the dryer and replace the heating element.
Follow the same steps backwards to put the dryer together again.
Read less
Was this instruction helpful to you?
Thank you for voting!