


Models
>
GTD75GCSL0WS
GTD75GCSL0WS General Electric Dryer
Jump to:
Find Part by Name
Keep searches simple, eg. "belt" or "pump".
Diagrams for GTD75GCSL0WS
Viewing 6 of 6


Keep searches simple, eg. "belt" or "pump".

$58.09
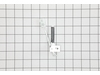
This igniter helps start the burner in your gas dryer, allowing it to produce heat for drying clothes. It’s a reliable replacement for fixing heating issues and restoring proper dryer performance. Eas...
In Stock
Order now and your part arrives by Mar 21

In Stock
Order now and your part arrives by Mar 21

$86.95
This top bearing assembly helps your dryer run quietly and smoothly by supporting the front of the drum. If your dryer is making loud noises or the drum isn?t turning right, this part may need replaci...
In Stock
Order now and your part arrives by Mar 21

In Stock
Order now and your part arrives by Mar 21

$51.45
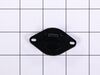
This thermistor monitors dryer temperature to prevent overheating and ensure proper drying. Replace it if your dryer isn’t heating, shuts off early, or shows temperature-related errors. A quick swap r...
In Stock
Order now and your part arrives by Mar 21

In Stock
Order now and your part arrives by Mar 21

In Stock
Order now and your part arrives by Mar 21

In Stock
Order now and your part arrives by Mar 21

Special Order

In Stock
Order now and your part arrives by Mar 21

On Order

Special Order
Questions and Answers
We're sorry, but our Q&A experts are temporarily unavailable.
Please check back later if you still haven't found the answer you need.
Common Problems and Symptoms for GTD75GCSL0WS
Viewing 3 of 3Not Heating
Fixed by these parts

How to fix it
Noisy
Fixed by these parts

How to fix it
Marks left on clothes
Fixed by these parts
How to fix it
Keep searches simple. Use keywords, e.g. "leaking", "pump", "broken" or "fit".
- Customer:
- Michael from HILLIARD, OH
- Parts Used:
- WE10X23891
- Difficulty Level:
- Really Easy
- Total Repair Time:
- 30 - 60 mins
- Tools:
- Screw drivers
Original door was broken. It had to be replaced.
Replacement door came with hinges. Removed four Phillips head screws, removed original door, and replaced it with the new door. Because I needed to move the dryer to allow room to get to the screws, I needed about 15 minutes to complete the project.
Was this instruction helpful to you?
Thank you for voting!
- Customer:
- Steve from Santa Ana, CA
- Parts Used:
- WE04X25996
- Difficulty Level:
- Really Easy
- Total Repair Time:
- 30 - 60 mins
- Tools:
- Screw drivers, Wrench (Adjustable)
No Heat
Removed gas line. removed control panel, removed top, removed front, removed burner, replaced igniter, put back in. paused and played the video. very easy to do. 42 minutes and I had a few beers.
Was this instruction helpful to you?
Thank you for voting!
- Customer:
- John from Austell, GA
- Parts Used:
- WE04X25996
- Difficulty Level:
- Difficult
- Total Repair Time:
- 30 - 60 mins
- Tools:
- Screw drivers, Socket set
Igniter burnt out
The bracket on the part supplied was different than the original. The wire connector was also different. The bracket had to be drilled for a hole to match the original. The connector had to be cut off and the wires soldered together, then tied off to the frame to keep them away from the flame. The repair works like new but not the simple
... Read more
plug and play I was expecting. In all fairness the exact model number was not available, probably since the appliance was 24 years old, so I chose the closest model number with the picture that looked like what I had. Problem solved.
Read less
Was this instruction helpful to you?
Thank you for voting!