


Models
>
HDG857K*129
HDG857K*129 General Electric Dryer
Jump to:
Find Part by Name
Keep searches simple, eg. "belt" or "pump".
Diagrams for HDG857K*129
Viewing 6 of 6


Keep searches simple, eg. "belt" or "pump".

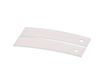
This single drum bearing slide is an OEM approved replacement part for dryers. It can also be known as a bearing drum slide, pad, or glide. The slides attach to the inner most slots on the front beari...
In Stock
Order now and your part arrives by Jul 21

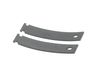
This single drum bearing slide attaches to the outer-most side of the bearing. This part is also sometimes referred to as a drum slide, drum glide, or drum pad. It provides support to the front of the...
In Stock
Order now and your part arrives by Jul 21

$79.09
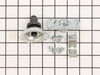
This rear drum bearing kit is a genuine OEM replacement for your dryer. The kit includes a shaft, ground strap, bracket, bearing and seven screws for installation. The bearing supports that back of th...
In Stock
Order now and your part arrives by Jul 21

In Stock
Order now and your part arrives by Jul 21

$21.82
This Genuine OEM door latch is designed for use with a wide range of GE clothes dryers. Constructed from a combination of durable metal and plastic, the latch is mounted onto the dryer frame to secure...
In Stock
Order now and your part arrives by Jul 21

$35.34
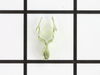
This interlock switch is a genuine OEM part that can be used in a variety of appliances like dishwashers and dryers. The switch is also known as a belt switch and works as a simple on and off mechanis...
In Stock
Order now and your part arrives by Jul 21

$15.26
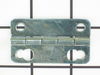
TThe door strike for your dryer is mounted on the dryer frame that the door shuts onto. It fits into the door catch on the door and keeps the door closed. If the door strike is damaged or missing, the...
In Stock
Order now and your part arrives by Jul 21

$37.49
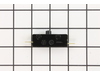
A door switch is a simple on/off mechanism that prohibits the dryer from operating when the door is open.
In Stock
Order now and your part arrives by Jul 21

This 'M' series coil is both a boosting as well as a holding coil. It has three terminals.
On Order

This part is the replacement main valve coil for your dryer. It is black and white in color and has 2 terminals. It is approximately 1 inch long and 1 inch wide. The main valve coil opens the gas valv...
Special Order

$20.72
The adjustable leveling screws on the bottom of your dryer can be screwed in or out to lower or raise the leg level. If one of the leveling screws is stripped, damaged, or missing, you may not be able...
In Stock
Order now and your part arrives by Jul 21

$48.21
Be very careful to not handle the igniter by its gray part. Hold it by its white tip only.
In Stock
Order now and your part arrives by Jul 21
Common Problems and Symptoms for HDG857K*129
Viewing 8 of 8Noisy
Fixed by these parts
How to fix it
Marks left on clothes
Fixed by these parts
How to fix it
Door won’t close
Fixed by these parts
How to fix it
Will Not Start
Fixed by these parts
How to fix it
Drum Not Spinning
Fixed by these parts
How to fix it
Won’t Start
Fixed by these parts

How to fix it
Door Pops Open
Fixed by these parts
How to fix it
Door latch failure
Fixed by these parts
How to fix it


Keep searches simple. Use keywords, e.g. "leaking", "pump", "broken" or "fit".
- Customer:
- Matt from La Belle, MO
- Parts Used:
- WE12X10014
- Difficulty Level:
- A Bit Difficult
- Total Repair Time:
- 15 - 30 mins
- Tools:
- Nutdriver, Screw drivers, Socket set
dryer belt broke
first I took the dryer apart 1st thing i did was unplug the power supply (safety first) then I removed the top of the unit then removed the front cleaned all the lint from the inside of the cabinet I found the proper belt size on part select.com the next day I had my dryer belt delivered (which cost 1/3 the price of the local repair shop
... Read more
price)
then I placed the belt over the dryer drum and made sure it was in the general location it should be I then replaced the front cover and the top. then I removed the rear cover which was held on by six 5/16 sheet metal screws which gave me access to the drive pulley and belt tensioner the belt goes on by going under the tensioner then around the drive pulley
Then i rotated the drum by hand to make sure everything had clearance I then buttend everything up plugged it and started it up it workd fine and I figure Ill get another 8 years out of it
Thank you partselect.com
Read less
Was this instruction helpful to you?
Thank you for voting!
- Customer:
- Joshua from Dallas, TX
- Parts Used:
- WE4M415
- Difficulty Level:
- A Bit Difficult
- Total Repair Time:
- 1- 2 hours
- Tools:
- Pliers, Screw drivers, Socket set
Dryer would not start
The end repair was very simple and took minimal effort. The time and difficulty was all in the testing. I disassembled the dryer and removed the drum and then hard wired each thermo-fuse to determine where the fault was. After test all of those I was stumped. When I opened the door the light would not come on so I assumed it was a pow
... Read more
er fault closer to the source. However after all of my testing I couldn't find anything wrong. I then removed the light bulb and realized it was burned out which led me to the door switch being the fault. I removed the switch and soldered the three wire together and the dryer started right up! All I had to do was order a new $15 part, unsolder the wires and plug them in. Would have been so much simpler if that light bulb hadn't of been burned out causing me to over think my diagnosis. This was my first major appliance repair and I did it with only the help of the parts diagram provided on the website.
Read less
Was this instruction helpful to you?
Thank you for voting!
Dryer would heat initially, but would not heat throughout entire cycle.
-Removed top panel
-Removed right side panel
-Gas coils were held in together under a metal strap
-Removed 2 screws holding strap
-Unplugged 1 wire harness to each coil
-Removed Primary and Holding coil
-Replace with two new coils, replace strap and plug in each harness
-Replace side, then top panel
... Read more >-Under 1 hour job...Took 45 minutes to remove/replace panels and only 5 minutes to replace coils.
-Anyone with a little mechanical ability can save $150 in labor and spend just $50 in parts to fix this problem.
-Questions: Erik at [email protected]
Read less
Was this instruction helpful to you?
Thank you for voting!