


Models
>
PTMN930GMWS0
PTMN930GMWS0 General Electric Dryer
Jump to:
Find Part by Name
Keep searches simple, eg. "belt" or "pump".
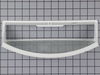
Diagrams for PTMN930GMWS0
Viewing 6 of 6


Keep searches simple, eg. "belt" or "pump".

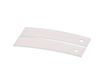
This single drum bearing slide is an OEM approved replacement part for dryers. It can also be known as a bearing drum slide, pad, or glide. The slides attach to the inner most slots on the front beari...
In Stock
Order now and your part arrives by Jul 25

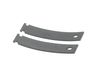
This single drum bearing slide attaches to the outer-most side of the bearing. This part is also sometimes referred to as a drum slide, drum glide, or drum pad. It provides support to the front of the...
In Stock
Order now and your part arrives by Jul 25

In Stock
Order now and your part arrives by Jul 25

$54.95
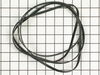
This 89.5-inch drive belt is for dryers. It has a 4-rib design on the inside for a better grip. If comparing the size of your current belt to the new one, keep in mind that a small amount of stretchin...
In Stock
Order now and your part arrives by Jul 25

$74.95
The lint filter is an important component of your dryer, as it traps lint and other debris from entering the dryer vents, where they can become a fire hazard. If your lint filter has become damaged or...
In Stock
Order now and your part arrives by Jul 25

$20.85
If the lightbulb inside your dryer drum has burned out, this is an authentic OEM replacement. It is a 10W, 120V bulb that is sold individually. The bulb turns on when the dryer door is open and should...
In Stock
Order now and your part arrives by Jul 25

$33.20
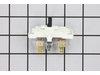
This push-to-start switch is a genuine OEM part and is used to activate your dryer. If your dryer will not start, or will only start if the switch is pushed down, or the timer knob is not engaging wit...
On Order

$15.26
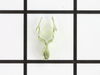
TThe door strike for your dryer is mounted on the dryer frame that the door shuts onto. It fits into the door catch on the door and keeps the door closed. If the door strike is damaged or missing, the...
In Stock
Order now and your part arrives by Jul 25

$37.49
A door switch is a simple on/off mechanism that prohibits the dryer from operating when the door is open.
In Stock
Order now and your part arrives by Jul 25

$69.95
This igniter helps start the burner in your gas dryer, allowing it to produce heat for drying clothes. It’s a reliable replacement for fixing heating issues and restoring proper dryer performance. Eas...
In Stock
Order now and your part arrives by Jul 25

$16.35
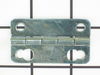
This dryer door strike plate helps secure the door in the closed position by properly engaging with the door latch during operation. Designed for reliable alignment and durability, it is commonly repl...
In Stock
Order now and your part arrives by Jul 25

In Stock
Order now and your part arrives by Jul 25
Common Problems and Symptoms for PTMN930GMWS0
Viewing 11 of 11Noisy
Fixed by these parts
How to fix it
Marks left on clothes
Fixed by these parts
How to fix it
Drum Not Spinning
Fixed by these parts
How to fix it
Won’t Start
Fixed by these parts

How to fix it
Door won’t close
Fixed by these parts

How to fix it
Not Heating
Fixed by these parts
How to fix it
Touchpad does not respond
Fixed by these parts
How to fix it
Will Not Start
Fixed by these parts
How to fix it
Too hot
Fixed by these parts
How to fix it
Door Pops Open
Fixed by these parts
How to fix it
Heat stays on after drum has stopped
Fixed by these parts
How to fix it


Keep searches simple. Use keywords, e.g. "leaking", "pump", "broken" or "fit".
- Customer:
- Adrian from Middletown, MD
- Parts Used:
- WE03X29897
- Difficulty Level:
- A Bit Difficult
- Total Repair Time:
- 30 - 60 mins
- Tools:
- Screw drivers
Drum belt broke
Removed the front Dryer panel. Left drum in place and lifted it up slightly to get access to motor drive. Slipped belt in place and put panel back on.
This was a first attempt ever at fixing an appliance and it was no big deal.
This was a first attempt ever at fixing an appliance and it was no big deal.
Was this instruction helpful to you?
Thank you for voting!
- Customer:
- Gary L. from Freeport, IL
- Parts Used:
- WE04X25996, WE4X448
- Difficulty Level:
- A Bit Difficult
- Total Repair Time:
- 1- 2 hours
- Tools:
- Screw drivers
The dryer drum turned ok, but the gas heat did not start.
First I found and watched three videos on how to open the dryer and replace the igniter.
Then I opened the dryer, but I did not remove the belt as suggested in the video, and then I removed the ignitor and flame detecter as the videos had shown.
I got on-line and ordered the new parts from PartsSelect in the afternoon and had t ... Read more hem in my hands the next morning by 9:30 am.
I installed the new parts and everything worked fine again. You must be very careful with the igniter to not touch it with hands or anything else. I practiced puting in the old parts first.
Read less
Was this instruction helpful to you?
Thank you for voting!
- Customer:
- Deborah from Glenburn, ME
- Parts Used:
- WE3M26, WE03X37318
- Difficulty Level:
- Really Easy
- Total Repair Time:
- 15 - 30 mins
- Tools:
- Screw drivers
My clothes were being "bitten", discolored with blackish smudges, and buttons eaten off clothing
First I really had to hunt for the proper way to get my dryer drum accessible for the repair. With my model it was as simple as removing two screws to take off the top panel (located by opening the dryer door), and then removing two other screws inside the front panel at the top. The front will then be able to swing to the left side (th
... Read more
e door switch wires are on this side for this model). Simply remove the drum bearing by gently pulling it off. My slides were in such poor shape for less than 4 years old!! One of them had completely disintegrated! These slides have a small whole on one end which attaches to a small nub at the edge of a slot while the other side just slid into a slot at the other end. No need to even take out the drum!!
The hardest part of the job was to get into the dryer!
The hardest part of the job was to get into the dryer!
Read less
Was this instruction helpful to you?
Thank you for voting!