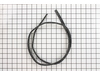
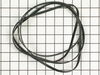
This 89.5-inch drive belt is for dryers. It has a 4-rib design on the inside for a better grip. If comparing the size of your current belt to the new one, keep in mind that a small amount of stretchin...
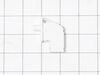
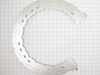
This is a duct felt seal for a dryer. The duct felt seal allows the front-load dryer drum to glide smoothly on the front panel. Your dryer will not function properly if the drum felt seal is compromis...
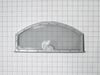
This Lint Filter is a genuine OEM part for your clothes dryer. The Lint Filter can be used with both electric and gas models. Proper air flow is essential to the operation of the dryer, and the lint f...
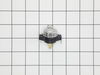
If the lightbulb inside your dryer drum has burned out, this is an authentic OEM replacement. It is a 10W, 120V bulb that is sold individually. The bulb turns on when the dryer door is open and should...
f your dryer is excessively noisy when operating, is not tumbling, or is leaving marks on your laundry, it may be time to replace the drum glides. The drum glide bearing is a genuine OEM part for your...
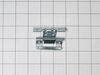
This is a genuine OEM replacement timer knob for your dryer. It is white in color, fits onto a D-shaped shaft, and is sold individually. The knob assembly includes the metal clip insert that helps to ...
If your dryer is making a squealing, metal-on-metal noise you may need to replace your slide bearings. These slide bearings are genuine OEM replacement parts that measure approximately 3 inches in len...
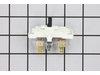
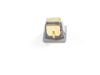
This push-to-start switch is a genuine OEM part and is used to activate your dryer. If your dryer will not start, or will only start if the switch is pushed down, or the timer knob is not engaging wit...
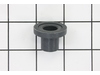
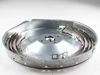
This rear drum bearing sleeve supports the dryer drum and helps it rotate smoothly. It’s a common fix for noisy dryers or drums that wobble or stop turning. Compatible with select GE and Hotpoint mode...
This is a replacement O-ring for the drum bearing retainer on your dryer. The drum bearing is found at the back of the dryer drum. The O-ring is designed to create a seal on the drum bearing. The O-r...
Ask our experts a question about this part and we'll get back to you as soon as possible!
2 questions answered by our experts.
< Prev
1
Next >
Sort by:
Search filter:
Clear Filter
Your search term must have 3 or more characters.
Keep searches simple. Use keywords, e.g. "leaking", "pump", "broken" or "fit".
Sorry, we couldn't find any existing answers that matched. Try using some different or simpler keywords, or submit your new question by using the "Ask a Question" button above!
James
June 6, 2023
I my dryer has just started turning itself off after a few minutes of drying. It's also intermittent. Sometimes I get a complete cycle, sometimes it just goes off. I have to open and close the door and hit the start button to get it to reingage. Sometimes it's been 5-6 times before it will actually start.
For model number GTD42EASJ2WW
Hello James, thank you for your query. You may need to replace the door switch, part number FIX12722948, to fix the issue. It prevents the dryer from running when the door is open. If this is faulty, your dryer may not start. We hope this helps, good luck with this repair!
Removed the front Dryer panel. Left drum in place and lifted it up slightly to get access to motor drive. Slipped belt in place and put panel back on. This was a first attempt ever at fixing an appliance and it was no big deal.
I had to take most of the dryer apart because there is no rear access to the motor. It turned out to be easy to dissasembel the dryer. The only problem that I had was that I could not figure out how to route the belt around the motor and the idol pullies. I could not find anywhere that gave instructions on how to properly tension the belt
... Read more. I finally figured out that the idoler pulley needs to be locked in place on the right side of the engie mount. Then the belt needs to be routed over idoler pulley and under the motor pulley. Finally release the idoler pully from the locked postion to put tension on the belt. It really turned out to be pretty easy.
This part arrived at our house two days after I ordered it. I was stunned by how quickly it arrived.
Our dryer was making a very annoying squeaking/rubbing noise while drying and it became worse as the outside temps dropped (it's winter)...colder air cooling the exhaust line, causing metal in dryer to contract more.
... Read more>I called an appliance repair service and they said, "Honestly, your money is going to be better spent to just buy a new dryer. The bearings on these are a pain to replace."
Yeah, right.
I've never taken apart a dryer, but it took me less than 45 minutes to complete this repair and our dryer is back to normal. Total cost was $18, including shipping. A $300 savings versus buying a new dryer.
There is another description of the process for this part so I won't repeat it all.
I did it a little differently than most, namely I did not remove the dryer drum. I simply pulled it out about six inches (make sure and slide belt back as you inch out the drum). But first, unplug the dryer, then remove the top, then the front.
A Philips screwdriver will quickly remove the top of the dryer (two screws on inside front, where door closes) and the front face (two screws at top of front, inside face). Lift the front up about an inch and it is free. I had to disconnect a couple wires, just make sure you mark before you disconnect them.
With that done, the drum will pull straight toward you (out). Make sure and support the weight of the drum as you slide it out. I found no need to remove the drum.
At the rear inside of our drum, there are three Torx screws that hold the bearing assembly on. I have a pretty long reach so I just removed two of the Torx screws, then reached around the back of the drum while removing the third screw, to keep the bearing assembly from falling onto the floor behind the back of the drum.
This plastic bearing is held to the bearing shaft by a little o-ring. Just pull the o-ring off, slide off the old bearing, slide the new bearing on and replace the o-ring (if yours is broken, any home store will have one that will work as a replacement in their faucet repair department).
Reattach the bearing housing to the drum with the Torx screws (get all three started before you tighten any of them), slide the drum back in - make sure you slide the belt as you move the drum back in and support the weight of the drum so you don't bash the bearing assembly into the back of the dryer.
You're doing this part blind, but in a few seconds, you can guide the bearing back into the hole in the back wall of the dryer. It just slides into the hole, nothing fancy.
Put the front of the dryer back on. Then replace the top (I had to remove the five screws on top of the dial panel to give it some flex so the top would pop back into place without stressing the dial panel), plug the dryer back in, and fire it up.
45 minutes after this part arrived at our home, our dryer problems were gone. Now that I've done one, I could probably do it in 20 minutes the next time (it's that simple/easy). And we didn't need a new dryer. Makes me think I should have the appliance guy who told me we needed a new dryer to direct all of these "pain in the fanny" bearing replacements to me because I could charge someone $50 total for the repair and make good money.
Hope all this babble helps someone else who doesn't need a new dryer.


 – Part Number: WE03X37319")

 – Part Number: WE03X37320")


")
")


