


Models
>
GTDL210ED1WW
GTDL210ED1WW General Electric Dryer
Jump to:
Find Part by Name
Keep searches simple, eg. "belt" or "pump".
Diagrams for GTDL210ED1WW
Viewing 4 of 4


Manuals & Guides for GTDL210ED1WW
Click to downloadKeep searches simple, eg. "belt" or "pump".

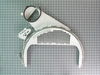
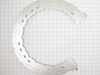
This single drum bearing slide attaches to the outer-most side of the bearing. This part is also sometimes referred to as a drum slide, drum glide, or drum pad. It provides support to the front of the...
In Stock
Order now and your part arrives by Jul 23

$54.95
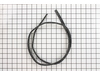
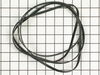
This 89.5-inch drive belt is for dryers. It has a 4-rib design on the inside for a better grip. If comparing the size of your current belt to the new one, keep in mind that a small amount of stretchin...
In Stock
Order now and your part arrives by Jul 23

$41.75
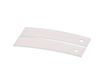
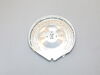
This is a duct felt seal for a dryer. The duct felt seal allows the front-load dryer drum to glide smoothly on the front panel. Your dryer will not function properly if the drum felt seal is compromis...
In Stock
Order now and your part arrives by Jul 23

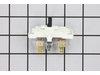
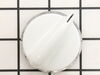
This knob and clip set is an OEM replacement part for your washer or dryer timer. It is common for this plastic knob to break around the shaft, or for the retainer clip inside the knob to go missing, ...
In Stock
Order now and your part arrives by Jul 23

$74.95
The lint filter is an important component of your dryer, as it traps lint and other debris from entering the dryer vents, where they can become a fire hazard. If your lint filter has become damaged or...
In Stock
Order now and your part arrives by Jul 23

$20.85
If the lightbulb inside your dryer drum has burned out, this is an authentic OEM replacement. It is a 10W, 120V bulb that is sold individually. The bulb turns on when the dryer door is open and should...
In Stock
Order now and your part arrives by Jul 23

$79.09
This rear drum bearing kit is a genuine OEM replacement for your dryer. The kit includes a shaft, ground strap, bracket, bearing and seven screws for installation. The bearing supports that back of th...
In Stock
Order now and your part arrives by Jul 23

In Stock
Order now and your part arrives by Jul 23

$33.20
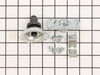
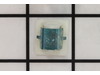
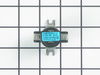
This push-to-start switch is a genuine OEM part and is used to activate your dryer. If your dryer will not start, or will only start if the switch is pushed down, or the timer knob is not engaging wit...
On Order

$86.64
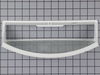
This lint chute assembly helps guide airflow from the dryer drum to the blower wheel and holds the lint filter. It fits GE and Hotpoint dryers and helps improve drying performance while reducing the r...
In Stock
Order now and your part arrives by Jul 23

$21.82
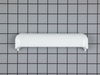
This Genuine OEM door latch is designed for use with a wide range of GE clothes dryers. Constructed from a combination of durable metal and plastic, the latch is mounted onto the dryer frame to secure...
In Stock
Order now and your part arrives by Jul 23

$35.95
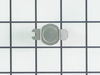
This rear drum bearing sleeve supports the dryer drum and helps it rotate smoothly. It’s a common fix for noisy dryers or drums that wobble or stop turning. Compatible with select GE and Hotpoint mode...
In Stock
Order now and your part arrives by Jul 23
Common Problems and Symptoms for GTDL210ED1WW
Viewing 12 of 12Noisy
Fixed by these parts
How to fix it
Marks left on clothes
Fixed by these parts
How to fix it
Door won’t close
Fixed by these parts

How to fix it
Drum Not Spinning
Fixed by these parts
How to fix it
Won’t Start
Fixed by these parts
How to fix it
Too hot
Fixed by these parts
How to fix it
Not Heating
Fixed by these parts
How to fix it
Will Not Start
Fixed by these parts
How to fix it
Door Pops Open
Fixed by these parts
How to fix it
Touchpad does not respond
Fixed by these parts
How to fix it
Timer Not Working
Fixed by these parts
How to fix it
Heat stays on after drum has stopped
Fixed by these parts
How to fix it


Keep searches simple. Use keywords, e.g. "leaking", "pump", "broken" or "fit".
- Customer:
- Irina from Englewood, NJ
- Parts Used:
- WE01X20378
- Difficulty Level:
- Really Easy
- Total Repair Time:
- Less than 15 mins
The original Knob just fell apart
The repair was so easy when I got the part, I did it myself without any help in 5 seconds!
Was this instruction helpful to you?
Thank you for voting!
- Customer:
- Adrian from Middletown, MD
- Parts Used:
- WE03X29897
- Difficulty Level:
- A Bit Difficult
- Total Repair Time:
- 30 - 60 mins
- Tools:
- Screw drivers
Drum belt broke
Removed the front Dryer panel. Left drum in place and lifted it up slightly to get access to motor drive. Slipped belt in place and put panel back on.
This was a first attempt ever at fixing an appliance and it was no big deal.
This was a first attempt ever at fixing an appliance and it was no big deal.
Was this instruction helpful to you?
Thank you for voting!
- Customer:
- Chad from Gilbert, SC
- Parts Used:
- WE09X27634, WE14X25080
- Difficulty Level:
- Easy
- Total Repair Time:
- 30 - 60 mins
- Tools:
- Screw drivers
original duct was broken
Dear PartSelect.com,
My repair went off without a hitch.
2 screws removed to remove top.
4 screws removed from inside to remove front panel w/ door.
4 screws removed from top of control panel, loosed and popped top right off.
Flathead screwdriver to pop off old plastic panel.
Removed old wire chas ... Read more e (plastic, approx 3” long).
Removed built-up lint, wiped down area for new duct.
Snapped new duct on.
Dryer works like new!!
Took about 35 minutes, most of time spent cleaning up inside of dryer from lint due to broken duct.
One problem was that salesperson sold me on a new felt strip to go with new duct. That felt comes already installed on the new duct so I did not need it. Cost me a few extra dollars I did not need to spend.
Other than that, easy ordering, fast shipment, and parts are as close to original as possible.
Thanks for all your help!
Read less
Was this instruction helpful to you?
Thank you for voting!