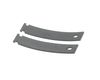
This single drum bearing slide is an OEM approved replacement part for dryers. It can also be known as a bearing drum slide, pad, or glide. The slides attach to the inner most slots on the front beari...
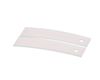
This single drum bearing slide attaches to the outer-most side of the bearing. This part is also sometimes referred to as a drum slide, drum glide, or drum pad. It provides support to the front of the...
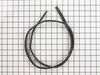
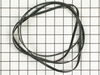
This 89.5-inch drive belt is for dryers. It has a 4-rib design on the inside for a better grip. If comparing the size of your current belt to the new one, keep in mind that a small amount of stretchin...
This is a duct felt seal for a dryer. The duct felt seal allows the front-load dryer drum to glide smoothly on the front panel. Your dryer will not function properly if the drum felt seal is compromis...
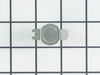
If the timer knob has broken off your dryer, it is important to replace it so that you are able to properly use your appliance. The plastic can become brittle with age, and with regular use the knob c...
The lint filter is an important component of your dryer, as it traps lint and other debris from entering the dryer vents, where they can become a fire hazard. If your lint filter has become damaged or...
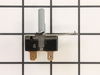
This is a genuine OEM rotary start switch for your dryer. If your dryer will not start, turns off too soon, or the timer will not advance, it may be time to replace the start switch. Replacing this pa...
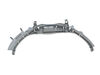
This rear drum bearing kit is a genuine OEM replacement for your dryer. The kit includes a shaft, ground strap, bracket, bearing and seven screws for installation. The bearing supports that back of th...
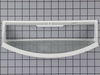
This lint chute assembly helps guide airflow from the dryer drum to the blower wheel and holds the lint filter. It fits GE and Hotpoint dryers and helps improve drying performance while reducing the r...
In Stock
Order now and your part arrives by Jul 3
Questions and Answers
Ask our experts a question about this part and we'll get back to you as soon as possible!
2 questions answered by our experts.
< Prev
1
Next >
Sort by:
Search filter:
Clear Filter
Your search term must have 3 or more characters.
Keep searches simple. Use keywords, e.g. "leaking", "pump", "broken" or "fit".
Sorry, we couldn't find any existing answers that matched. Try using some different or simpler keywords, or submit your new question by using the "Ask a Question" button above!
Bruce
February 24, 2024
Replaced start switch but did not fix the problem. When you hit the start switch the dryer drum turns and heating element heats up but as soon as I release the start switch the drum and element turn off. Any ideas on problem? Thank you
For model number DBXR463ED1WW
Hi Bruce, thank you for reaching out. Based on the description, we would recommend checking the wire connections associated with the start switch. If the wire connection looks good, then you may have a defective timer, part number FIX267977. You may need to replace the timer to fix the issue. We hope this solves your problem!
Hi David,
Thank you for your question. If your dryer is shutting off too soon, check and make sure that both the lint filter and the entire length of the venting tube is free of lint. If it is full of lint, this can cause the dryer to overheat and shut off. You should also check the dryer thermostats and the heating element. We hope this helps!
It was pretty easy. After already taking apart the dryer to install a new belt I knew exactly my plan of action. I removed the two screws that hold the top panel of the dryer to the front panel. I then removed the top panel and removed the screws that hold the front to each side panel. I than pulled the front away from the cabinet and
... Read more drum. I put the new slides in place and installed a new felt strip. I put it back together and that was that. Very easy.
Basically, I followed the same steps a prior person posted. 1.Removed the two screws inside the door, on the top part of the opening. 2.Lifted up and removed the top. 3.Removed two screws holding the front panel in place. 4.Held up the drum while removing the front panel. I carefully turned the panel so I could get at
... Read morethe drum bearing without pulling the wires connecting it to the front panel. The wires are not very long, so I had to be careful not to pull on them. 5.Carefully pried off the old drum bearing, using just my hands. It was fairly tight, and popped out just as I started to worry if I was putting too much pressure on it. 6.Checked to see how the old felt was installed, then I pulled out the old felt. 7.Inserted the new felt, being careful to insert one end into a slot the same way the original was installed. 8.Inserted the new slides into the new drum bearing. The gray slides went in at the eleven and one o'clock positions, the white slides went in at ten and two o'clock. 9.Removed a surplus plastic piece from the new drum bearing (where the light comes through). 10.Inserted the new drum bearing, putting the bottom tabs in first, then pivoting it into place. I squeezed it into place to make sure it was tight. 11.Lifted up the drum and put the front panel back on. 12.Screwed the front panel back on, using the two screws. 13.Carefully put the top back on. 14.Screwed in the two screws inside the front door to fasten down the top. That was it! I started up the dryer and it worked fine. No more squeaking. About the only thing odd about the repair is why PartSelect sells each slide separately (i.e., I had to order 2 white slides and 2 gray slides). I can't imagine replacing just one, so why not package them in pairs, or maybe even all four in one package. At any rate, the repair was easy, and a lot cheaper than having someone come out to fix it.
First of all, unplug the dryer. I removed the two screws on the front of the cabinet to remove the top. I then took out the screws to remove the dial panel. Release the belt for the drum through the access hole in the rear of the dryer. Remove the front cover and pull the drum assembly out.
Remove the element disc from the
... Read more rear of the housing, take note of the the wireing placement. Replace disc and reverse order of disassembly.
This job was easy for me as I am a tinkerer by nature. The hardest part of the whole job was waiting on the part, which by the way was ordered on a Sunday evening and I had the replacement in my hands and back in the dryer running by 1:00 PM on the following Tuesday!
I book marked this website and WILL refer it to others who simply need a repair, not a costly new appliance!