


Models
>
VTD56GASV0WB
VTD56GASV0WB General Electric Dryer
Jump to:
Find Part by Name
Keep searches simple, eg. "belt" or "pump".
Diagrams for VTD56GASV0WB
Viewing 7 of 7


Keep searches simple, eg. "belt" or "pump".

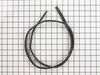
$54.12
This 89.5-inch drive belt is for dryers. It has a 4-rib design on the inside for a better grip. If comparing the size of your current belt to the new one, keep in mind that a small amount of stretchin...
In Stock
Order now and your part arrives by Apr 6

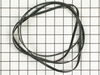
$43.55
This is a duct felt seal for a dryer. The duct felt seal allows the front-load dryer drum to glide smoothly on the front panel. Your dryer will not function properly if the drum felt seal is compromis...
In Stock
Order now and your part arrives by Apr 6
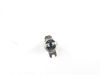
 – Part Number: WE03X37320")
$26.19
If your dryer is making a squealing, metal-on-metal noise you may need to replace your slide bearings. These slide bearings are genuine OEM replacement parts that measure approximately 3 inches in len...
In Stock
Order now and your part arrives by Apr 6

In Stock
Order now and your part arrives by Apr 6

In Stock
Order now and your part arrives by Apr 6

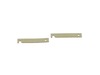
$46.07
This front drum support kit helps your dryer drum glide smoothly and stay aligned during use. It’s located near the front opening and supports the drum as it spins. Worn slides can cause noise and red...
In Stock
Order now and your part arrives by Apr 6

In Stock
Order now and your part arrives by Apr 6

In Stock
Order now and your part arrives by Apr 6

In Stock
Order now and your part arrives by Apr 6

In Stock
Order now and your part arrives by Apr 6

In Stock
Order now and your part arrives by Apr 6

In Stock
Order now and your part arrives by Apr 6
Questions and Answers
We're sorry, but our Q&A experts are temporarily unavailable.
Please check back later if you still haven't found the answer you need.
Common Problems and Symptoms for VTD56GASV0WB
Viewing 8 of 8Noisy
Fixed by these parts
How to fix it
Drum Not Spinning
Fixed by these parts
How to fix it
Marks left on clothes
Fixed by these parts

How to fix it
Won’t Start
Fixed by these parts
How to fix it
Not Heating
Fixed by these parts
How to fix it
Too hot
Fixed by these parts
How to fix it
Door won’t close
Fixed by these parts

How to fix it
Heat stays on after drum has stopped
Fixed by these parts
How to fix it

")


Keep searches simple. Use keywords, e.g. "leaking", "pump", "broken" or "fit".
- Customer:
- Adrian from Middletown, MD
- Parts Used:
- WE03X29897
- Difficulty Level:
- A Bit Difficult
- Total Repair Time:
- 30 - 60 mins
- Tools:
- Screw drivers
Drum belt broke
Removed the front Dryer panel. Left drum in place and lifted it up slightly to get access to motor drive. Slipped belt in place and put panel back on.
This was a first attempt ever at fixing an appliance and it was no big deal.
This was a first attempt ever at fixing an appliance and it was no big deal.
Was this instruction helpful to you?
Thank you for voting!
- Customer:
- Richard from Ashton, MD
- Parts Used:
- WE03X29897
- Difficulty Level:
- Easy
- Total Repair Time:
- 1- 2 hours
- Tools:
- Nutdriver, Screw drivers
Broken Dryer Belt
I had to take most of the dryer apart because there is no rear access to the motor. It turned out to be easy to dissasembel the dryer. The only problem that I had was that I could not figure out how to route the belt around the motor and the idol pullies. I could not find anywhere that gave instructions on how to properly tension the belt
... Read more
. I finally figured out that the idoler pulley needs to be locked in place on the right side of the engie mount. Then the belt needs to be routed over idoler pulley and under the motor pulley. Finally release the idoler pully from the locked postion to put tension on the belt. It really turned out to be pretty easy.
Read less
Was this instruction helpful to you?
Thank you for voting!
- Customer:
- Christopher from Miami, FL
- Parts Used:
- WE03X29897
- Difficulty Level:
- Easy
- Total Repair Time:
- 15 - 30 mins
- Tools:
- Screw drivers, Wrench (Adjustable)
dryer cylinder wouldn't turn
Pryed off the top with a flat head screwdriver and removed the 2 screws holding the front panel to the sides. Then lifted the front panel off of the bottom brackets. Belt fit perfectly and followed the provided instructions to loop it around the motor and pulley. PartSelect got the part to me within a couple of days and the repair was a
... Read more
snap.
Read less
Was this instruction helpful to you?
Thank you for voting!