


Models
>
GTR12BAXLWW
GTR12BAXLWW General Electric Dryer
Jump to:
Find Part by Name
Keep searches simple, eg. "belt" or "pump".
Diagrams for GTR12BAXLWW
Viewing 5 of 5


Keep searches simple, eg. "belt" or "pump".

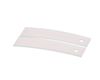
This single drum bearing slide is an OEM approved replacement part for dryers. It can also be known as a bearing drum slide, pad, or glide. The slides attach to the inner most slots on the front beari...
In Stock
Order now and your part arrives by Apr 11

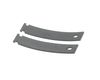
This single drum bearing slide attaches to the outer-most side of the bearing. This part is also sometimes referred to as a drum slide, drum glide, or drum pad. It provides support to the front of the...
In Stock
Order now and your part arrives by Apr 11

$54.12
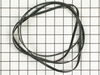
This 89.5-inch drive belt is for dryers. It has a 4-rib design on the inside for a better grip. If comparing the size of your current belt to the new one, keep in mind that a small amount of stretchin...
In Stock
Order now and your part arrives by Apr 11

$43.92
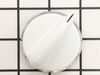
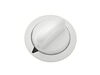
If the timer knob has broken off your dryer, it is important to replace it so that you are able to properly use your appliance. The plastic can become brittle with age, and with regular use the knob c...
In Stock
Order now and your part arrives by Apr 11

This knob and clip set is an OEM replacement part for your washer or dryer timer. It is common for this plastic knob to break around the shaft, or for the retainer clip inside the knob to go missing, ...
In Stock
Order now and your part arrives by Apr 11

$76.42
This is an evaporator fan motor, located in the freezer compartment. It is sold as a single unit. It is responsible for moving air over the evaporator coils as the compressor is running. When this par...
In Stock
Order now and your part arrives by Apr 11

$64.74
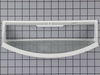
The lint filter is an important component of your dryer, as it traps lint and other debris from entering the dryer vents, where they can become a fire hazard. If your lint filter has become damaged or...
In Stock
Order now and your part arrives by Apr 11

$14.16
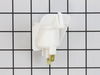
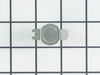
The evaporator fan grommet is used to provide a cushion between the fan motor and the motor mounting bracket in your freezer. This genuine OEM part is about one inch in diameter and is red in color. I...
In Stock
Order now and your part arrives by Apr 11

$34.39
This fixed shelf is made of white plastic, approximately 24 inches wide, and fastens to your fridge door to hold items in place. Regular wear and tear can cause the shelf bar to become damaged over ti...
In Stock
Order now and your part arrives by Apr 11

$25.18
If the lightbulb inside your dryer drum has burned out, this is an authentic OEM replacement. It is a 10W, 120V bulb that is sold individually. The bulb turns on when the dryer door is open and should...
In Stock
Order now and your part arrives by Apr 11

In Stock
Order now and your part arrives by Apr 11

$78.55
This is a genuine OEM replacement shelf frame for the vegetable drawer in your refrigerator. Please note that this part is just the white plastic frame, the glass shelf and crisper drawers can be purc...
In Stock
Order now and your part arrives by Apr 11
Questions and Answers
We're sorry, but our Q&A experts are temporarily unavailable.
Please check back later if you still haven't found the answer you need.
Common Problems and Symptoms for GTR12BAXLWW
Viewing 25 of 25Noisy
Fixed by these parts

How to fix it
Marks left on clothes
Fixed by these parts

How to fix it
Light not working
Fixed by these parts

How to fix it
Door won’t close
Fixed by these parts


How to fix it
Fridge too warm
Fixed by these parts


How to fix it
Drum Not Spinning
Fixed by these parts
How to fix it
Will Not Start
Fixed by these parts

How to fix it
Won’t Start
Fixed by these parts

How to fix it
Freezer section too warm
Fixed by these parts


How to fix it
Too hot
Fixed by these parts

How to fix it
Fridge too cold
Fixed by these parts

How to fix it
Freezer not defrosting
Fixed by these parts

How to fix it
Timer Not Working
Fixed by these parts

How to fix it
Door won’t open or close
Fixed by these parts


How to fix it
Clicking sound
Fixed by these parts


How to fix it
Fridge and Freezer are too warm
Fixed by these parts
How to fix it
Not Heating
Fixed by these parts

How to fix it
Fridge runs too long
Fixed by these parts
How to fix it
Door Pops Open
Fixed by these parts
How to fix it
Touchpad does not respond
Fixed by these parts
How to fix it
Frost buildup
Fixed by these parts
How to fix it
Too warm
Fixed by these parts
How to fix it
Door latch failure
Fixed by these parts
How to fix it
Won’t start
Fixed by these parts
How to fix it
Heat stays on after drum has stopped
Fixed by these parts
How to fix it


Keep searches simple. Use keywords, e.g. "leaking", "pump", "broken" or "fit".
- Customer:
- Daniel from Chantilly, VA
- Parts Used:
- WE01X20378, WE1M654
- Difficulty Level:
- Easy
- Total Repair Time:
- Less than 15 mins
Knob broke
Pulled off old knob and aligned new knob and pushed on. Videos sent with order was very clear and great customer service tool.
Was this instruction helpful to you?
Thank you for voting!
- Customer:
- Irina from Englewood, NJ
- Parts Used:
- WE01X20378
- Difficulty Level:
- Really Easy
- Total Repair Time:
- Less than 15 mins
The original Knob just fell apart
The repair was so easy when I got the part, I did it myself without any help in 5 seconds!
Was this instruction helpful to you?
Thank you for voting!
- Customer:
- Luis from College Station, TX
- Parts Used:
- WR60X31522
- Difficulty Level:
- Really Easy
- Total Repair Time:
- 15 - 30 mins
- Tools:
- Screw drivers, Socket set
Freezer Fan
I removed two srews from the back panel inside fthe reezer compartment and the two that hold the air manifold/baffle? and pulled the baffle out. Then, I removed the two srews that hold the front part of the fan bracket behind the baffle and the back panel came out easily. Two more screws and one quick connect plug attached to the fan and
... Read more
I was done with removal. Insallation was even quicker, I slid the original fan right off the old motor and slid it on the new motor's shaft. Piece of cake! Thanks Partselect.
Read less
Was this instruction helpful to you?
Thank you for voting!