


Models
>
LCE756BS8
LCE756BS8 Frigidaire Dryer
Jump to:
Find Part by Name
Keep searches simple, eg. "belt" or "pump".
Diagrams for LCE756BS8
Viewing 6 of 6


Keep searches simple, eg. "belt" or "pump".

$10.45
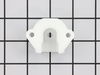
The drum support bearing is an authentic OEM replacement part for your dryer. The bearing is used to support the drum and allow it to rotate smoothly and quietly. If your dryer is excessively noisy wh...
In Stock
Order now and your part arrives by Mar 26

In Stock
Order now and your part arrives by Mar 26

$23.05
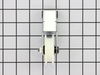
If your washer drum is not spinning, there may be an issue with your drive belt. The drive belt wraps around the motor pulley and helps the basket to spin. Other signs there are issues with the belt i...
In Stock
Order now and your part arrives by Mar 26

$39.09
This dryer lint screen is for laundry centers.
Dryer lint screen captures lint and debris from the exhaust air flowing from the dryer.
Follow the instructions in the owner's manual when installing this part.
In Stock
Order now and your part arrives by Mar 26

$12.55
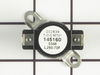
This thermal fuse limiter is used in dryers to monitor the temperature and make sure it does not overheat. The thermal fuse has a limit of 220 degrees Fahrenheit before the heating element and power a...
In Stock
Order now and your part arrives by Mar 26

In Stock
Order now and your part arrives by Mar 26

$22.00
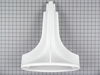
This drum bearing bracket is for dryers. Drum bearing bracket holds and supports the drum bearing
In Stock
Order now and your part arrives by Mar 26

$52.99
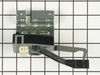
The two-terminal high limit thermostat has a limit of 260 degrees Fahrenheit and acts as a safety mechanism that keeps the dryer from overheating. The thermostat will cut out when the internal dryer t...
In Stock
Order now and your part arrives by Mar 26

In Stock
Order now and your part arrives by Mar 26

In Stock
Order now and your part arrives by Mar 26


$24.10
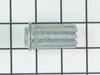
This is a screw and it is used with a variety of home appliances. It is less than 1/2 an inch long, and is #8-18 x 3/8. This part is a pan head, sheet metal, screw. It is made of metal.
In Stock
Order now and your part arrives by Mar 26
Questions and Answers
We're sorry, but our Q&A experts are temporarily unavailable.
Please check back later if you still haven't found the answer you need.
Common Problems and Symptoms for LCE756BS8
Viewing 14 of 14Noisy
Fixed by these parts


How to fix it
Burning smell
Fixed by these parts

How to fix it
Will not agitate
Fixed by these parts
How to fix it
Too hot
Fixed by these parts

How to fix it
Will not drain
Fixed by these parts
How to fix it
Not Heating
Fixed by these parts

How to fix it
Drum Not Spinning
Fixed by these parts
How to fix it
Spins slowly
Fixed by these parts
How to fix it
Marks left on clothes
Fixed by these parts
How to fix it
Won’t Start
Fixed by these parts
How to fix it
Will Not Start
Fixed by these parts
How to fix it
Leaking
Fixed by these parts

How to fix it
Door won’t close
Fixed by these parts

How to fix it
Spinning Issues
Fixed by these parts
How to fix it


Keep searches simple. Use keywords, e.g. "leaking", "pump", "broken" or "fit".
- Customer:
- rodney from fairfield bay, AR
- Parts Used:
- 134511600
- Difficulty Level:
- Really Easy
- Total Repair Time:
- 15 - 30 mins
- Tools:
- Screw drivers
replace broken drive belt
carefully pry up on front washer top to release plastic keeper pins,remove 2 phillips screws from beneath lower front washer panel,slightly lift upward on panel to release.remove old broken belt,push new belt beneath large tub pulley,put belt on small motor pulley,push back belt tension /idler arm,start belt on large tub pulley,turn tub p
... Read more
ulley by hand to run belt on,release tension on idler arm.replace front panel and lower top.WALAAH!!!! you are done.
Read less
Was this instruction helpful to you?
Thank you for voting!
- Customer:
- Stephen from Newnan, GA
- Parts Used:
- 134120900
- Difficulty Level:
- A Bit Difficult
- Total Repair Time:
- 15 - 30 mins
- Tools:
- Pliers, Screw drivers
Thermal Limiter opened
Unplugged Dryer.
Opened top of Dryer, over the drum.
Removed Thermal Limiter.
Tested the Thermal Limiter - found it was open.
Checked all vents and exhaust tube for lint build-up.
Replaced Thermal Limiter.
Closed top of dryer.
Plugged Dryer back.
Tested Dryer - it works.
Opened top of Dryer, over the drum.
Removed Thermal Limiter.
Tested the Thermal Limiter - found it was open.
Checked all vents and exhaust tube for lint build-up.
Replaced Thermal Limiter.
Closed top of dryer.
Plugged Dryer back.
Tested Dryer - it works.
Was this instruction helpful to you?
Thank you for voting!
- Customer:
- Stephen from Austin, TX
- Parts Used:
- 134120900
- Difficulty Level:
- Easy
- Total Repair Time:
- 15 - 30 mins
- Tools:
- Nutdriver, Pliers, Screw drivers
Dryer would not start
I found a electrical diagram and some common problems on some websites which led me to check the thermal limiters. There are two right up top near the back of the dryer - one mounted closer to the heating coils and one mounted directly to the sheet metal on the inside back of the dryer. Using an DMM on the "Ohms" setting, I checked each
... Read more
sensor to make sure that they were "closed" (near zero ohms). Sure enough, the sensor mounted on the back of the enclosure was open (high resistance) which prevented the dryer from starting. To confirm, I shorted the two leads going to the sensor together temporarily and wrapped them with electrical tape and then tested the dryer - it worked perfectly. The part from Part Select was ordered and shipped very quickly. Since the sheet metal screws holding the sensor on were difficult to access with the drum in place, I used small machine screws/nuts to fasten the sensor - this allowed me to tighten the nuts from the outside of the dryer, making it very easy to attach.
Read less
Was this instruction helpful to you?
Thank you for voting!