


Models
>
ELFG7637AT1
ELFG7637AT1 Frigidaire Dryer
Jump to:
Find Part by Name
Keep searches simple, eg. "belt" or "pump".
Diagrams for ELFG7637AT1
Viewing 5 of 5


Keep searches simple, eg. "belt" or "pump".

In Stock
Order now and your part arrives by Mar 28

$25.10
This is a screw and it is used with a variety of home appliances. It is less than 1/2 an inch long, and is #8-18 x 3/8. This part is a pan head, sheet metal, screw. It is made of metal.
In Stock
Order now and your part arrives by Mar 28

$33.20
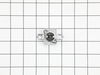
This thermal fuse is a safety component designed to protect the appliance by interrupting electrical flow if excessive temperatures are detected. It helps prevent overheating and potential damage to i...
In Stock
Order now and your part arrives by Mar 28

$38.56
This dryer thermal fuse is a critical safety component designed to protect the appliance from overheating. It automatically shuts off power to the motor or heating system if excessive temperatures are...
In Stock
Order now and your part arrives by Mar 28

$28.91
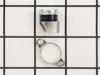
This metal motor mounting clamp helps keep the dryer’s motor securely in place, reducing vibration and supporting smooth drum rotation during each cycle. It’s a direct OEM replacement for a damaged or...
In Stock
Order now and your part arrives by Mar 28

In Stock
Order now and your part arrives by Mar 28

$121.07
This external dryer door frame assembly forms the outer portion of the dryer door, providing a clean, finished look while securing the window in place. Made from durable materials with a modern metall...
In Stock
Order now and your part arrives by Mar 28

In Stock
Order now and your part arrives by Mar 28

In Stock
Order now and your part arrives by Mar 28

In Stock
Order now and your part arrives by Mar 28
$105.98
This lint chute assembly holds the lint filter and directs air from the drum to the blower wheel. It helps maintain airflow and reduce lint buildup. Installation requires unplugging the dryer before replacing the part.
In Stock
Order now and your part arrives by Mar 28

On Order
Questions and Answers
We're sorry, but our Q&A experts are temporarily unavailable.
Please check back later if you still haven't found the answer you need.
Common Problems and Symptoms for ELFG7637AT1
Viewing 4 of 4Drum Not Spinning
Fixed by these parts

How to fix it
Noisy
Fixed by these parts

How to fix it
Not Heating
Fixed by these parts
How to fix it
Won’t Start
Fixed by these parts
How to fix it
Keep searches simple. Use keywords, e.g. "leaking", "pump", "broken" or "fit".
- Customer:
- Scott from PFLUGERVILLE, TX
- Parts Used:
- 134719300
- Difficulty Level:
- Easy
- Total Repair Time:
- 1- 2 hours
- Tools:
- Pliers, Screw drivers, Wrench (Adjustable)
Drum belt broke
I removed the front, top and back panels of the dryer, installed belt around drum and through the pulley system so the belt was snug, replaced all screws and panels, and done.
Was this instruction helpful to you?
Thank you for voting!
- Customer:
- Bert from Silver City, NM
- Parts Used:
- 137539200
- Difficulty Level:
- A Bit Difficult
- Total Repair Time:
- More than 2 hours
- Tools:
- Screw drivers
The Heating System Of The Propane Dryer Stopped Working
When I direct the dryer exhaust into the room during the winter there is an external lint filter in the ducting. For some reason,enough lint got by the dryers filter and over a few cycles clogged the exhaust. I correctly assumed that the dryer overheated and some thermal limiter had opened up. The manual had exploded views and I located
... Read more
the limiter. Getting to it was another issue. The manual gave nbo instructions on getting to the limiter, but I had installed a propane conversion kit when I first got the dryer. It was necessary to remove the top, control panel, and front panel/door assembly. Disconnecting the gas line,some cable connectors, and a few screws allowed the removale of the burner assembly, then removal of the metal tube that surrounded the burner assembly and held a number of sensors, including the thermal limit, which, as expected, showed an open circuit. The replacement part was ordered and checked out as a closed circuit, which it should. Reassembly was the reverse. A little difficult to work in the cramped lower corner of the dryer. I'm 82 years old now but machines cannot beat me!!
Read less
Was this instruction helpful to you?
Thank you for voting!
- Customer:
- David from Irvine, CA
- Parts Used:
- 137539200
- Difficulty Level:
- A Bit Difficult
- Total Repair Time:
- 30 - 60 mins
- Tools:
- Pliers, Screw drivers
Error code 66 - door open
Remove 2 screws at the upper rear attached to the top panel. Slide panel rear back and remove. Remove 2 screws attached to the front control panel. Lift panel upward. Remove 4 screws attached to the front panel (2 at the top, under the control panel, two at the very bottom). Lift front panel up and off, and unplug connector to door switch
... Read more
. Remove some more screws on the internal front panel edges, and the front to back brace holding up the control board. Lift panel up and out, and remove the drum, too. Thermal limiter located toward the rear, attached to the heating vent tube. Disconnect and replace. Re-assemble in reverse order.
Read less
Was this instruction helpful to you?
Thank you for voting!