


Models
>
DG7000AWW1
DG7000AWW1 Frigidaire Dryer
Jump to:
Find Part by Name
Keep searches simple, eg. "belt" or "pump".
Diagrams for DG7000AWW1
Viewing 5 of 5


Keep searches simple, eg. "belt" or "pump".

$43.95
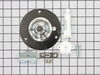
This ball-and-socket style bearing kit is used in your dryer to support the rear of the drum as it tumbles through the dry cycle. The bearing attaches on the inside of the rear panel of the dryer cabi...
In Stock
Order now and your part arrives by Aug 3

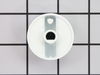
If your dryer is noisy while tumbling, you may need to replace the drum glides. This genuine OEM part is found attached to the front panel of your dryer. It is used to reduce friction and allows the d...
No Longer Available

$10.95
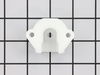
The drum support bearing is an authentic OEM replacement part for your dryer. The bearing is used to support the drum and allow it to rotate smoothly and quietly. If your dryer is excessively noisy wh...
In Stock
Order now and your part arrives by Aug 3

$63.45
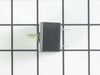
This door catch is an authentic OEM replacement part for your dryer. This part holds the door strike and ensures that the door stays closed while your dryer is running. This prevents hot air or laundr...
In Stock
Order now and your part arrives by Aug 3

In Stock
Order now and your part arrives by Aug 3

In Stock
Order now and your part arrives by Aug 3

$28.22
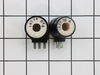
This coil ignition kit is used in dryers to open the gas valve when the dryer is on. This kit includes two coils. One is a two-wire secondary coil and the other is a three-wire booster coil. If your d...
In Stock
Order now and your part arrives by Aug 3

$23.05
This drum bearing bracket is for dryers. Drum bearing bracket holds and supports the drum bearing
In Stock
Order now and your part arrives by Aug 3

This filter collects lint as it passes through the dryer vent.
No Longer Available

In Stock
Order now and your part arrives by Aug 3

$26.35
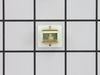
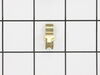
This is a screw and it is used with a variety of home appliances. It is less than 1/2 an inch long, and is #8-18 x 3/8. This part is a pan head, sheet metal, screw. It is made of metal.
In Stock
Order now and your part arrives by Aug 3

Common Problems and Symptoms for DG7000AWW1
Viewing 9 of 9Noisy
Fixed by these parts
How to fix it
Door won’t close
Fixed by these parts
How to fix it
Marks left on clothes
Fixed by these parts
How to fix it
Drum Not Spinning
Fixed by these parts
How to fix it
Not Heating
Fixed by these parts
How to fix it
Door Pops Open
Fixed by these parts
How to fix it
Will Not Start
Fixed by these parts
How to fix it
Won’t Start
Fixed by these parts
How to fix it
Touchpad does not respond
Fixed by these parts
How to fix it


Keep searches simple. Use keywords, e.g. "leaking", "pump", "broken" or "fit".
- Customer:
- Matthew from Portland, OR
- Parts Used:
- 5303937139, 5303281049, 131553800
- Difficulty Level:
- Really Easy
- Total Repair Time:
- 1- 2 hours
- Tools:
- Pliers, Screw drivers
Clothes getting scorch marks, drum noise
First and foremost, I read the repair reviews here at parts source and found that a) Other people had the same symptoms, b)following their repair tips made it super easy.
What I would add to previous reviews is to pull the front off or the little acces grill in back and check to see what kind of belt you have. According to the model ... Read more #, It showed the wide flat belt when in fact I had the smaller ribbed belt. Glad I checked before ordering.
A few things that will make your life easier is once you have the old upper guide/seal removed, put down the glue then use several med sized plastic spring clamps to hold the seal in place while the glue sets up, (@ 20-30 min). Their cheap and you should have some around anyway. When replacing the seals I would go ahead and replace the belt too. It's cheap and if your machine is 5+ yrs old probably is worn. Total cost of repair was about $60 (inc shipping). Took about 1 hr 20 min total time. Most of that time was scrapping the old seal material/ glue off the dryer front. Actual disassembly and repair maybe 1/2 hour. Other little tip is the clips for the lid of dryer is to use a flat screwdriver and gently push straight in until it's compressed enough to release the lid, it will pop up when pushed in far enough. That one took me a while to figure out.
Thanks to Part Select for such a helpful site. My dryer is like new again.
Read less
Was this instruction helpful to you?
Thank you for voting!
- Customer:
- Cheri from Cary, NC
- Parts Used:
- 134011703
- Difficulty Level:
- Really Easy
- Total Repair Time:
- Less than 15 mins
Original timer knob broke
I looked in my appliance paperwork, found the model number, keyed it in, located and ordered the knob. It arrived in a few days and voila, pushed new knob on and dryer is back in great working order. Thanks!
Was this instruction helpful to you?
Thank you for voting!
- Customer:
- Frank from Boyertown, PA
- Parts Used:
- 5303281153
- Difficulty Level:
- Easy
- Total Repair Time:
- 15 - 30 mins
- Tools:
- Nutdriver, Screw drivers
Loud Squeaking
1. Unplug dryer from outlet
2. Using Lg. flat screwdriver, pry under the front edge of the top and release two spring tabs
3. Lift up top and tilt back out of your way
4. Unscrew two phillips scews on inside of front panel
5. Lift up and out the front panel. Two spring clips at bottom.
6. Rlease tension on drum be ... Read more lt at the motor. Access panel at rear of dryer.
7.Unscrew 3 screws from inside, center rear of drum.
8. Remove drum through the front of the dryer. You may have to spread the sides apart a little bit for it to fit
9. Lift up on the rear drum bearing to remove it from the bearing retainer. ( U shaped plastic socket)
10. unsrew 2 screws and remove the bearing retainer, ground ball. Ball retainer is on outside of dryer.
11. Vacuum everything--duct, blower, lint trap, ect.
12. Intall new bearing retainer and grounding ball, an assistant is helpful at this time, one to hold ball retainer on rear of dryer, one to screw it in from the inside
13. reassemble remainder of parts in reverse order.
Read less
Was this instruction helpful to you?
Thank you for voting!