


Models
>
DE450PDA1
DE450PDA1 Frigidaire Dryer
Jump to:
Find Part by Name
Keep searches simple, eg. "belt" or "pump".
Keep searches simple, eg. "belt" or "pump".

$43.95
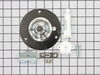
This ball-and-socket style bearing kit is used in your dryer to support the rear of the drum as it tumbles through the dry cycle. The bearing attaches on the inside of the rear panel of the dryer cabi...
In Stock
Order now and your part arrives by Jul 31

$10.95
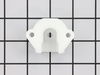
The drum support bearing is an authentic OEM replacement part for your dryer. The bearing is used to support the drum and allow it to rotate smoothly and quietly. If your dryer is excessively noisy wh...
In Stock
Order now and your part arrives by Jul 31

In Stock
Order now and your part arrives by Jul 31

Use this idler pulley assembly with gas or electric clothes dryer that has a flat dryer belt.
***Please NOTE: This part has been redesigned by the manufacturer and may not fit your appliance.
No Longer Available

This dryer lint screen and frame is used for Frigidaire/WCI brand electric and gas dryers. The filter is 14-1/4 inches wide and comes with a bezel frame and mounting screws.
No Longer Available

Special Order

Special Order

Special Order

$29.76
This condenser coil brush is useful for cleaning refrigerator condenser coils and dryer venting systems.
Special Order

Special Order
Common Problems and Symptoms for DE450PDA1
Viewing 4 of 4Noisy
Fixed by these parts

How to fix it
Marks left on clothes
Fixed by these parts
How to fix it
Drum Not Spinning
Fixed by these parts
How to fix it
Won’t Start
Fixed by these parts
How to fix it


Keep searches simple. Use keywords, e.g. "leaking", "pump", "broken" or "fit".
- Customer:
- Frank from Boyertown, PA
- Parts Used:
- 5303281153
- Difficulty Level:
- Easy
- Total Repair Time:
- 15 - 30 mins
- Tools:
- Nutdriver, Screw drivers
Loud Squeaking
1. Unplug dryer from outlet
2. Using Lg. flat screwdriver, pry under the front edge of the top and release two spring tabs
3. Lift up top and tilt back out of your way
4. Unscrew two phillips scews on inside of front panel
5. Lift up and out the front panel. Two spring clips at bottom.
6. Rlease tension on drum be ... Read more lt at the motor. Access panel at rear of dryer.
7.Unscrew 3 screws from inside, center rear of drum.
8. Remove drum through the front of the dryer. You may have to spread the sides apart a little bit for it to fit
9. Lift up on the rear drum bearing to remove it from the bearing retainer. ( U shaped plastic socket)
10. unsrew 2 screws and remove the bearing retainer, ground ball. Ball retainer is on outside of dryer.
11. Vacuum everything--duct, blower, lint trap, ect.
12. Intall new bearing retainer and grounding ball, an assistant is helpful at this time, one to hold ball retainer on rear of dryer, one to screw it in from the inside
13. reassemble remainder of parts in reverse order.
Read less
Was this instruction helpful to you?
Thank you for voting!
- Customer:
- Tod from West Springfield, MA
- Parts Used:
- 5303281154
- Difficulty Level:
- A Bit Difficult
- Total Repair Time:
- 1- 2 hours
- Tools:
- Nutdriver, Screw drivers, Wrench set
Broken Dryer Belt
1st I pried the dryer top open then disconnected the two wires for the auto shut-off. Removed four nuts with driver that opens front and releases dryer barrel. Lifted front up a bit to remove from two lower tabs at bottom of unit and put aside.
I then slid the belt over the barrel noting the side up directions on the belt. On ... Read more the lower left on the back of unit I opened up the vented cover to reveal the motor pulley and belt tension pulley. I put the belt on the pulley and brought the belt tension pulley over the belt. I then aligned the belt to the proper point on the barrel and reattached the front being careful to center the barrel onto the rim that is built into the front. Take care to align all the tabs and shims in the correct order so that barrel rotates freely. Replace auto shut off wires to switch on inside of front and close top.
I then slid the belt over the barrel noting the side up directions on the belt. On ... Read more the lower left on the back of unit I opened up the vented cover to reveal the motor pulley and belt tension pulley. I put the belt on the pulley and brought the belt tension pulley over the belt. I then aligned the belt to the proper point on the barrel and reattached the front being careful to center the barrel onto the rim that is built into the front. Take care to align all the tabs and shims in the correct order so that barrel rotates freely. Replace auto shut off wires to switch on inside of front and close top.
Read less
Was this instruction helpful to you?
Thank you for voting!
- Customer:
- Chad from Glyndon, MN
- Parts Used:
- 5303281153
- Difficulty Level:
- Easy
- Total Repair Time:
- 1- 2 hours
- Tools:
- Screw drivers, Wrench set
Dryer drum would squeak and squeal until warmed up, but progressively got worse as the days drug on.
First pry up on the front edge of the top panel of the dryer which is held in place by snap in clips. Pivot the top open and support against wall or other taking care not to pull on wiring harness. Next remove the 2 screws that hold the front panel in place. These are located on the inside of the front panel. The front then snaps loose al
... Read more
so. Remove the plastic drum stop located at the top edge of the front of the dryer. Next I removed the 3 drum screws located inside at the back center of the dryer. Next you can you need to remove the belt the motor located at the rear vent panel on the back. Slide the now loose drum out exposing the rear bearing. With a 5/16 end wrench, loosen the 2 screws on either side of the bearing retainer. Assemble the new bearing bracket to match the old one. Apply a liberal amount of supplied lubricant to the pivot ball and plastic retainer. At this point it was helpful to have someone at the rear of the dryer hold the new retainer bracket against the back of the dryer while I tightened the new bearing assembly in. Assemble dryer in reverse.
Read less
Was this instruction helpful to you?
Thank you for voting!