


Models
>
EFMC517STT0
EFMC517STT0 Electrolux Dryer
Jump to:
Find Part by Name
Keep searches simple, eg. "belt" or "pump".
Diagrams for EFMC517STT0
Viewing 6 of 6


Manuals & Guides for EFMC517STT0
Click to downloadInstall
Installation Instructions
(16.87MB)
Specs
Product Specifications Sheet
(4.24MB)
Wiring
Wiring Diagram
(4.24MB)
Keep searches simple, eg. "belt" or "pump".

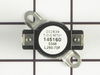
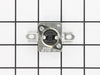
$56.28
The two-terminal high limit thermostat has a limit of 260 degrees Fahrenheit and acts as a safety mechanism that keeps the dryer from overheating. The thermostat will cut out when the internal dryer t...
In Stock
Order now and your part arrives by Jul 30

$25.25
This screw is designed to fit washers and dryers. Refer to the diagram provided by the manufacturer for further installation instructions and accurate application of screw in your tool.
In Stock
Order now and your part arrives by Jul 30

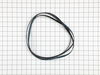
$58.49
Keep your dryer operating properly with this dryer belt, designed to rotate the drum during each cycle for effective drying. Made from durable material, it provides the strength needed to handle regul...
In Stock
Order now and your part arrives by Jul 30

$26.35
This is a screw and it is used with a variety of home appliances. It is less than 1/2 an inch long, and is #8-18 x 3/8. This part is a pan head, sheet metal, screw. It is made of metal.
In Stock
Order now and your part arrives by Jul 30

In Stock
Order now and your part arrives by Jul 30

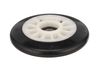
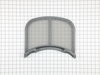
$65.15
This lint screen is for dryers.
The lint screen traps lint and debris from the exhaust air flowing from the dryer.
In Stock
Order now and your part arrives by Jul 30

In Stock
Order now and your part arrives by Jul 30

$39.46
This dryer thermal fuse is a critical safety component designed to protect the appliance from overheating. It automatically shuts off power to the motor or heating system if excessive temperatures are...
In Stock
Order now and your part arrives by Jul 30

$89.81
This element is strung with a coiled wire made of a nickel and a chrome alloy. This wire receives, but resists, a controlled electric current and as a result, the wire heats up. The heat produced is u...
In Stock
Order now and your part arrives by Jul 30

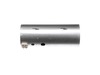
$83.68
This dryer rear air duct is designed to channel heated air from the burner or heating element into the drum and guide moisture- and lint-laden air toward the exhaust, ensuring optimal airflow and dryi...
In Stock
Order now and your part arrives by Jul 30

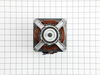
$222.77
This dryer motor powers both the drum and the blower wheel. It includes a pulley for the drum belt and uses reverse threads to secure the blower wheel. For safety, disconnect power before installation...
In Stock
Order now and your part arrives by Jul 30

Common Problems and Symptoms for EFMC517STT0
Viewing 6 of 6Noisy
Fixed by these parts

How to fix it
Drum Not Spinning
Fixed by these parts
How to fix it
Too hot
Fixed by these parts
How to fix it
Not Heating
Fixed by these parts
How to fix it
Marks left on clothes
Fixed by these parts
How to fix it
Won’t Start
Fixed by these parts
How to fix it


Keep searches simple. Use keywords, e.g. "leaking", "pump", "broken" or "fit".
- Customer:
- Philip from Oakland, CA
- Parts Used:
- 134719300, 5304523152
- Difficulty Level:
- A Bit Difficult
- Total Repair Time:
- 1- 2 hours
- Tools:
- Pliers, Screw drivers, Wrench (Adjustable)
Noisy Dryer
When I described the noise to a YouTube appliance diagnostician, I was directed to check the felt seals front and back of the rotating drum for wear, tears, or foreign objects. As it happens the felt seals looked find and there were foreign objects so, not wanting to disassemble and reassemble the dryer more than I had, I ended up replac
... Read more
ing all the replaceable moving parts that I considered possible culprits: The idler tension spring, the idler tension bracket (which includes a nylon pulley wheel), the drum belt, the five rubber-tipped bearings that support the drum and keep it in place, and the foam seal on the blower housing which seemed a little brittle and old, as well as high-temperature adhesive for the latter. The instructional videos here and on YouTube were extremely helpful (I doubt that I would have attempted this job at all, had I not watched these ahead of time). The most time-consuming aspect was waiting for the arrival of the parts as I didn't order them all at the same time or all from the same place (I ordered from whomever could ship me a given part the fastest. Disassembly took less than an hour. Re-assembly with the new parts in place took about the same but was a little more awkward because this appliance sits in a very narrow closet and it's difficult to ensure that the 4" flexible duct stays in place when sliding the appliance back into the closet. No regrets. Now I know the basics if this dryer needs attention in future and I also know all the parts that I can eliminate as suspects in any future maintenance (the parts that I replaced)
Read less
Was this instruction helpful to you?
Thank you for voting!
- Customer:
- Rich from New Albany, OH
- Parts Used:
- 5304508449
- Difficulty Level:
- Easy
- Total Repair Time:
- 30 - 60 mins
- Tools:
- Screw drivers
Internal vent inside the drum was coated in black (plastics from use)
1. Loosened the 3 screws inside of the drum
2. Removed the entire back of the dryer (lots of screws)
3. Removed the old vent (there are 2 screws at the bottom that hold it in)
4. Install new vent (put the screws back in)
5. Close up back and proceed to put all of the screws back
2. Removed the entire back of the dryer (lots of screws)
3. Removed the old vent (there are 2 screws at the bottom that hold it in)
4. Install new vent (put the screws back in)
5. Close up back and proceed to put all of the screws back
Was this instruction helpful to you?
Thank you for voting!
- Customer:
- Scott from PFLUGERVILLE, TX
- Parts Used:
- 134719300
- Difficulty Level:
- Easy
- Total Repair Time:
- 1- 2 hours
- Tools:
- Pliers, Screw drivers, Wrench (Adjustable)
Drum belt broke
I removed the front, top and back panels of the dryer, installed belt around drum and through the pulley system so the belt was snug, replaced all screws and panels, and done.
Was this instruction helpful to you?
Thank you for voting!