


Models
>
CDG6000W
CDG6000W Crosley Dryer
Jump to:
Find Part by Name
Keep searches simple, eg. "belt" or "pump".
Diagrams for CDG6000W
Viewing 8 of 8


 Diagram and Parts List for Crosley Dryer")


Keep searches simple, eg. "belt" or "pump".

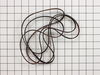
$15.26
This multi rib belt is an OEM replacement part for a dryer. It attaches to the drum, idler pulley, and motor pulley, and is responsible for spinning the drum. Over time, the belt can become frayed, br...
In Stock
Order now and your part arrives by Aug 6

$28.91
This OEM kit comes with two ignition coils (one three-terminal boost/hold coil, and one two-terminal secondary coil). Usually only one of them burns out, but you should replace them as a set as both h...
In Stock
Order now and your part arrives by Aug 6

$52.50
This dryer lint filter is a critical component designed to trap lint and debris from the exhaust air during drying cycles. Positioned within the lint trap housing, it helps maintain proper airflow, re...
In Stock
Order now and your part arrives by Aug 6

$36.42
This genuine OEM part is a radiant flame sensor for your gas dryer. It is used to determine when the temperature of the igniter is hot enough to ignite the gas. Once the igniter is hot enough, it allo...
In Stock
Order now and your part arrives by Aug 6

$45.00
This kit comes with three separate thermal fuses and is usually used with clothes dryers that have a fan mounted on the motor shaft. Included within this kit is the high limit (Limit: 258) the gas hig...
In Stock
Order now and your part arrives by Aug 6

In Stock
Order now and your part arrives by Aug 6

$7.60
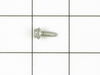
This is a multi-use screw and can be used on a variety of appliances. The measurements of the screw are: 8/18 x 3/8. *Please note: the screw is sold individually. Refer to the manual provided by the m...
In Stock
Order now and your part arrives by Aug 6

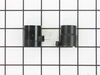
$11.98
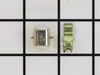
This blower wheel clamp is less than an inch long and is used for some clothes dryers to hold the blower wheel firmly in place. This green clamp is made of metal.
In Stock
Order now and your part arrives by Aug 6

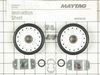
Included in this rear drum support roller kit are 4 screws, 1 spacers, 2 washers, 2 retaining rings, 2 rear rollers, and 2 cylinder support shafts.
*** Note: Per manufacturer this kit has been upd...
No Longer Available

$61.55
This wheel has a deep D-shaped shaft receptacle. The spring clamp is not included with this part.
In Stock
Order now and your part arrives by Aug 6

In Stock
Order now and your part arrives by Aug 6

$78.55
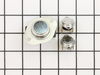
If this part appears to be too wide for your particular appliance, per the manufacturer, all you have to do is pull it apart.
Special Order
Common Problems and Symptoms for CDG6000W
Viewing 13 of 13Noisy
Fixed by these parts

How to fix it
Drum Not Spinning
Fixed by these parts
How to fix it
Not Heating
Fixed by these parts

How to fix it
Door won’t close
Fixed by these parts
How to fix it
Won’t Start
Fixed by these parts
How to fix it
Too hot
Fixed by these parts
How to fix it
Heat stays on after drum has stopped
Fixed by these parts
How to fix it
Door Pops Open
Fixed by these parts
How to fix it
Marks left on clothes
Fixed by these parts

How to fix it
Door latch failure
Fixed by these parts
How to fix it
Will Not Start
Fixed by these parts
How to fix it
Will not agitate
Fixed by these parts

How to fix it
Touchpad does not respond
Fixed by these parts
How to fix it


Keep searches simple. Use keywords, e.g. "leaking", "pump", "broken" or "fit".
- Customer:
- Jane from Grand Forks, ND
- Parts Used:
- WP53-0918
- Difficulty Level:
- Really Easy
- Total Repair Time:
- Less than 15 mins
lint filter broke
I pulled out the broken lint filter and put the new one back in, real easy. I am so happy with the prompt delivery I got from PartsSelect.com. I ordered on a Monday and and it was delivered on a Wednesday
Was this instruction helpful to you?
Thank you for voting!
- Customer:
- Gary from Haverhill, NH
- Parts Used:
- 279834
- Difficulty Level:
- Easy
- Total Repair Time:
- 30 - 60 mins
- Tools:
- Nutdriver, Screw drivers, Socket set
Dryer ran but would not heat
PartSelect showed seven different possibilities why the dryer wouldn't heat. I removed the two screws to remove the bottom panel and turned the dryer on and noticed that the heating element that ignites the gas was working fine. This meant that it was not getting gas so it could be the gas valve or one of the two gas valve coils which are
... Read more
located on top of the gas valve. I borrowed my neighbor"s ohm meter and touched the two probes on the coils terminals to check for continuity and found that one of the coils read zero. I then took both of the coils out by removing two screws and tested each coil again. One coil read 500-850 and the other read zero. This meant that it was no good so I called for the part and received it in three days. I reassembled the parts and turned the dryer on and it fired up after a few seconds. It works as good as new. The part plus shipping was less than $30. My repairman would have charged me $150-$200. While the dryer was apart I gave it a good cleaning with a vacuum and a toothbrush in delicate areas. I also removed and cleaned the lint trap housing by removing two nuts. I didn't know much about gas dryers, but thanks to PartSelect I easily fixed it myself.
Read less
Was this instruction helpful to you?
Thank you for voting!
- Customer:
- Stan from Riverside, CA
- Parts Used:
- WP53-0918, WP31001556, 341241
- Difficulty Level:
- Easy
- Total Repair Time:
- 30 - 60 mins
- Tools:
- Screw drivers, Socket set
No Heat
Lift the top. Remove (2) screws holding the front of the dryer in place. Lift the front off the 2 retaining clips on the bottom of the dryer. The hardest part of the install was removing and replacing the igniter. A couple of helping hands from the girlfriend to hold the parts in place while I replaced the two screws was very helpfull
... Read more
. Installing the multi rib belt was also very easy with the help of a second pair of arms to reach under the drum to thread the belt onto the tensioner. The lint filter, of coarse was just a matter of throwing the old cracked one away and replacing w/ the new.
Read less
Was this instruction helpful to you?
Thank you for voting!