


Models
>
CDE20R7AC
CDE20R7AC Crosley Dryer
Jump to:
Find Part by Name
Keep searches simple, eg. "belt" or "pump".
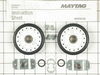
Diagrams for CDE20R7AC
Viewing 3 of 3 Diagram and Parts List for Crosley Dryer")
 Diagram and Parts List for Crosley Dryer")
 Diagram and Parts List for Crosley Dryer")
Keep searches simple, eg. "belt" or "pump".

$33.01
This kit comes with three separate thermal fuses and is usually used with clothes dryers that have a fan mounted on the motor shaft. Included within this kit is the high limit (Limit: 258) the gas hig...
In Stock
Order within the next 3 hrs and your part ships today!

In Stock
Order within the next 3 hrs and your part ships today!

$5.42
This is a multi-use screw and can be used on a variety of appliances. The measurements of the screw are: 8/18 x 3/8. *Please note: the screw is sold individually. Refer to the manual provided by the m...
In Stock
Order within the next 3 hrs and your part ships today!

$13.61
This blower wheel clamp is less than an inch long and is used for some clothes dryers to hold the blower wheel firmly in place. This green clamp is made of metal.
In Stock
Order within the next 3 hrs and your part ships today!

Included in this rear drum support roller kit are 4 screws, 1 spacers, 2 washers, 2 retaining rings, 2 rear rollers, and 2 cylinder support shafts.
*** Note: Per manufacturer this kit has been upd...
No Longer Available


$11.10
This timer resistor assembly is two inches long. It is made of ceramic and metal.
In Stock
Order within the next 3 hrs and your part ships today!


In Stock
Order within the next 3 hrs and your part ships today!

$60.00
This idler pulley wheel is just over two inches in diameter. It is all white in color and it is made entirely of plastic.
In Stock
Order within the next 3 hrs and your part ships today!

$68.89
This dryer drum glide is used with many dryers. It is almost three inches long, and it has an adhesive backing.
Special Order
Questions and Answers
We're sorry, but our Q&A experts are temporarily unavailable.
Please check back later if you still haven't found the answer you need.
Common Problems and Symptoms for CDE20R7AC
Viewing 6 of 6Noisy
Fixed by these parts


How to fix it
Too hot
Fixed by these parts


How to fix it
Won’t Start
Fixed by these parts
How to fix it
Will Not Start
Fixed by these parts
How to fix it
Not Heating
Fixed by these parts
How to fix it
Will not agitate
Fixed by these parts

How to fix it


Keep searches simple. Use keywords, e.g. "leaking", "pump", "broken" or "fit".
- Customer:
- Ronald from Fredericksburg, VA
- Parts Used:
- LA-1053
- Difficulty Level:
- Easy
- Total Repair Time:
- 30 - 60 mins
- Tools:
- Nutdriver, Pliers, Screw drivers
Electric dryer would not heat - Thermal fuses - $25 fix - I love DIY
1. Unplug dryer from power outlet
2. Lift dryer top from front (hinged in rear). Just friction holding top down. Use flat scewdriver wrapped in cloth to help lift.
3. Locate heating element - rear top behind drum
4. Unplug red wires to the high limit thermal fuse
5. Unplug red wires to the heating element
6. Unlug ... Read more white wires to the high limit fuse
7. Remove high limit thermal fuse
8. Remove heating element
9. Remove high limit fuse
10 Clean heating box
Installation is reverse order but do the following first!
Clean lint trap - Remove front of dryer
1. Unplug white door switch wires. inside front top right
2. remove two screws securing the front of dryer - inside front top left and top right. Front of dryer is hinged at bottom
3. Clean all the lint you can find. If you have never cleaned out the lint, there might be a lot and the cause of over heating (shorting fuse life). Add to your yearly things to do list.
4. While your at it check the alignment of the plastic glides the drum sits on.
5. Also check the foam gasket between the fan housing and lint trap. Mine was off a bit. Realigned with doubled sided tape.
Read less
Was this instruction helpful to you?
Thank you for voting!
- Customer:
- Brianna from Littleton, CO
- Parts Used:
- LA-1044
- Difficulty Level:
- Really Easy
- Total Repair Time:
- Less than 15 mins
- Tools:
- Socket set
Dry stopped heating - still had good air flow
I was about to purchase a new dryer because of the age of my dryer and not wanting to hire someone to fix it. After a little web research, I saw several do-it -yourself stories indicating this was a very easy repair.
This was an extremely easy repair and it save me lots of $$:
(1) Disconnected power
(2) Opened the ... Read more top of the dryer
(3) Disconnected wires to temperature sensor.
(4) Used a 1/2" socket wrench with extension and a drill to remove 2 screws holding down the temperature sensor
(5) Removed 1 screw holding down the heating element.
(6) Removed wires connected to heating element and pulled out old element.
(7) Reassembled new element.
(8) Turned on empty dryer for 30 minutes to burn off smell from the new element.
Worked like a charm!
Read less
Was this instruction helpful to you?
Thank you for voting!
- Customer:
- Michelle from Kirkwood, MO
- Parts Used:
- LA-1008
- Difficulty Level:
- Really Easy
- Total Repair Time:
- 15 - 30 mins
- Tools:
- Pliers, Screw drivers, Socket set
Dryer squeaking really badly
I opened the dryer from the front by pushing in on the two clips just under the top. I then had to remove two screws on each side and took the front panel off. I reached around underneath on the right side to slip the belt off the pulley. I pulled the drum out and then I could see the roller that was squeaking (the left one). The whee
... Read more
l had sheared some of the support off and that was the cause of the squeak.
I took the locking ring off and removed the wheel and support. I put the new support in, attached it, and then the wheel, washer and lock ring. I used pliers to push the lock ring onto the support.
Then I put the drum back in making sure it was in all the way (it fits snugly between the wheel and the back of the dryer). The belt is a little tricky to get back on. I put it around the drum and then reached underneath and behind again. The pulley is on a spring, so you have to pull it up and put the belt on all one-handed and blind. Once that was on, I gave it a few turns to make sure everything was working again.
It is quiet as can be now!
Read less
Was this instruction helpful to you?
Thank you for voting!