


Models
>
DE16CA
DE16CA Amana Dryer
Jump to:
Find Part by Name
Keep searches simple, eg. "belt" or "pump".
Diagrams for DE16CA
Viewing 10 of 10


Keep searches simple, eg. "belt" or "pump".

$13.07
This roller shaft washer is just under an inch in diameter and is used for some of Whirlpool's brands of clothes dryers.Sold individually.
In Stock
Order now and your part arrives by Jul 30

$7.60
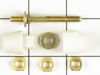
This is a multi-use screw and can be used on a variety of appliances. The measurements of the screw are: 8/18 x 3/8. *Please note: the screw is sold individually. Refer to the manual provided by the m...
In Stock
Order now and your part arrives by Jul 30

$11.98
This foot pad is just over an inch in diameter. It is made entirely of rubber and is gray in color. This pad is intended for use with washers and some dryers.
In Stock
Order now and your part arrives by Jul 30

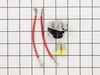
This thermostat kit helps regulate your dryer’s temperature by cycling the heating element on and off. It’s adjustable between 135°F and 155°F and reactivates the heat when the temperature drops by 20...
In Stock
Order now and your part arrives by Jul 30

$17.44
Sold Individually. This adjustable leveling leg comes with a stop nut.
In Stock
Order now and your part arrives by Jul 30

$209.13
This lower dishwasher rack is a genuine replacement component designed to provide flexible and secure loading for both small and large dishware. Measuring approximately 22 inches by 21 inches, it feat...
In Stock
Order now and your part arrives by Jul 30

In Stock
Order now and your part arrives by Jul 30

In Stock
Order now and your part arrives by Jul 30


In Stock
Order now and your part arrives by Jul 30


Special Order
Common Problems and Symptoms for DE16CA
Viewing 3 of 3Noisy
Fixed by these parts


How to fix it
Too hot
Fixed by these parts
How to fix it
Not Heating
Fixed by these parts
How to fix it


Keep searches simple. Use keywords, e.g. "leaking", "pump", "broken" or "fit".
- Customer:
- Edith from Grove City, OH
- Parts Used:
- Y311946
- Difficulty Level:
- Difficult
- Total Repair Time:
- More than 2 hours
- Tools:
- Nutdriver, Screw drivers, Wrench (Adjustable)
Dryer wouldn't heat
Since the heating coil is right behind the front door I had to remove all panels starting with the back one to get to it. The back has a lot of tech screws that I removed with the nut driver. The side panels were removed with a phillips screwdriver. The top is held in place with the other panels. The base was shifted away from the fro
... Read more
nt and I released the heating coil case with 4 screws in the front and was able to pull it out of the top to replace it. I cut the old one out with wire cutters and snaked the new one through the ceramic insulators. I was careful not to touch the new one without gloves because the oil from your hands can burn them out more quickly. I screwed the new ones to the contact points while trying not to stretch it too much. I vacuumed the whole dryer out before putting it back together.
Read less
Was this instruction helpful to you?
Thank you for voting!
Stripped leveler screw making impossible to level my washer
Put blocks under the washer where the leveling leg was needed and screwed the part into the washer. Then it was just a matter of moving the washer into place and leveling. Pretty easy.
Was this instruction helpful to you?
Thank you for voting!
- Customer:
- Robert from Buffalo, NY
- Parts Used:
- WP694674
- Difficulty Level:
- Easy
- Total Repair Time:
- 30 - 60 mins
- Tools:
- Nutdriver, Screw drivers
Temperature setting not working
Took off back cover, thermostat was easily identified because of photos I've seen on website. Took 2 connectors off, removed 2 screws and removed old thermostat. That was pretty much it!
NOTE: Replacement thermostat 694674 has an adjustable temperature range setting that MUST be manually set prior to installing! You need to use ... Read more the enclosed chart to find your original part# and make sure the setting is matched. My original part# 341146 had a "D" setting so I had to change but very easy to do.
NOTE: Replacement thermostat 694674 has an adjustable temperature range setting that MUST be manually set prior to installing! You need to use ... Read more the enclosed chart to find your original part# and make sure the setting is matched. My original part# 341146 had a "D" setting so I had to change but very easy to do.
Read less
Was this instruction helpful to you?
Thank you for voting!