The dishwasher roller assembly connects to the dishrack, and is located in the lower level of the dishwasher. It allows the dishrack to easily slide in and out. If the lower rack keeps falling off the...
Keep your dishwasher’s dish rack stable and secure with this compact gray holder, also known as a mounting bracket. Measuring 1 inch by 1 inch, it plays a key role in preventing the rack from moving d...
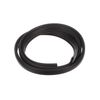
This rubber door gasket creates a watertight seal around the dishwasher tub, helping prevent leaks and improve wash performance. Made from heat-resistant material, it’s built to last and withstand reg...
If your washer isn’t draining like it should, this LG drain hose assembly might be the fix. It comes with a flexible rubber hose and plastic connectors to guide water from the tub to your drain. Thing...
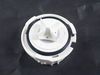
This part is the replacement inlet valve for your dishwasher. It is approximately 4-1/2 inches by 3-1/2 inches. The water inlet valve in your dishwasher connects to the water source and solenoid wire...
This genuine OEM Control Panel Assembly fits select LG dishwashers, housing the buttons and display for managing cycles. Verify compatibility and unplug the appliance before installation.
Restore the full functionality of your dishwasher with this sturdy upper dishrack, designed to hold dishes securely in place during every cycle. Made for select models, it’s built to last and helps en...
This pump casing assembly is a vital component in select LG dishwashers, responsible for managing water flow during both wash and drain cycles. It includes several integrated parts: a motor that power...
In Stock
Order now and your part arrives by Jul 5
Questions and Answers
Ask our experts a question about this part and we'll get back to you as soon as possible!
3 questions answered by our experts.
< Prev
1
Next >
Sort by:
Search filter:
Clear Filter
Your search term must have 3 or more characters.
Keep searches simple. Use keywords, e.g. "leaking", "pump", "broken" or "fit".
Sorry, we couldn't find any existing answers that matched. Try using some different or simpler keywords, or submit your new question by using the "Ask a Question" button above!
Dennis
October 16, 2021
Dishwasher turns off during cycle
For model number LDF5545ST
Hello Dennis, thank you for writing. It could be that part FIX12080273, the Sensor Assembly is shorted out or that maybe be the Door Latch is faulty part FIX12588938. We hope this helps.
Hello Susan, Thank you for asking. You should be able to pull the rack all the way out and then lift up and out to remove from the rails. We hope this helps!
Was this helpful?
Thank you for voting!
Bill
February 14, 2025
How to remove and replace the A154 and A153 handles that raise and lower the upper rack
For model number LDF5545ST
Hello Bill, thank you for your question. We found the information in the manual. The Manual link https://www.manuals.ca/lg/ldf5545st/manual?p=34. The information is on pages 33-34. Good luck with your repair.
Was this helpful?
Thank you for voting!
Ask a Question
Ask our experts a question on this part and we'll respond as soon as we can.
Replacing this pump is pretty easy. Disconnect the power and drain hose, and pull your dishwasher out from the counter. Lay it on its side on a towel. There WILL be spillage. Disconnecting the pump is simple. There are a couple hoses, one single wire connection (the thermistor) and one multi-wire plug. The pump is held in place by a
... Read morepair of thick rubber holders which can be pulled off by hand. That's it!
After removing the pump, I disassembled it to find out why these fail so soon. It's a very poor design. I found that the nose of the electric motor, where the bearings are located, sits in a plastic cup formed by the top of the pump body. Any leakage from the pump around the motor shaft will be held in place against the motor bearing. It has no place to go. This causes rusting of the bearing. I expect I'll be replacing this one in a few years. :(
But kudos to PartsSelect for getting the right pump assembly for me, after getting the wrong one from another supplier!
This is apparently a widely known issue for LG, and since their call center was closed due to Coronavirus, I had no luck getting them to cover the repair. Not wanting to wait weeks of months for them to get off their duffs, I ordered the part and unscrewed the six screws holding the control panel on and unplugged the old part, plugged in
... Read more the new part, and replaced the screws.
The inside gasket deteriorates over time - However replacement is easy. the main thing you have to remember is after you remove the old gasket, install the new one starting at the middle top of the tub and work your way down both sides. Also, don't push the gasket all the way in...only enough to hold in place. When you close the door the
... Read moregasket will form a better seal around the door.