


Models
>
D1471TBK
D1471TBK LG Dishwasher
Jump to:
Find Part by Name
Keep searches simple, eg. "belt" or "pump".
Keep searches simple, eg. "belt" or "pump".

$18.54
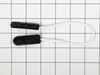
If the door to your dishwasher drops suddenly when opening, there may be an issue with your connector assembly. It works by connecting the door hinge to the door spring, which applies tension and prev...
In Stock
Order now and your part arrives by Jul 25

$15.26
The dishwasher roller assembly connects to the dishrack, and is located in the lower level of the dishwasher. It allows the dishrack to easily slide in and out. If the lower rack keeps falling off the...
In Stock
Order now and your part arrives by Jul 25

$13.07
This is a roller and axle, which mounts to the dishwasher rack (sold independently). It is gray in color, made of plastic, and measures approximately an inch in diameter, with the axle making it rough...
On Order

In Stock
Order now and your part arrives by Jul 25

$66.86
This rubber door gasket creates a watertight seal around the dishwasher tub, helping prevent leaks and improve wash performance. Made from heat-resistant material, it’s built to last and withstand reg...
In Stock
Order now and your part arrives by Jul 25

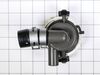
$90.41
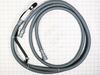
This drain pump assembly is a genuine OEM replacement part for your dishwasher. In order to complete this repair you will need a Phillips screwdriver, pliers, and a socket. You will need to pull the d...
In Stock
Order now and your part arrives by Jul 25

In Stock
Order now and your part arrives by Jul 25

$82.21
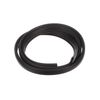
Ensure proper drainage and prevent leaks with this replacement dishwasher drain hose assembly. Its corrugated design allows for flexibility and durability, directing wastewater from the dishwasher to ...
Special Order

$225.07
The upper dishrack assembly securely holds dishes during the cleaning cycle and is compatible with select LG dishwasher models. Made with durable materials, this genuine OEM replacement part ensures a...
In Stock
Order now and your part arrives by Jul 25

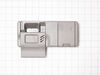
$98.09
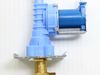
This part is the replacement inlet valve for your dishwasher. It is approximately 4-1/2 inches by 3-1/2 inches. The water inlet valve in your dishwasher connects to the water source and solenoid wire...
In Stock
Order now and your part arrives by Jul 25

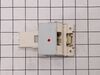
$78.46
This genuine LG door latch assembly helps keep your dishwasher door securely closed during each cycle, preventing leaks and ensuring the machine starts properly. If your door won’t lock or the dishwas...
In Stock
Order now and your part arrives by Jul 25

In Stock
Order now and your part arrives by Jul 25
Common Problems and Symptoms for D1471TBK
Viewing 9 of 9Leaking
Fixed by these parts
How to fix it
Door latch failure
Fixed by these parts

How to fix it
Not draining
Fixed by these parts
How to fix it
Door won’t close
Fixed by these parts
How to fix it
Not cleaning dishes properly
Fixed by these parts
How to fix it
Noisy
Fixed by these parts
How to fix it
Will not fill with water
Fixed by these parts
How to fix it
Will not dispense detergent
Fixed by these parts
How to fix it
Not drying dishes properly
Fixed by these parts
How to fix it


Keep searches simple. Use keywords, e.g. "leaking", "pump", "broken" or "fit".
- Customer:
- Gregory L from INDEPENDENCE, OH
- Parts Used:
- 4970ED4004G
- Difficulty Level:
- Easy
- Total Repair Time:
- 15 - 30 mins
- Tools:
- Screw drivers
Broken door spring allows the door to overextend to the floor if not propped.
Simple, removed screws securing machine in the cabinet, then pull the unit out of the cabinet space about 10 inches. Springs are accessible within this extension. You need strong hands to extend the springs and attach them. Once attached, push machine back in place and re-install the anchor screws. In my situation, only one spring was bro
... Read more
ken, so the attached side revealed the correct slot to place the hook on the top position, the bottom position has a plastic lead for the spring, and that lead is attached to a rope to the door hinge. Note: Replace BOTH springs, even if only one is broken.
Read less
Was this instruction helpful to you?
Thank you for voting!
- Customer:
- Patrick from CHANDLER, AZ
- Parts Used:
- ABQ73503004
- Difficulty Level:
- Easy
- Total Repair Time:
- 30 - 60 mins
- Tools:
- Pliers, Screw drivers
Water not draining, causing "0E" number to appear and initiatate dishwasher shutdown.
According to your site, the part(s), to consider, to resolve the problem were: 1.Motor Assembly DC Pump, OR 2.Drain Pump. I simply selected the drain pump because it was cheaper and because it was making a clicking noise. (The only significant noise that this dishwasher was making) To be safe, I unplugged the unit and turned off the w
... Read more
ater, under the sink. I removed the kick plate and I unscrewed the anchor clips from under the counter and carefully pulled the unit out. I then opened the dishwasher and removed the lower rack. To minimize water clean-up, I took a rag and soaked up the standing water in the bottom until it was nearly dry. I then tipped the dishwasher on it's left side, knowing where the location of the drain pump (front, right), would be in an easier location for me to work. I first unplugged the pumps wiring. Then, with pliers, I was able to disconnect the clips on the short, rubber hoses that hold the pump in alignment.(Use caution: If reusing the same rubber hose(s) on the new pump, it will be easier if you put them on in the same direction as they were take off) Then I removed the rubber supports off their hooks, that allow the pump to hang from the bottom of the dishwasher. Once the rubber hoses are re-connected on the new pump and placed on to it's former proper alignment, you can re-attach the rubber supports to their hooks. And last, but not least, remember to plug the new pump's wires back in place. Carefully stand up dishwasher and push it slowly back into place. I plugged in the unit and turned on the water. Before I screwed the unit back to the counter and kick plate back on the front, I ran a load and watched for leaks beneath the new pumps area. No leaks. "Easy, Peasy".
Read less
Was this instruction helpful to you?
Thank you for voting!
- Customer:
- Robert from VERNAL, UT
- Parts Used:
- ABQ73503004
- Difficulty Level:
- Really Easy
- Total Repair Time:
- 30 - 60 mins
- Tools:
- Pliers, Screw drivers, Wrench set
Dishwasher wouldn’t completely drain
Shut off electrical breaker, Removed bottom cover plate by removing 2 Phillips head screws. I was able to remove the pump without pulling the dishwasher out by removing wiring connection, hose clamps with a pair of pliers, and removed the 2 rubber hangers However I couldn’t reinstall the pump without pulling the dishwasher out. 1.I disco
... Read more
nnected the electrical wiring (breaker was shut off). 2. Shut the water supply off and removed water line at the dishwasher. 3. Disconnected the drain at the sink. 4. Removed the 2 retaining screws 1 on each side that secures the dishwasher in place. 4. Removed the upper and lower racks, Used a shop vac and sucked the water out of the bottom of the dishwasher. 5. Pulled the dishwasher out making sure the drain line came with it. 6. Laid The dishwasher over on the back side to the floor. 7. Reinstalled pump with new hose clamps and hoses that came with the pump. ( it probably would have been easier to remove the pump with the dishwasher pulled out) reinstall the wire connection to the pump (snap in connection), connected the 2 new rubber hangers to pump and connected to the dishwasher . 8. Slide the dishwasher back in place and reconnect water line be sure and use some Teflon tape, reconnect electrical wiring, reconnect drain line, secure dishwasher with screws. Turn water on and check for leaks, turn electrical power back on. I ran the dishwasher to make sure it worked and make sure there weren’t any leaks before I installed the bottom cover plate.
I had an appliance service person say that they wouldn’t work on an LG because they were hard to work on and very difficult to get parts. My experience was just the opposite thanks to partselect. The Dishwasher works like brand new.
I had an appliance service person say that they wouldn’t work on an LG because they were hard to work on and very difficult to get parts. My experience was just the opposite thanks to partselect. The Dishwasher works like brand new.
Read less
Was this instruction helpful to you?
Thank you for voting!