


Models
>
KUDE20IXSSA
KUDE20IXSSA KitchenAid Dishwasher
Jump to:
Find Part by Name
Keep searches simple, eg. "belt" or "pump".
Diagrams for KUDE20IXSSA
Viewing 12 of 12


 Diagram and Parts List for KitchenAid Dishwasher")


Keep searches simple, eg. "belt" or "pump".

This rack adjuster kit is connected to the dishrack and allows you to adjust the height of the upper rack of your dishwasher up and down to give more space. The kit is constructed of gray plastic and ...
In Stock
Order now and your part arrives by Aug 1

$34.27
This OEM gray plastic lower dishrack wheel assembly allows the rack to slide in and out of the dishwasher with ease. It measures roughly 3 by 6 inches. If it breaks or becomes damaged it may make slid...
In Stock
Order now and your part arrives by Aug 1

$29.98
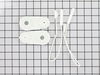
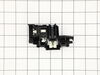
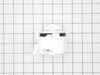
If your dishwasher door is not opening or closing properly, it may be time to install a new balance kit. This part helps to support the weight of the door as it opens and closes. You should also check...
In Stock
Order now and your part arrives by Aug 1

$13.07
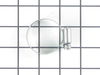
The genuine OEM replacement rack stop clip is for dishwashers. It measures just over an inch and is made of gray plastic. The purpose of this part is to prevent your dishwasher rack from pulling out t...
In Stock
Order now and your part arrives by Aug 1

$15.26
The mounting bracket is used to secure the top part of your dishwasher to the underside of your counter or cabinet. If you have solid surface counters (granite, quartz, etc.) you will likely need to s...
In Stock
Order now and your part arrives by Aug 1

$49.29
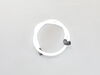
The dishwasher positioner clip is also known as a rack adjuster and is used to hold the top rack in your dishwasher in the desired position. If the rack is not staying in place, the clip may have beco...
In Stock
Order now and your part arrives by Aug 1

$58.37
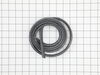
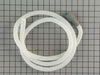
Prevent leaks and maintain optimal cleaning performance with this durable dishwasher door seal. It creates a secure barrier to keep water contained during wash cycles, ensuring reliable operation. Rep...
In Stock
Order now and your part arrives by Aug 1

$45.00
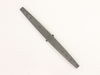
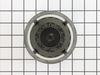
This is a lower spray arm for a dishwasher. The lower spray arm allows water to be spread evenly throughout the dishwasher tub with the proper force so dishes come out clean. This spray arm is gray in...
In Stock
Order now and your part arrives by Aug 1

$49.29
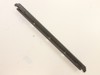
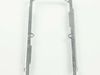
This is an authentic OEM replacement drawer track for the upper rack of your dishwasher. Also known as a rack slider bar, it helps to support the top rack and allows it to glide in and out of your dis...
In Stock
Order now and your part arrives by Aug 1

$36.42
The dishrack adjuster, also known as an adjuster clip, is used to change the height of the top rack in your dishwasher. If the clip has become damaged, it may not function properly, which would result...
In Stock
Order now and your part arrives by Aug 1

$49.29
The tine row is located on the lower dishrack. The tine row can be raised or lowered to provide more room in the lower dishrack. Over time the tine row can become rusted, damaged, or lost, and will ne...
In Stock
Order now and your part arrives by Aug 1

In Stock
Order now and your part arrives by Aug 1
Common Problems and Symptoms for KUDE20IXSSA
Viewing 11 of 11Leaking
Fixed by these parts
How to fix it
Door latch failure
Fixed by these parts
How to fix it
Not cleaning dishes properly
Fixed by these parts
How to fix it
Door won’t close
Fixed by these parts
How to fix it
Not drying dishes properly
Fixed by these parts

How to fix it
Not draining
Fixed by these parts
How to fix it
Will not fill with water
Fixed by these parts
How to fix it
Noisy
Fixed by these parts
How to fix it
Will Not Start
Fixed by these parts
How to fix it
Will not dispense detergent
Fixed by these parts
How to fix it
Will not drain
Fixed by these parts
How to fix it


Keep searches simple. Use keywords, e.g. "leaking", "pump", "broken" or "fit".
- Customer:
- Paul from Encinitas, CA
- Parts Used:
- W10712394
- Difficulty Level:
- Easy
- Total Repair Time:
- 15 - 30 mins
- Tools:
- Screw drivers
Replace rack adjusters - wheel were broken
Replacement was pretty easy after figuring out how to unsnap/unlock the old pieces. Tools only used to do a little prying and poking, but really aren't needed. Everything either snaps or slides together. Piece of cake
Was this instruction helpful to you?
Thank you for voting!
- Customer:
- Scott from Fort Lauderdale, FL
- Parts Used:
- 8194001
- Difficulty Level:
- Easy
- Total Repair Time:
- Less than 15 mins
- Tools:
- Screw drivers
Replaced Hinge Link
Pulled dishwasher from under counter, attached link to spring, hooked spring back into frame/chassis, threaded link through pulleys, attached other end of link onto door, reinstalled dishwasher under counter. All's well. Note-I purchased an extra link anticipating that the other one will fail. They're cheap enough.
Was this instruction helpful to you?
Thank you for voting!
- Customer:
- Walton from Chittenango, NY
- Parts Used:
- W10712394
- Difficulty Level:
- A Bit Difficult
- Total Repair Time:
- 15 - 30 mins
- Tools:
- Pliers, Screw drivers
broken rollers on upper basket
I took the broken basket adjuster off and then attached the new one. It wasn't too difficult, however some removal instructions and re-install instructions( or just a picture supplied) would have been helpful. This isn't an issue for a mechanically inclined person, but would be a challenge for someone that isn't. Thanks.
Was this instruction helpful to you?
Thank you for voting!