


Models
>
66512789K311
66512789K311 Kenmore Dishwasher
Jump to:
Find Part by Name
Keep searches simple, eg. "belt" or "pump".
Keep searches simple, eg. "belt" or "pump".

$28.91
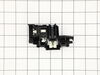
This door latch secures the dishwasher door and signals the control board when closed, allowing the cycle to begin. If the door won’t latch or the dishwasher won’t start, the latch may be faulty. Comp...
In Stock
Order now and your part arrives by Aug 1

$92.52
New Black Single Metal Access Panel Replacement Kit. Replaces old two part toe kick plates. Reuse insulation off old panel or see Recommended Parts.
In Stock
Order now and your part arrives by Aug 1

In Stock
Order now and your part arrives by Aug 1

Sold individually. The size of this screw is 1/4" hex head and 10-12 x 1/2".
In Stock
Order now and your part arrives by Aug 1

$76.95
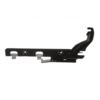
If your dishwasher door won’t close properly or feels loose, the hinge might be the problem. This replacement hinge supports the door and helps it open and close smoothly. Easy to install and built fo...
Special Order

$36.42
This dishwasher toe kick access panel, also known as a kick plate, is designed to cover the gap beneath the dishwasher for a clean, finished look while protecting internal components from dirt, moistu...
In Stock
Order now and your part arrives by Aug 1
$69.95
This door hinge supports smooth opening and secure closure by maintaining correct door alignment. Proper hinge function helps preserve door sealing and prevents uneven wear. Replacing a worn hinge res...
In Stock
Order now and your part arrives by Aug 1

In Stock
Order now and your part arrives by Aug 1

In Stock
Order now and your part arrives by Aug 1

In Stock
Order now and your part arrives by Aug 1

The electronic control board manages the functions of the dishwasher such as washing, draining and drying.
In Stock
Order now and your part arrives by Aug 1

In Stock
Order now and your part arrives by Aug 1
Common Problems and Symptoms for 66512789K311
Viewing 5 of 5Door latch failure
Fixed by these parts
How to fix it
Door won’t close
Fixed by these parts
How to fix it
Will Not Start
Fixed by these parts
How to fix it
Leaking
Fixed by these parts

How to fix it
Not cleaning dishes properly
Fixed by these parts
How to fix it


Keep searches simple. Use keywords, e.g. "leaking", "pump", "broken" or "fit".
- Customer:
- RONALD from PRESCOTT, AZ
- Parts Used:
- WPW10653840
- Difficulty Level:
- Really Easy
- Total Repair Time:
- 30 - 60 mins
Door would not latch shut
Following a utube video made it easy. Removed the outer cover of the door to expose latch. Two screws remove the latch, pay attention to how it was positioned and put the new one on and then replace the panel. But first turn off the electricity to the unit at the fuse box.
Was this instruction helpful to you?
Thank you for voting!
- Customer:
- Colin from Goffstown, NH
- Parts Used:
- WPW10653840
- Difficulty Level:
- Easy
- Total Repair Time:
- 30 - 60 mins
- Tools:
- Screw drivers
Door latch wouldn't close
Turned off power to the dishwasher. Removed the front panel via the screws on the inner wall of the door. Lifted and pulled out the front panel. Disconnected cable connections to fully remove the front panel. Pressed down on the latches to the left and right side of the door latch. Pulled out the door latch. Put in new door latch until it
... Read more
clicked into place. Reattached cable connections. Put the front panel back on with the screws. Turned back on power to the dishwasher.
Read less
Was this instruction helpful to you?
Thank you for voting!
Hinge bent went spring cable broke
My wife hired a local repairman when the right side spring cable broke (I was out of town). He took two hours to fix it (and two appointments). The door would then pop open when running. He came back and replaced the latch. Problems persisted. I then ordered new hinges and replaced both in half hour or so. Would recommend doing all
... Read more
of these repairs yourself. None of these repairs are that hard and definitely not worth paying hundreds to do it. Trickiest part is pulling the dishwasher out from the counter without impacting the electrical or water connections. Disconnecting the power is important on all repairs. When you take the screws out of the door to get to the hinges, make sure you have a helper just to hold the door up while removing the last few screws. The left side hinge was really bent (when the right side spring cable broke) - caused the door to be out of square and thus would not effectively close. This was obvious after a 5 minute search on this this and other repair sites. Process that I used: 1. remove screws from both sides holding dishwasher into counter (may have screws into countertop as well). 2. turn off power, 3. pull out dishwasher far enough to see hinges and springs (careful of connections), 4. remove front door screws, 5. take off front panel, 6. remove spring cables (pull cable taut and remove "hook" from hinge)., 7. unscrew two screws holding hinge to door, 8. bend metal fingers around hinge pin to be able to remove hinge., 9. attach hinge in opposite path. 10. repeat on other side (if necessary), 11. reconnect things in opposite order...test door prior to reattaching door panel. Make sure you level the unit with the adjustable feet. Make sure screws in sides of cabinet aren't too tight as it can take the unit out of square pretty easily...
Read less
Was this instruction helpful to you?
Thank you for voting!