


Models
>
66517422992
66517422992 Kenmore Dishwasher
Jump to:
Find Part by Name
Keep searches simple, eg. "belt" or "pump".
Manuals & Guides for 66517422992
Click to downloadKeep searches simple, eg. "belt" or "pump".

In Stock
Order now and your part arrives by Jul 31

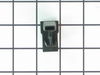
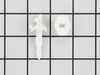
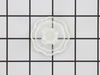
This metallic spring is for your dishwasher's soap cup cover. Sold individually.
In Stock
Order now and your part arrives by Jul 31

$48.21
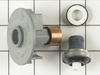
Used with some portable dishwashers and washers. NOTE: As per the factory, this is used for faucets with inside or outside threads. For female connection (outside) just remove the washers.
In Stock
Order now and your part arrives by Jul 31

$7.60
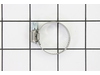
This hose clamp extends from half an inch to an inch in diameter. It is made entirely of metal and is intended for use with Maytag brand washing machines.
In Stock
Order now and your part arrives by Jul 31

In Stock
Order now and your part arrives by Jul 31

$24.15
This 18 ml bottle of white appliance touch-up paint is used to cover scratches or marks on your appliance. The white touch-up paint can be used on refrigerators, microwaves, ranges, clothes dryers, an...
In Stock
Order now and your part arrives by Jul 31

$10.88
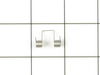
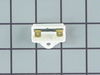
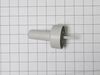
The lid hinge pin or detergent lid pin on your dishwasher helps dispense your dish detergent when your dishwasher is running. The pin fits with the dispenser lid and allows the lid to pop open and dis...
In Stock
Order now and your part arrives by Jul 31

In Stock
Order now and your part arrives by Jul 31


In Stock
Order now and your part arrives by Jul 31

In Stock
Order now and your part arrives by Jul 31

$36.42
This panel is reversible, black on one side, white on the other side.
In Stock
Order now and your part arrives by Jul 31
Common Problems and Symptoms for 66517422992
Viewing 10 of 10Leaking
Fixed by these parts
How to fix it
Will not dispense detergent
Fixed by these parts

How to fix it
Door latch failure
Fixed by these parts
How to fix it
Not drying dishes properly
Fixed by these parts
How to fix it
Not cleaning dishes properly
Fixed by these parts
How to fix it
Will Not Start
Fixed by these parts
How to fix it
Not draining
Fixed by these parts

How to fix it
Door won’t close
Fixed by these parts
How to fix it
Will not fill with water
Fixed by these parts

How to fix it
Noisy
Fixed by these parts
How to fix it


Keep searches simple. Use keywords, e.g. "leaking", "pump", "broken" or "fit".
- Customer:
- mary from Fountain Green, UT
- Parts Used:
- WP3371710
- Difficulty Level:
- A Bit Difficult
- Total Repair Time:
- 15 - 30 mins
- Tools:
- Screw drivers
leaking water
The first thing I did was to investigate. I needed to find where the leak was coming from. It was leaking from just above tne door front panel, directly underneath the control panel buttons. I opened the dishwasher door, and decided to remove the door screen vent. I was covered with some offwhite fiberous, or filter like material. I thou
... Read more
ght perhaps the filter had broken down, and I ordered a new screen. When it arrived, and, although I had expected to receive a new filter with the plastic door screen, I didn't. There wasn't one to be ordered. I looked at the screen again. My problem was, that although I had considered that the substance I had thought was a filter, was instead build up of detergent, and other particals. That idea didn't seem to make sense. I didn't think it was possible for that stuff to get to the door screen. I thought, it was too far away from the dispenser and food particles. As it turned out, the buildup was, in fact, the problem. I properly cleaned the door vent, which was then fine, and I put it back into the door. There were no more leaks, that was it, and the problem was solved. As a last note however, unfortunatley, I have to return the new door vent screen that I ordered. I enjoyed solving the problem, and you all helped alot. Let's do it again sometime.
Read less
Was this instruction helpful to you?
Thank you for voting!
Worn out spring on detergent release box lid
First, examine very carefully how the old spring relates to the detergent release box lid. Note that the top of the spring has a square-end upside down "U" . This rests on a small ledge on the detergent box. Also note that on either end of the spring is a straight extension of the spring wire. These two "legs" must rest on the inside o
... Read more
f the edge of the detergent box. Second, use a flat blade screw driver to pry the LID hinge pin from the mounting "posts. Remove the pin, first noting the position of the spring. Reassemble the spring on the hinge pin in reverse order. Then snap the lid onto the spring using the two mounting "posts". NOTE: I used a very fine needle nose pliers to move the two spring "legs" behind the detergent box edge after I had mounted the lid. Flip the lid down to test if the spring pressure on the lid can be felt. Harold Kitzmann, Fishersville VA
Read less
Was this instruction helpful to you?
Thank you for voting!
- Customer:
- Andrew from Cottage Grove, MN
- Parts Used:
- 4386996A
- Difficulty Level:
- Easy
- Total Repair Time:
- 1- 2 hours
- Tools:
- Pliers, Screw drivers
Dishwasher was leaking from bottom
After determining that the leak was coming basically from the motor shaft I googled until I thought I could handle it, took it apart to confirm I could get it apart (I thought it might be too stuck and I might need the whole motor thing) and then ordered the kit.
I don't think this could be done with the dishwasher in place, so ... Read more I turned the water off to the unit and unplugged it. I had previously removed the front bottom cover plates (4 screws). I opened the front, removed the lower dish rack and unscrewed it from the bottom side of the counter, disconnected the water supply and drain line, then wiggled it out being careful of the insulation sheets, hoses, etc. Note, water drains everywhere. I had some baking pans to contain and paper towels to wipe but still, be safe / prepared.
I disconnected everything from the motor / impeller housing area, then went inside the unit and loosened the lock ring thing around the base of whatever you call the spinning arm / sprayer, it took a little effort, might be easier to try this when it is still mounted to the counter. After that main ring was removed the housing with the motor and everything just wiggled free.
I unscrewed the motor's 3 Torx screws, and then the unscrewed the plastic "X" at the end opposite the motor, the brass weight pulls straight off and the impeller is supposed to come off too. Mine was stuck like many I read about. I drilled a hole in the end of the plastic impeller and drove the motor shaft out with a punch and hammer, it worked pretty slick. Then I carefully pried out the last seal and stopped for a cold beverage, major success.
I carefully pushed the new seal into the housing, reattached the motor to the housing, pushed on the other new seals, the impeller, the new brass weight in the same order the old ones were, and screwed on the "X" on the end as snug as I could. Then I carefully reattached the motor and housing to the bottom of the dishwasher, ensuring good solid seals and tightening that big ring again from the inside as snug as I could get it, carefully hooked everything on the bottom back up basically in the reverse of disassembly, put the unit back under the counter, plugged it in, turned the water back on to it, loaded it and tested it. I was fortunate enough to not have it leak anywhere, after 3 or 4 loads I reattached the bottom trim pieces and checked this off my list.
Also, would love to mention that your site is great, the parts were priced attractively, they arrived very quickly and were a snap to install.
Thanks for saving me a ton of money / headaches!
Andy
Read less
Was this instruction helpful to you?
Thank you for voting!