


Models
>
HDA3740G02SA
HDA3740G02SA Hotpoint Dishwasher
Jump to:
Find Part by Name
Keep searches simple, eg. "belt" or "pump".
Diagrams for HDA3740G02SA
Viewing 4 of 4


Manuals & Guides for HDA3740G02SA
Click to downloadKeep searches simple, eg. "belt" or "pump".

$83.24
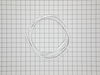
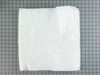
This one piece dishwasher door gasket provides a water tight seal to keep water from leaking out of your dishwasher.
In Stock
Order now and your part arrives by Jul 27

In Stock
Order now and your part arrives by Jul 27

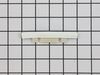
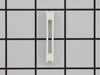
The gasket insert is connected to the gasket in the bottom of your dishwasher door. It is a small piece of white plastic that measures approximately 4 inches by 1 inch, and is sold individually. The g...
No Longer Available

$79.61
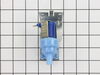
This water inlet valve should be located behind the lower kickplate panel in either the right or left corner. The attaching solenoids on the valve open and close according to the desired amount of wat...
In Stock
Order now and your part arrives by Jul 27

In Stock
Order now and your part arrives by Jul 27

$15.26
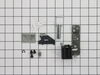
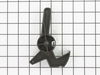
The hinge link on your dishwasher connects the spring to the dishwasher door hinge. If the hinge link becomes cracked or damaged, you may not be able to shut or lock your dishwasher door properly. In ...
In Stock
Order now and your part arrives by Jul 27

$226.47
This dishwasher pump and motor kit is a comprehensive replacement solution for various models manufactured since 1970. The redesigned assembly includes a built-in drain solenoid, streamlining installa...
In Stock
Order now and your part arrives by Jul 27

In Stock
Order now and your part arrives by Jul 27

On Order


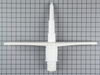
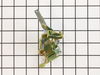
This part helps stop your dishwasher from leaking. This kit includes the impeller, seal, blade, filter, skidder and skidder holder.
No Longer Available

$28.91
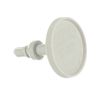
This is the replacement detergent cup release arm for your dishwasher. It is made of black plastic and is sold individually. The detergent cup release arm is found on the inside of the dishwasher door...
In Stock
Order now and your part arrives by Jul 27
Common Problems and Symptoms for HDA3740G02SA
Viewing 10 of 10Leaking
Fixed by these parts
How to fix it
Not draining
Fixed by these parts

How to fix it
Not cleaning dishes properly
Fixed by these parts
How to fix it
Will not fill with water
Fixed by these parts
How to fix it
Door latch failure
Fixed by these parts
How to fix it
Will not dispense detergent
Fixed by these parts

How to fix it
Will Not Start
Fixed by these parts
How to fix it
Door won’t close
Fixed by these parts
How to fix it
Noisy
Fixed by these parts
How to fix it
Not drying dishes properly
Fixed by these parts
How to fix it


Keep searches simple. Use keywords, e.g. "leaking", "pump", "broken" or "fit".
- Customer:
- Dan from Minnetonka, MN
- Parts Used:
- WD24X10018
- Difficulty Level:
- Really Easy
- Total Repair Time:
- Less than 15 mins
- Tools:
- Nutdriver
Dishwasher wouldn't fully drain
I removed the four screws holding the screen and molded plastic cage inside the rear of the dishwasher to expose the check valve assembly. I then unscrewed the piston and nut assembly with my hand and replaced it with the new one. I found that the rubber cone shaped valve on the old piston and nut assembly was entirely disintegrated. T
... Read more
his easy repair solved the problem.
Read less
Was this instruction helpful to you?
Thank you for voting!
- Customer:
- mike from huntley, IL
- Parts Used:
- WD15X10003
- Difficulty Level:
- Easy
- Total Repair Time:
- Less than 15 mins
- Tools:
- Pliers, Screw drivers, Wrench (Adjustable), Wrench set
Dish washer is not running through cycles
First and formost before you buy read everything in trouble shooting your dishwasher. Then you do not buy parts you do not need. First you turn off power, then water. Remove two screws, a rubber hose and a hard line by unscrewing if you are lucky some contractors might sweat this on. No biggie just two extra steps that's all. do in reve
... Read more
rse to assemble...
Read less
Was this instruction helpful to you?
Thank you for voting!
- Customer:
- Ed from Cornelius, NC
- Parts Used:
- WD21X10060
- Difficulty Level:
- Really Easy
- Total Repair Time:
- Less than 15 mins
- Tools:
- Nutdriver, Screw drivers
D/W would not drain. Water standing in bottom.
It is a simple process to replace the drain solenoid on these dishwashers, having replaced several in the past few months.
After removing the front bottom panels, I removed the 2 screws holding the old solenoid, unplugged the wire harness, and then switched over the springs to the new solenoid. Assembly was installing 2 scre ... Read more ws, and plugging in the wire harness.
I work on a 260 + unit property, as well as working for a property management company who rents single family homes.
PartSelect.com is an excellent source of parts, shipping in a quick manner, allowing the repairs to be completed in a timely manner. Thank you.
Read less
Was this instruction helpful to you?
Thank you for voting!