


Models
>
HDA2100H65CC
HDA2100H65CC Hotpoint Dishwasher
Jump to:
Find Part by Name
Keep searches simple, eg. "belt" or "pump".
Diagrams for HDA2100H65CC
Viewing 3 of 3


Keep searches simple, eg. "belt" or "pump".

$155.35
This is a manufacturer-approved lower dish rack with six wheels and supports. The lower dish rack is where dishes are placed in the bottom portion of the dishwasher to be cleaned during the wash cycle...
In Stock
Order now and your part arrives by Jul 23

$83.24
This one piece dishwasher door gasket provides a water tight seal to keep water from leaking out of your dishwasher.
In Stock
Order now and your part arrives by Jul 23

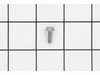
This OEM-compatible screw is designed for use with many GE dishwashers. Measuring 8-16 HXW and 1/2" in length, this stainless steel screw secures the middle spray arm hub to the upper rack assembly, e...
In Stock
Order now and your part arrives by Jul 23

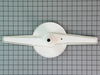
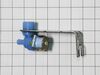
This valve opens in order for the water to drain out of the dishwasher.
In Stock
Order now and your part arrives by Jul 23

$184.15
This is a replacement lower wash arm assembly for your dishwasher. The lower spray arm is mounted to the bottom of your dishwasher tub and will rotate and spray water during the wash cycle. The spray ...
In Stock
Order now and your part arrives by Jul 23

$79.50
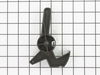
This part fits just under the fine filter assembly and supports the lower spray arm.
In Stock
Order now and your part arrives by Jul 23

$28.91
This is the replacement detergent cup release arm for your dishwasher. It is made of black plastic and is sold individually. The detergent cup release arm is found on the inside of the dishwasher door...
In Stock
Order now and your part arrives by Jul 23

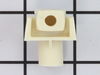
$15.26
This coupler, also known as a hose connector, is made of white plastic and is about one inch in height, and just over one inch in length. Replacing the coupler is a fairly easy repair. The hardest par...
In Stock
Order now and your part arrives by Jul 23

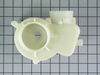
$194.58
This motor and pump assembly circulates water during wash and rinse cycles and drains it from the tub. It’s a durable replacement for units that cause poor cleaning or drainage problems. Installing a ...
In Stock
Order now and your part arrives by Jul 23

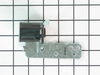
Special Order

$106.95
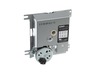
This dishwasher timer controls the sequence and timing of wash, rinse, and dry cycles. It replaces faulty units that cause cycle interruptions or irregular operation. Compatible with GE and Hotpoint m...
In Stock
Order now and your part arrives by Jul 23

$36.81
This inlet valve regulates water entering the dishwasher for proper wash and rinse cycles. A worn valve can cause filling issues or leaks. Compatible with GE and Hotpoint models, it installs quickly a...
In Stock
Order now and your part arrives by Jul 23
Common Problems and Symptoms for HDA2100H65CC
Viewing 8 of 8Leaking
Fixed by these parts

How to fix it
Not draining
Fixed by these parts

How to fix it
Not cleaning dishes properly
Fixed by these parts
How to fix it
Will not dispense detergent
Fixed by these parts
How to fix it
Door latch failure
Fixed by these parts
How to fix it
Will not fill with water
Fixed by these parts
How to fix it
Noisy
Fixed by these parts
How to fix it
Will Not Start
Fixed by these parts
How to fix it


Keep searches simple. Use keywords, e.g. "leaking", "pump", "broken" or "fit".
- Customer:
- Larry from Fort Worth, TX
- Parts Used:
- WD22X10055, WD12X10244
- Difficulty Level:
- A Bit Difficult
- Total Repair Time:
- 30 - 60 mins
- Tools:
- Socket set, Wrench set
Telescopic sprayer assembly in the Spray Arm Weld broke top element popped out
First off on this model, if one of the telescopic spray arm weld assembly comes out it is NOT repairable you have to replace the whole part.
The assembly on my model number was simple you do NOT have to PRY anything out...(I broke the base spray arm trying to shove a screw driver into the Spray arm weld.(You could try this but chanc ... Read more es are the plastic will break and I recommend replacing both parts why not???.)
There are two bolts on the sump protector basket that has to be removed first. They are 1/4 inch.
Once that cover is free there is a bolt (also 1/4 inch) on the base spray arm it is easy to see but hard to get to I used a very thin open ended wrench
1/3 turn at a time till I could get the socket on it.
Next there is a rubber gromet like thingy that just pulls loose remove it also.
Next take the spanner wrench (I used one with a rubber belt) wrap around base spray arm and turn counter clockwise it just unscrews.
reassembly is simple but this is GE so I inspected the sump and found one medal impeller and one black screw at the bottom!!!!!
The impeller is threaded and just screws onto the shaft (look at the diagrams on this web site to see placement.)
Throw the screw away it does nothing except if left there jacks up the impeller I am guessing it fell out of some factory workers pocket.
If after you put all the parts back in and the washer does not drain check your reassembly if you don't line the parts up just right the unit will not drain.
Don't forget the rubber grommet (not sure what it does but it's easy to replace after all is assembled) also there is a metal washer that is inbetween the base spray arm and the spray arm weld put it back before you click those two parts together it protect the plastic from wearing it is a bearing!!
If you found this site you are doing really good This site had all the diagrams I was looking for I love you guys you so rock!!! I wish the diagrams were bigger but they were adequate. GE 's site was no help and I doubt I will ever buy another one from them.
Good luck just remember look at the parts diagrams before attempting the repair.
Read less
Was this instruction helpful to you?
Thank you for voting!
- Customer:
- michael from Bloomington, IN
- Parts Used:
- WD28X31819
- Difficulty Level:
- Really Easy
- Total Repair Time:
- More than 2 hours
lower dishrack rusted
replaced rack, no repairs required
Was this instruction helpful to you?
Thank you for voting!
- Customer:
- Hector from West Melbourne, FL
- Parts Used:
- WD21X10268
- Difficulty Level:
- Really Easy
- Total Repair Time:
- Less than 15 mins
- Tools:
- Screw drivers
Dishwasher water will not drain.
Very easy about 5 min replacement, Checked electrical conductivity to verify I had a bad solinoid, after I received the new part. I removed and replaced part by only removing and re-installed 2 screws and spring. Dishwasher worked like new.
Was this instruction helpful to you?
Thank you for voting!