


Models
>
CDT765SSF7SS
CDT765SSF7SS General Electric Dishwasher
Jump to:
Find Part by Name
Keep searches simple, eg. "belt" or "pump".
Diagrams for CDT765SSF7SS
Viewing 7 of 7


Keep searches simple, eg. "belt" or "pump".

$51.95
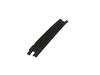
If your dishwasher door will not close or latch, or the machine will not start, you may need to replace the door latch. This genuine OEM replacement latch is meant to keep your dishwasher door closed ...
In Stock
Order now and your part arrives by Jul 30

$60.95
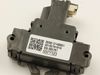
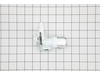
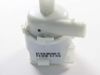
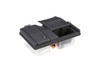
The flood switch in your dishwasher controls the amount of hot and cold water that enters the appliance, ensuring the proper quantity of water to run the cycle. If your dishwasher is over or under fil...
In Stock
Order now and your part arrives by Jul 30

$35.95
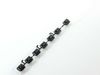
- Includes: 4 brackets, 4 roller wheel brackets, and 8 wheels part # WD12X26146
Dishwasher Lower Dishrack Carrier and Roller Kit (Set of 4). This kit will replace all four one piece roller carriers w...
In Stock
Order now and your part arrives by Jul 30

$37.49
This genuine OEM bracket is used to secure the dishwasher to your cabinetry. The mounting bracket measures approximately 3 inches in length and is made of metal. If you have a solid-surface countertop...
In Stock
Order now and your part arrives by Jul 30

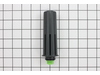
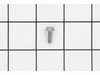
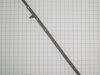
This OEM-compatible screw is designed for use with many GE dishwashers. Measuring 8-16 HXW and 1/2" in length, this stainless steel screw secures the middle spray arm hub to the upper rack assembly, e...
In Stock
Order now and your part arrives by Jul 30

$31.20
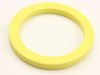
This dishwasher tub gasket is a durable replacement designed to create a watertight seal between the tub and door, preventing leaks during wash cycles and protecting surrounding cabinetry from water d...
Special Order

In Stock
Order now and your part arrives by Jul 30

In Stock
Order now and your part arrives by Jul 30

$37.35
This part is the replacement tub trim for your dishwasher. It is approximately 26 inches long and 2 inches wide. The tub trim is found on the exterior of the dishwasher, and the main reason you would ...
In Stock
Order now and your part arrives by Jul 30

In Stock
Order now and your part arrives by Jul 30

$50.36
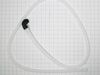
This middle conduit assembly, also known as the middle spray arm water supply tube, is an authentic OEM replacement part designed for dishwashers. It is a gray, plastic tube that connects the main wat...
In Stock
Order now and your part arrives by Jul 30

Special Order
Common Problems and Symptoms for CDT765SSF7SS
Viewing 10 of 10Leaking
Fixed by these parts

How to fix it
Will Not Start
Fixed by these parts
How to fix it
Not drying dishes properly
Fixed by these parts
How to fix it
Door latch failure
Fixed by these parts
How to fix it
Not cleaning dishes properly
Fixed by these parts

How to fix it
Will not fill with water
Fixed by these parts
How to fix it
Not draining
Fixed by these parts
How to fix it
Door won’t close
Fixed by these parts
How to fix it
Will not dispense detergent
Fixed by these parts
How to fix it
Noisy
Fixed by these parts
How to fix it


Keep searches simple. Use keywords, e.g. "leaking", "pump", "broken" or "fit".
- Customer:
- Jeff from AUBURNDALE, MA
- Parts Used:
- WD21X10519
- Difficulty Level:
- Easy
- Total Repair Time:
- 30 - 60 mins
- Tools:
- Nutdriver, Screw drivers
No water flowing into dishwasher
We tried cleaning out the filter and it clogged with a huge amount of gunk. We removed the gunk, scrubbed the filter, and tried running the dishwasher, but still no water. That took over an hour (not counting the time the dishwasher spent running). Then we tried your diagnosis center and it pointed to the flood switch or the water valve.
... Read more
I extracted the flood switch (another 30-60 minutes) to check it, and it also contained gunk and (significantly) did not rattle, which made me suspect the flood switch was the problem, so I ordered one. Once the replacement arrived, I checked it and the flood switch rattled, confirming that it should work properly. I spent 30-45 minutes installing it, plus the filter assembly and racks I had to remove to access it. Ran the dishwasher and everything came out sparkling clean. I don't know where the gunk came from, but if you aren't getting water and the filter is full of gunk, check the flood switch.
Read less
Was this instruction helpful to you?
Thank you for voting!
- Customer:
- Cheyne from RIVERSIDE, CA
- Parts Used:
- WD21X10519
- Difficulty Level:
- Really Easy
- Total Repair Time:
- Less than 15 mins
- Tools:
- Nutdriver
Heating Element Wasn't Turning On So Dishes Weren't Drying
Ran the diagnostic code test and no alarms turned on. Ran the heater test and it didn't turn on. I figured it was either the flood switch or the heating element itself. Removed and cleaned the flood switch and still nothing. Replaced the old flood switch and now it works like a charm. It took a minute to run tests and figure out a pl
... Read more
an of action, but after ordering and receiving the part it was a quick operation to replace the old flood switch. Kill the power. Remove lower basket. Remove lower arm. Remove the coarse filter and the fine filter. Dry up water in bottom of dishwasher. Use 1/4" nut driver to remove two screws holding flood switch in place. Unplug old switch. Plug in new one. And put everything back. Saved a few bucks for sure. If I can do it, you can do it!
Read less
Was this instruction helpful to you?
Thank you for voting!
- Customer:
- James from ALBRIGHTSVLLE, PA
- Parts Used:
- WD21X10490
- Difficulty Level:
- Really Easy
- Total Repair Time:
- Less than 15 mins
- Tools:
- Screw drivers
Door latch not functioning
1. Turn off breaker supplying power to dishwasher in electrical panel
2. Open dishwasher door
3. Unscrew the screws that secure the dishwasher to the counter.
4. Tip dishwasher forward. Identify the non-functioning door latch. It looks exactly like the replacement. Unclip the wire harness from the door latch.
5. ... Read more On the inside of the dishwasher, there are 2 screws directly under the door latch. Unscrew them and carefully set aside.
6. Remove old door latch.
7. Set new door latch in place. Holding securely, replace screws removed in step 5. Toward the end they get a little tougher to screw in.
8. Plug wire harness into new door latch.
9. Re-align dishwasher and re-secure to counter in previous position.
10. Test latch to make sure it closes properly.
11. Turn on breaker in electrical panel.
The dishwasher should now function properly.
Read less
Was this instruction helpful to you?
Thank you for voting!