


Models
>
GDT655SGJ0BB
GDT655SGJ0BB General Electric Dishwasher
Jump to:
Find Part by Name
Keep searches simple, eg. "belt" or "pump".
Diagrams for GDT655SGJ0BB
Viewing 6 of 6


Keep searches simple, eg. "belt" or "pump".

$16.95
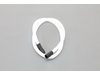
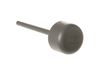
The roller helps the lower rack of your dishwasher to smoothly slide in and out of your appliance. A broken or worn roller wheel can make it clunky or difficult to get the rack in and out of the dishw...
In Stock
Order now and your part arrives by Aug 3

$30.95
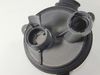
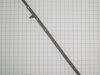
Please be informed that this OEM-verified part that DOES NOT come with the heatshield, as per GE directly and are no longer required. This lower spray arm assembly in your dishwasher distributes water...
In Stock
Order now and your part arrives by Aug 3

$51.95
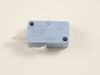
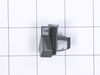
If your dishwasher door will not close or latch, or the machine will not start, you may need to replace the door latch. This genuine OEM replacement latch is meant to keep your dishwasher door closed ...
In Stock
Order now and your part arrives by Aug 3

$57.30
If your dishes are not dry after a cycle in the dishwasher, they may be an issue with the heating element. This part is used to heat the water in the dishwasher while it is running, and then helps to ...
In Stock
Order now and your part arrives by Aug 3

$35.95
- Includes: 4 brackets, 4 roller wheel brackets, and 8 wheels part # WD12X26146
Dishwasher Lower Dishrack Carrier and Roller Kit (Set of 4). This kit will replace all four one piece roller carriers w...
In Stock
Order now and your part arrives by Aug 3

$37.49
This genuine OEM bracket is used to secure the dishwasher to your cabinetry. The mounting bracket measures approximately 3 inches in length and is made of metal. If you have a solid-surface countertop...
In Stock
Order now and your part arrives by Aug 3

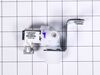
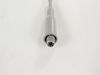
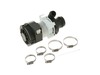
This is a washer inlet valve assembly for your dishwasher. This valve allows water to flow into your dishwasher at the proper rate. If your dishwasher tub is not filling with water or filling when the...
In Stock
Order now and your part arrives by Aug 3

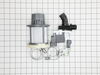
$118.71
This drain pump kit removes water from the dishwasher tub during the drain cycle. It may include multiple parts—check your model’s diagram for details. Designed for select models, it ensures proper dr...
In Stock
Order now and your part arrives by Aug 3

This OEM-compatible screw is designed for use with many GE dishwashers. Measuring 8-16 HXW and 1/2" in length, this stainless steel screw secures the middle spray arm hub to the upper rack assembly, e...
In Stock
Order now and your part arrives by Aug 3

In Stock
Order now and your part arrives by Aug 3

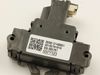
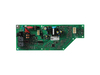
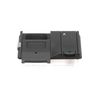
This is the user interface control board for various dishwashers. The user interface panel is what you directly interact with on your dishwasher to start and stop it and select the specific cycle you ...
In Stock
Order now and your part arrives by Aug 3

$46.07
This dishwasher detergent dispenser holds detergent securely and releases it during the wash cycle for effective cleaning. It’s a direct replacement for worn or malfunctioning dispensers and installs ...
In Stock
Order now and your part arrives by Aug 3
Common Problems and Symptoms for GDT655SGJ0BB
Viewing 10 of 10Leaking
Fixed by these parts

How to fix it
Will Not Start
Fixed by these parts
How to fix it
Not cleaning dishes properly
Fixed by these parts
How to fix it
Not drying dishes properly
Fixed by these parts
How to fix it
Not draining
Fixed by these parts
How to fix it
Door latch failure
Fixed by these parts
How to fix it
Noisy
Fixed by these parts
How to fix it
Will not fill with water
Fixed by these parts
How to fix it
Will not dispense detergent
Fixed by these parts
How to fix it
Door won’t close
Fixed by these parts
How to fix it


Keep searches simple. Use keywords, e.g. "leaking", "pump", "broken" or "fit".
- Customer:
- Brian from MANSFIELD, MA
- Parts Used:
- WD21X31902C
- Difficulty Level:
- A Bit Difficult
- Total Repair Time:
- 30 - 60 mins
- Tools:
- Nutdriver
Dishwasher was randomly beeping when not in use. Then eventually the display wouldn’t light up.
I first tested for 120volts to my dishwasher to verify it was getting power from my electrical panel. Then tested pins 2 and 5 on the control board to make sure there was 14 volts going to the user interface harness. After I verified that I knew it was the user interface that was bad. I watched a video I found on YouTube and followed it.
... Read more
This repair was fairly easy while watching the video and making sure that you use the correct pin out that comes in the box for your model. I’m not an appliance repair person and it took me about an hour start to finish. I’m going to attach the video I https://youtu.be/TI8cUjy5YOE
https://www.youtube.com/watch?v=GN5t4VFgLCY
https://www.youtube.com/watch?v=GN5t4VFgLCY
Read less
Was this instruction helpful to you?
Thank you for voting!
- Customer:
- David from SHAWNEE, KS
- Parts Used:
- WD05X30818
- Difficulty Level:
- Easy
- Total Repair Time:
- 30 - 60 mins
Diswasher not drying dishes
Didn't actually do the compete repair but got close. Pulled out dishwasher, disconnected and checked continuity on the existing heating element (about 16 ohms) the new element was also about 16 ohms. This indicates they both were working fine and no need for replacement. Next step would have been to swap the elements would have been
... Read more
simple. Tried to replace main board as well, still not the issue so giving up and replacing the dishwasher. It wasn't the high temp cut off thermostat either incidentally and no error codes in maintenance mode. Check continuity of your existing element before ordering to save aggravation.
Read less
Was this instruction helpful to you?
Thank you for voting!
- Customer:
- Daniel from JACKSONVILLE, AL
- Parts Used:
- WD05X30818
- Difficulty Level:
- Really Easy
- Total Repair Time:
- 15 - 30 mins
- Tools:
- Screw drivers, Wrench (Adjustable)
The dishes were not dry after the wash cycle
Open the washer, remove the bottom dish rack, then twist off the bottom water sprayer. Use a screwdriver to remove the mounting/ stabilizing screws so you can slide out the dishwasher. Close the dishwasher and slide it out. Underneath at the back there are two wires powering the drying element, carefully remove them. Use an adjustable wre
... Read more
nch to remove the two plastic mounting nuts for the drying element. Open the washer and remove the old drying element, and insert the new element. Reassemble the dishwasher in the reverse order if disassembly.
Read less
Was this instruction helpful to you?
Thank you for voting!