


Models
>
GSD490M-01
GSD490M-01 General Electric Dishwasher
Jump to:
Find Part by Name
Keep searches simple, eg. "belt" or "pump".
Diagrams for GSD490M-01
Viewing 3 of 3


Keep searches simple, eg. "belt" or "pump".

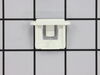
The rack slide end cap attaches to the rails of the upper dishrack, to prevent it from sliding all the way out. It is a one-inch white plastic part that can break over time. This might be the part you...
In Stock
Order now and your part arrives by Mar 29
 – Part Number: WD28X265")
In Stock
Order now and your part arrives by Mar 29

In Stock
Order now and your part arrives by Mar 29

$15.26
This push on nut is for your dishwasher or refrigerator. As the name suggests, it pushes into place, rather than being screwed in. It is approximately half an inch in diameter and is made of stainless steel.
In Stock
Order now and your part arrives by Mar 29

$202.13
This dishwasher pump and motor kit is a comprehensive replacement solution for various models manufactured since 1970. The redesigned assembly includes a built-in drain solenoid, streamlining installa...
In Stock
Order now and your part arrives by Mar 29

$50.36
This water inlet valve is specially designed for those dishwashers that fit under the counter from 1974 To Present. The valve should be located behind the lower kickplate panel in either the right or ...
In Stock
Order now and your part arrives by Mar 29

This part helps stop your dishwasher from leaking. This kit includes the impeller, seal, blade, filter, skidder and skidder holder.
No Longer Available

$63.68
This slide is mounted to each side of the upper cabinet wall. The dishrack wheels roll inside this track, which guides the upper rack.
In Stock
Order now and your part arrives by Mar 29

$48.21
This drain hose is an OEM, manufacturer-approved replacement part for your dishwasher. The drain hose filters out the wastewater from the dishwasher. If there is a hole in it, water will leak out of y...
In Stock
Order now and your part arrives by Mar 29

In Stock
Order now and your part arrives by Mar 29

$77.29
This kit includes the armature and link assembly. You may need the solenoid bracket which is sold separately.
This valve opens in order for the water to drain out of the dishwasher.
In Stock
Order now and your part arrives by Mar 29

$25.10
This hose clamp kit contains two clamps. The smaller of the two is an inch in diameter while the larger of the two is two inches in diameter.
In Stock
Order now and your part arrives by Mar 29
Questions and Answers
We're sorry, but our Q&A experts are temporarily unavailable.
Please check back later if you still haven't found the answer you need.
Common Problems and Symptoms for GSD490M-01
Viewing 8 of 8Leaking
Fixed by these parts


How to fix it
Not draining
Fixed by these parts


How to fix it
Will not fill with water
Fixed by these parts

How to fix it
Not cleaning dishes properly
Fixed by these parts


How to fix it
Noisy
Fixed by these parts

How to fix it
Will Not Start
Fixed by these parts
How to fix it
Door won’t close
Fixed by these parts
How to fix it
Door latch failure
Fixed by these parts
How to fix it


")


Keep searches simple. Use keywords, e.g. "leaking", "pump", "broken" or "fit".
- Customer:
- Mark from Morgan Hill, CA
- Parts Used:
- WD26X10013, WD24X10014, WD21X802, WD19X10032
- Difficulty Level:
- Easy
- Total Repair Time:
- 1- 2 hours
- Tools:
- Screw drivers, Socket set
Water not draining from dishwasher
I had never done work on my dishwasher - I was a rookie in this area. Turns out the work itself was quite simple. Pulled the dishwasher out, turned it over, and was able to easily replace the motor and pump assembly. The drain tube was also an easy replace. A couple key notes:
1. I also purchased a new drain solenoid and impell ... Read more er kit. Note that both of these items are already included in the Motor and Pump kit replacement. There is no need to by both, now I have extras.
2. The end of the drain tube has to be trimmed if you are routing the drain tube to an air gap mounted on your kitchen sink. You have to cut the large diameter end of the tube to get to the narrow portion that will fit on your air gap.
3. The first cycle you run with the new motor/pump assembly is noisy. When you first fire it up the components in the pump are all dry, and they squeal until the water gets to them. I initially thought I had done something wrong, but once the water started flowing all the peculiar sounds cleared up.
Read less
Was this instruction helpful to you?
Thank you for voting!
Water leak from gate (diverter) valve shaft
This was a fairly simple repair. After disconnecting power to the dishwasher and removing the panel below the door, first had to remove a retainer C clip from the gate valve shaft. Then disconnected the linkage from the gate valve solenoid, removed two return springs and slid the gate valve contol arm off the shaft. Then removed the solen
... Read more
oid bracket that was fastened to the housing by 2 screws. This allowed access to the push on nut on the valve shaft. Removed the old push on nut which exposed the leaking seal. Removed the bad seal, then moistened and carefully slid on and seated the new drain valve shaft seal. Affixed new push on nut. Reinstalled the above mentioned parts that were removed. Problem solved - no more leak. Total cost $18.81 for factory GE parts plus $6.95 shipping. Thank you PartSelect.
Read less
Was this instruction helpful to you?
Thank you for voting!
- Customer:
- Don from Mount Vernon, IL
- Parts Used:
- WD15X93
- Difficulty Level:
- Easy
- Total Repair Time:
- 30 - 60 mins
- Tools:
- Nutdriver, Screw drivers, Wrench set
Insufficient fill water, dishes not getting clean (valve diaphram had ruptured)
1. Remove lower cover skirt.
2. Shut of water at undersink valve.
3. Unplug power cord or turn off circuit breaker.
4. Disconnect water supply line from fill valve.
5. Unplug the electrical connector from the valve.
6. Remove the 2 valve mounting bracket screws.
7. With loose valve in hand, rotate to g ... Read more ain access to allow release of outlet hose clamp for hose removal.
8. Remove brass fitting from old valve and install on new valve. Use teflon tape on the pipe threads only.
Install new valve by reversing the procedure.
Read less
Was this instruction helpful to you?
Thank you for voting!