


Models
>
GSD5112F00AA
GSD5112F00AA General Electric Dishwasher
Jump to:
Find Part by Name
Keep searches simple, eg. "belt" or "pump".
Diagrams for GSD5112F00AA
Viewing 3 of 3


Manuals & Guides for GSD5112F00AA
Click to downloadKeep searches simple, eg. "belt" or "pump".

$147.07
This is a manufacturer-approved lower dish rack with six wheels and supports. The lower dish rack is where dishes are placed in the bottom portion of the dishwasher to be cleaned during the wash cycle...
In Stock
Order now and your part arrives by Apr 6

$81.09
This one piece dishwasher door gasket provides a water tight seal to keep water from leaking out of your dishwasher.
In Stock
Order now and your part arrives by Apr 6

In Stock
Order now and your part arrives by Apr 6

$42.85
This is a basket for washing flatware or silverware in your dishwasher.
In Stock
Order now and your part arrives by Apr 6

$31.05
The gasket insert is connected to the gasket in the bottom of your dishwasher door. It is a small piece of white plastic that measures approximately 4 inches by 1 inch, and is sold individually. The g...
In Stock
Order now and your part arrives by Apr 6

In Stock
Order now and your part arrives by Apr 6

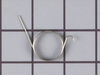
$15.26
The hinge link on your dishwasher connects the spring to the dishwasher door hinge. If the hinge link becomes cracked or damaged, you may not be able to shut or lock your dishwasher door properly. In ...
In Stock
Order now and your part arrives by Apr 6

$202.13
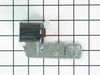
This dishwasher pump and motor kit is a comprehensive replacement solution for various models manufactured since 1970. The redesigned assembly includes a built-in drain solenoid, streamlining installa...
In Stock
Order now and your part arrives by Apr 6

This valve opens in order for the water to drain out of the dishwasher.
In Stock
Order now and your part arrives by Apr 6

In Stock
Order now and your part arrives by Apr 6

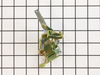
This part helps stop your dishwasher from leaking. This kit includes the impeller, seal, blade, filter, skidder and skidder holder.
No Longer Available

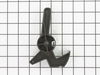
$28.91
This is the replacement detergent cup release arm for your dishwasher. It is made of black plastic and is sold individually. The detergent cup release arm is found on the inside of the dishwasher door...
In Stock
Order now and your part arrives by Apr 6
Questions and Answers
We're sorry, but our Q&A experts are temporarily unavailable.
Please check back later if you still haven't found the answer you need.
Common Problems and Symptoms for GSD5112F00AA
Viewing 10 of 10Leaking
Fixed by these parts


How to fix it
Not draining
Fixed by these parts


How to fix it
Not cleaning dishes properly
Fixed by these parts


How to fix it
Door latch failure
Fixed by these parts

How to fix it
Will not dispense detergent
Fixed by these parts

How to fix it
Will Not Start
Fixed by these parts


How to fix it
Door won’t close
Fixed by these parts

How to fix it
Noisy
Fixed by these parts

How to fix it
Will not fill with water
Fixed by these parts
How to fix it
Not drying dishes properly
Fixed by these parts
How to fix it


Keep searches simple. Use keywords, e.g. "leaking", "pump", "broken" or "fit".
- Customer:
- Dan from Minnetonka, MN
- Parts Used:
- WD24X10018
- Difficulty Level:
- Really Easy
- Total Repair Time:
- Less than 15 mins
- Tools:
- Nutdriver
Dishwasher wouldn't fully drain
I removed the four screws holding the screen and molded plastic cage inside the rear of the dishwasher to expose the check valve assembly. I then unscrewed the piston and nut assembly with my hand and replaced it with the new one. I found that the rubber cone shaped valve on the old piston and nut assembly was entirely disintegrated. T
... Read more
his easy repair solved the problem.
Read less
Was this instruction helpful to you?
Thank you for voting!
- Customer:
- michael from Bloomington, IN
- Parts Used:
- WD28X31819
- Difficulty Level:
- Really Easy
- Total Repair Time:
- More than 2 hours
lower dishrack rusted
replaced rack, no repairs required
Was this instruction helpful to you?
Thank you for voting!
- Customer:
- Daniel from South Elgin, IL
- Parts Used:
- WD22X10043, WD24X10018
- Difficulty Level:
- Easy
- Total Repair Time:
- Less than 15 mins
- Tools:
- Nutdriver, Screw drivers
Dishwasher would not drain completely,
Found a forum on the internet that said the Air Check Valve located under the screen on the bottom of the back wall inside the wash compartment may be the culprit. Took it out by using nut driver to remove screen, and twisting the part out. The seal was deteriorated. Repleacing the part was simply the opposite, and very easy.
... Read more I also replaced the screen on the floor of the wash compartment because the rubber was deteriorating there too. Here I had to remove the spray arm by carefully prying the locking tabs outwards and lifting the entire spray assembly upwards. Then, then plastic covers need to be unscrewed and removed. The new part had the plastic cage molded into it. So I discarded the old plastic cage. There are a couple of retaining clips that are a little tricky to get off the plastic posts. But, they can be removed by prying a standard screw driver underneath and working them off the post. Do not break the plastic post, and save the retaining rings. The new part does not come with any screws or retainers, so you will need to re-use them. Simply, place the new screen in position, slide on the retaining clips, and screw down the cage. The spray assembly is just slid back onto the shaft and snaps into place. A lot of writing, but was rather simple to do. 15-20 minutes.
... Read more I also replaced the screen on the floor of the wash compartment because the rubber was deteriorating there too. Here I had to remove the spray arm by carefully prying the locking tabs outwards and lifting the entire spray assembly upwards. Then, then plastic covers need to be unscrewed and removed. The new part had the plastic cage molded into it. So I discarded the old plastic cage. There are a couple of retaining clips that are a little tricky to get off the plastic posts. But, they can be removed by prying a standard screw driver underneath and working them off the post. Do not break the plastic post, and save the retaining rings. The new part does not come with any screws or retainers, so you will need to re-use them. Simply, place the new screen in position, slide on the retaining clips, and screw down the cage. The spray assembly is just slid back onto the shaft and snaps into place. A lot of writing, but was rather simple to do. 15-20 minutes.
Read less
Was this instruction helpful to you?
Thank you for voting!