


Models
>
GDT665SBN2TS
GDT665SBN2TS General Electric Dishwasher
Jump to:
Find Part by Name
Keep searches simple, eg. "belt" or "pump".
Diagrams for GDT665SBN2TS
Viewing 7 of 7


Keep searches simple, eg. "belt" or "pump".

This basket is part of a silverware basket that has 3 sections. This is the middle section of the basket.
In Stock
Order now and your part arrives by Jul 27

$35.95
- Includes: 4 brackets, 4 roller wheel brackets, and 8 wheels part # WD12X26146
Dishwasher Lower Dishrack Carrier and Roller Kit (Set of 4). This kit will replace all four one piece roller carriers w...
In Stock
Order now and your part arrives by Jul 27

$37.49
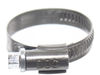
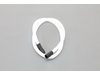
This genuine OEM bracket is used to secure the dishwasher to your cabinetry. The mounting bracket measures approximately 3 inches in length and is made of metal. If you have a solid-surface countertop...
In Stock
Order now and your part arrives by Jul 27

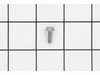
This OEM-compatible screw is designed for use with many GE dishwashers. Measuring 8-16 HXW and 1/2" in length, this stainless steel screw secures the middle spray arm hub to the upper rack assembly, e...
In Stock
Order now and your part arrives by Jul 27

$31.20
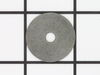
This dishwasher tub gasket is a durable replacement designed to create a watertight seal between the tub and door, preventing leaks during wash cycles and protecting surrounding cabinetry from water d...
Special Order

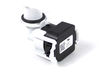
This part is a replacement middle spray arm bearing for your dishwasher. The spray arm bearing reduces friction and allows the spray arm to rotate during the operating cycle. If the spray arm is not r...
On Order

$15.35
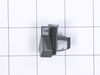
This dishwasher latch strike is a manufacturer-approved replacement part for your appliance. The latch strike is an important component in your dishwasher door assembly, and adds an extra layer of sec...
In Stock
Order now and your part arrives by Jul 27

$37.35
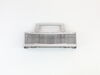
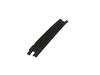
This part is the replacement tub trim for your dishwasher. It is approximately 26 inches long and 2 inches wide. The tub trim is found on the exterior of the dishwasher, and the main reason you would ...
In Stock
Order now and your part arrives by Jul 27

In Stock
Order now and your part arrives by Jul 27

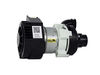
$118.45
This wash pump service kit is designed to restore proper water circulation in your dishwasher, ensuring thorough cleaning during each cycle. Operating at 120 volts and 60 Hz, the pump pressurizes wate...
In Stock
Order now and your part arrives by Jul 27

In Stock
Order now and your part arrives by Jul 27

In Stock
Order now and your part arrives by Jul 27
Common Problems and Symptoms for GDT665SBN2TS
Viewing 8 of 8Leaking
Fixed by these parts

How to fix it
Not cleaning dishes properly
Fixed by these parts
How to fix it
Will Not Start
Fixed by these parts
How to fix it
Not draining
Fixed by these parts
How to fix it
Will not fill with water
Fixed by these parts
How to fix it
Door latch failure
Fixed by these parts
How to fix it
Noisy
Fixed by these parts
How to fix it
Door won’t close
Fixed by these parts
How to fix it


Keep searches simple. Use keywords, e.g. "leaking", "pump", "broken" or "fit".
- Customer:
- Gary from ARLINGTON, WA
- Parts Used:
- WD21X27998
- Difficulty Level:
- Very Easy
- Total Repair Time:
- 30 - 60 mins
- Tools:
- Screw drivers, Socket set
Dishwasher would quit after about 3-4 minutes.
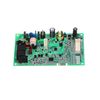
Decided it could be 1 of 3 things. Fuse on main circuit board that controls hot water. Main control board or drain pump failure. Was not able to find out how to do diagnostics on this unit as there is no "cycle control" feature and this is a top of the line unit. Replaced the fuse and dishwasher failed. Replaced the circuit board and dish
... Read more
washer failed the first time. Second time it went to completion and has worked properly since. You can go on line and find videos on removing the circuit board for GE dishwashers. This can be done without pulling the dishwasher out. Remove the lower black dust panel and insulation. Remove cover to electrical box - 1 screw and remove. Remove 2 to 4 screw on a sheet metal bracket that holds the circuit board. Notice where 2 metal hangers are located if you remove 4 screws on the left and right side of machine as they drop out. Remove black corded door sensor under circuit board. Work the sheet metal back and forth to remove from dish washer so that circuit board is exposed. Remove circuit board connectors and pull out unit to install new circuit board. Some have one screw and some have only plastic retainers. Re-install. I did not need the drain pump and the circuit board comes with a control board fuse. Washer was only 14 months old and 2 months out of warranty.
Read less
Was this instruction helpful to you?
Thank you for voting!
- Customer:
- Linda from MYRTLE BEACH, SC
- Parts Used:
- WD21X25468
- Difficulty Level:
- Easy
- Total Repair Time:
- More than 2 hours
- Tools:
- Nutdriver, Pliers, Screw drivers, Wrench (Adjustable)
Dishwasher would not fill with water and would shut off
I found it online! There were step by step instructions that were easy to understand. I have never had to do anything like this in my life, only recently had to start doing everything around the house myself due to husband's illness.
The repairman came out, charged me $100 to determine what the dishwasher needed & left me with the p ... Read more art number. He was going to charge me $389 to install the part and they were over charging for the part. The repairman suggested I just get a new dishwasher.
I ordered the part from the website at 1/2 the price that the other place charges and found it on line. With the step by step instructions and the online page, I successfully installed it MYSELF. Saved me a ton of $$.
I LOVE the website
Thank You!!!!
Read less
Was this instruction helpful to you?
Thank you for voting!
- Customer:
- Craig from Cedar Rapids, IA
- Parts Used:
- WD28X24469
- Difficulty Level:
- Really Easy
- Total Repair Time:
- Less than 15 mins
Original Silverware Basket Broken
Removed original silverware basket from dishwasher rack. Replaced it with new silverware basket. Placed original silverware basket in recycle bin (plastic content). So easy, even my 24 year old son could do it!
Was this instruction helpful to you?
Thank you for voting!