


Models
>
CDT845M5N2S5
CDT845M5N2S5 General Electric Dishwasher
Jump to:
Find Part by Name
Keep searches simple, eg. "belt" or "pump".
Diagrams for CDT845M5N2S5
Viewing 7 of 7


Keep searches simple, eg. "belt" or "pump".

$35.95
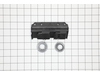
- Includes: 4 brackets, 4 roller wheel brackets, and 8 wheels part # WD12X26146
Dishwasher Lower Dishrack Carrier and Roller Kit (Set of 4). This kit will replace all four one piece roller carriers w...
In Stock
Order now and your part arrives by Aug 1

$37.49
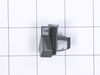
This genuine OEM bracket is used to secure the dishwasher to your cabinetry. The mounting bracket measures approximately 3 inches in length and is made of metal. If you have a solid-surface countertop...
In Stock
Order now and your part arrives by Aug 1

This OEM-compatible screw is designed for use with many GE dishwashers. Measuring 8-16 HXW and 1/2" in length, this stainless steel screw secures the middle spray arm hub to the upper rack assembly, e...
In Stock
Order now and your part arrives by Aug 1

$31.20
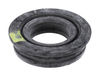
This dishwasher tub gasket is a durable replacement designed to create a watertight seal between the tub and door, preventing leaks during wash cycles and protecting surrounding cabinetry from water d...
Special Order

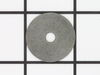
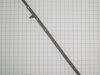
This part is a replacement middle spray arm bearing for your dishwasher. The spray arm bearing reduces friction and allows the spray arm to rotate during the operating cycle. If the spray arm is not r...
On Order

$15.35
This dishwasher latch strike is a manufacturer-approved replacement part for your appliance. The latch strike is an important component in your dishwasher door assembly, and adds an extra layer of sec...
In Stock
Order now and your part arrives by Aug 1

$37.35
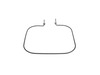
This part is the replacement tub trim for your dishwasher. It is approximately 26 inches long and 2 inches wide. The tub trim is found on the exterior of the dishwasher, and the main reason you would ...
In Stock
Order now and your part arrives by Aug 1

$52.75
This heating element helps your dishwasher clean and dry dishes by heating water and aiding in moisture evaporation. It’s made of black metal and located at the bottom of the tub. The dimensions are r...
In Stock
Order now and your part arrives by Aug 1

$16.35
PLEASE NOTE: THIS PART IS INCLUDED IN THE WASH PUMP SERVICE KIT PART # WD19X25700
In Stock
Order now and your part arrives by Aug 1

$30.95
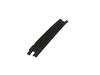
This dishwasher toe-kick plate covers the lower front section of the appliance to create a clean, finished appearance while protecting internal components from dust, debris, and accidental contact. Ma...
In Stock
Order now and your part arrives by Aug 1

In Stock
Order now and your part arrives by Aug 1

$15.26
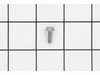
This is a genuine hex head screw replacement, designed for use with dishwashers. Most of this type of screw is used to hold the kickplate in place on the bottom of your appliance. This screw is sold i...
In Stock
Order now and your part arrives by Aug 1
Common Problems and Symptoms for CDT845M5N2S5
Viewing 9 of 9Leaking
Fixed by these parts

How to fix it
Not cleaning dishes properly
Fixed by these parts
How to fix it
Will Not Start
Fixed by these parts
How to fix it
Not drying dishes properly
Fixed by these parts
How to fix it
Will not fill with water
Fixed by these parts
How to fix it
Door latch failure
Fixed by these parts
How to fix it
Door won’t close
Fixed by these parts
How to fix it
Noisy
Fixed by these parts
How to fix it
Not draining
Fixed by these parts
How to fix it


Keep searches simple. Use keywords, e.g. "leaking", "pump", "broken" or "fit".
- Customer:
- Gary from ARLINGTON, WA
- Parts Used:
- WD21X27998
- Difficulty Level:
- Very Easy
- Total Repair Time:
- 30 - 60 mins
- Tools:
- Screw drivers, Socket set
Dishwasher would quit after about 3-4 minutes.
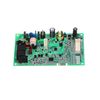
Decided it could be 1 of 3 things. Fuse on main circuit board that controls hot water. Main control board or drain pump failure. Was not able to find out how to do diagnostics on this unit as there is no "cycle control" feature and this is a top of the line unit. Replaced the fuse and dishwasher failed. Replaced the circuit board and dish
... Read more
washer failed the first time. Second time it went to completion and has worked properly since. You can go on line and find videos on removing the circuit board for GE dishwashers. This can be done without pulling the dishwasher out. Remove the lower black dust panel and insulation. Remove cover to electrical box - 1 screw and remove. Remove 2 to 4 screw on a sheet metal bracket that holds the circuit board. Notice where 2 metal hangers are located if you remove 4 screws on the left and right side of machine as they drop out. Remove black corded door sensor under circuit board. Work the sheet metal back and forth to remove from dish washer so that circuit board is exposed. Remove circuit board connectors and pull out unit to install new circuit board. Some have one screw and some have only plastic retainers. Re-install. I did not need the drain pump and the circuit board comes with a control board fuse. Washer was only 14 months old and 2 months out of warranty.
Read less
Was this instruction helpful to you?
Thank you for voting!
- Customer:
- Joseph from Waldorf, MD
- Parts Used:
- WD08X27458
- Difficulty Level:
- Easy
- Total Repair Time:
- 30 - 60 mins
- Tools:
- Nutdriver
A slow drip from the pump area.
Replaced floating seal. Un plugged and Pulled washer out from the counter and laid on its left side. Pull pump out of seal by hand. Straight screwdriver to lever seal out of fitting. Clean hole and wipe seal then push into hole. Reinsert pump reverse install.
To make it easier I previously extended the water supply hose to nearly 8 ... Read more feet so did not have to disconnect it.
To make it easier I previously extended the water supply hose to nearly 8 ... Read more feet so did not have to disconnect it.
Read less
Was this instruction helpful to you?
Thank you for voting!
- Customer:
- jeff from FORT COLLINS, CO
- Parts Used:
- WD08X22095, WD01X31858, WD01X31858, WD01X31858
- Difficulty Level:
- A Bit Difficult
- Total Repair Time:
- 1- 2 hours
- Tools:
- Pliers, Screw drivers, Wrench (Adjustable)
leaking from somewhere around tub
the actual gasket tub seal was easy, 10 minutes. The trim tub gaskets were a pain because I had to uninstall the dishwasher (not plumbing or electrical) then pull it out from the cabinet, remove old trim and re-install. Re-leveled dishwasher, screwed into side of cabinets but it still leaks. Can't figure out where but after replacing all
... Read more
the trim and gaskets its very frustrating.
Read less
Was this instruction helpful to you?
Thank you for voting!