


Models
>
ADW350RAW
ADW350RAW (PADW350RAW0) Amana Dishwasher
Jump to:
Find Part by Name
Keep searches simple, eg. "belt" or "pump".
Diagrams for ADW350RAW
Viewing 6 of 6


Keep searches simple, eg. "belt" or "pump".

$7.60
This hose clamp extends from half an inch to an inch in diameter. It is made entirely of metal and is intended for use with Maytag brand washing machines.
In Stock
Order now and your part arrives by Jul 23

In Stock
Order now and your part arrives by Jul 23

In Stock
Order now and your part arrives by Jul 23


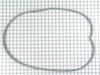
$230.48
This door latch assembly is for dishwashers.
The door latch assembly is at the top of the dishwasher door and keeps the door closed when the dishwasher is running. The assembly may include multiple...
Special Order


Special Order

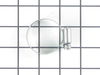
$21.82
This is a genuine OEM replacement part. This nut is used in a number of appliances. Most often it can be found in the assembly of ranges, air conditioners, cook tops, washers, microwave oven combos, r...
Special Order

NOTE: Spray arm has been updated by the manufacture and is now straight.
No Longer Available


$103.81
This part may appear different than the original, but is deemed a functional equivalent.
Special Order
Common Problems and Symptoms for ADW350RAW
Viewing 2 of 2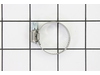


Keep searches simple. Use keywords, e.g. "leaking", "pump", "broken" or "fit".
- Customer:
- Ester from LA QUINTA, CA
- Parts Used:
- WPR9900669
- Difficulty Level:
- Really Easy
- Total Repair Time:
- Less than 15 mins
- Tools:
- Pliers, Screw drivers
Door Springs worn
First: I unplugged the dishwasher.
Second: I removed the two screws that hold the dishwasher in place under the counter.
Third: I pulled the dishwasher out in order to see the sides of the doors where the springs hold the door attached to the dishwasher.
Fourth: I removed the worn springs with needle nose ... Read more pliers.
Fifth: I attached the new springs where the old springs were attached.
Sixth I tested to see how the door functioned with the new springs.
Seventh: I repositioned the dishwasher under the counter and secured it with the screws that I removed in step 2
Read less
Was this instruction helpful to you?
Thank you for voting!
- Customer:
- Nydia from Howell, NJ
- Parts Used:
- WPR9900669
- Difficulty Level:
- Really Easy
- Total Repair Time:
- Less than 15 mins
- Tools:
- Screw drivers
Springs that held up door were broken
I unscrewed the dishwasher brackets (2 of them) from under the counter, slid out the dishwasher. The springs (or broken springs) were visible. I removed them, popped the new ones in and viola!!! The door sprung up like it was new. Of course I slid the dishwasher back under the counter and put the screws back in. This took 15 minutes.
... Read more
I couldn't believe how easy it was. A repair man wanted to charge us $75 just for a service call (plus parts). I repaired for less than $25!!!!
Read less
Was this instruction helpful to you?
Thank you for voting!
- Customer:
- Wayne from Glenshaw, PA
- Parts Used:
- WPW10247175
- Difficulty Level:
- Easy
- Total Repair Time:
- 15 - 30 mins
- Tools:
- Nutdriver, Screw drivers
BROKEN handle
Removed 6 inside upper door screws which allowed the front control panel drop out. then 2 star screws to remove handle assembly. reversed all to install new handle
Was this instruction helpful to you?
Thank you for voting!